Tuesday, June 30, 2015

Red, White & Blue Week--You're Invited

It's Party Time!!  Here is an invitation for that big block party you are planning for the 4th of July.  Or the kids Captain America birthday party.  Or the retirement celebration for a dear friend.


I love the Red and Silver Glimmer Paper on this one.  I cut two 1-1/2" x 4" rectangles from each paper.  Then cut each on diagonally in half.  I covered a piece of scrap cardstock in glue stick and put the glimmer triangles on with all the points meeting in the middle of one side.  I then trimmed the extra glimmer paper off the edges.  It is put on a Whisper White piece of cardstock and onto a Pacific Point card base.  The Stitched Satin Ribbon is wonderful.  There is a texture on one side from the stitching and the other side shines with the subtle lines.  The sentiment tag was made with the Decorative Label Punch.

I am hoping my son picks Captain America for his birthday party theme this year, so I have a reason to make more of these.

PRODUCTS USED:
Built for Free Using: My Stampin Blog


My Demonstrator Website

Monday, June 29, 2015

Red, White and Blue Week

4th of July is this coming weekend, so I thought it would be a great time for a week brought to you "Courtesy of the Red, White & Blue."  I love that song.  Toby Keith rocks!   Those who follow my blog or come to my classes know my husband is a proud Army soldier.  I am a proud Army wife who does what I can to support our unit and the families.  There are lots of military spouses who do the same.  While we never do it for the recognition it is nice when the thank you's come.  Be it a verbal thank you in front of the group, a certificate for outstanding dedication or a handmade card.  I like to keep a few cards on hand to give to someone who might help at the car wash fundraiser or clean-up from the summer picnic after everyone else has gone home.


Stampin' Up! has several stamp sets that can be used to simulate stripes on a flag.  This stamp is new to the 2015-16 catalog.  It is called Brushstokes (#138952) and is actually a full size background stamp.  I used my Real Red and Pacific Point Markers to color in 7 stripes on the stamp in the 3x4" size I wanted.  I then cleaned my stamp and inked only the blue stripe area again.  I carefully laid my cardstock back on the stamp to fill in the white spaces in the blue field.  I cut the flag out with my paper snips following the curvy lines the brushstroke stamp made.  The 3 stars are punched out with the star from the Itty Bitty Accents Punch Pack (#133787).  The saying was inked with my marker and is from the One Big Meaning Stamp Set (#138788).  The background was done with the Gorgeous Grunge Stamp Set (#130517).  You can ink it with you marker a few times or use your Pacific Point ink pad.

Cards do not have to be lots of layers and use lot of accessories to make someone know you appreciate what they have done for you.  Just give them a simple card and a "Thank You" from the heart.

PRODUCTS USED:
Built for Free Using: My Stampin Blog


My Demonstrator Website

Friday, June 26, 2015

Layered Letters--Last Day

I hope you have enjoyed this week with the stamp set Layered Letters.  It truly is a wonderful alphabet set.  I have one last project to show you.  The inspiration for this came from the Baby card I showed you yesterday.  I like to keep various cards on hand for a last minute need.  Baby cards are tough though.  I never know which gender I might need, so I end up making them neutral colors.  It has also been 6 years since I was on the receiving side of the baby card.  Things have sure changed in that short time and now, gender reveal announcements are all over the place.  I live far from my family, how cool would it have been to announce the gender with a card.


The Layered Letters Stamp Set has several additional symbols.  I used the # sign the other day.  How perfect is the ? sign for this project!  I used my Stampin' Write marker to draw in the apostrophe.  Then of course we have the REVEAL!  (And so my blog reading family and friends know--I am NOT having another baby!)


How much do you love that cute print used inside the explosion box?  It is from the Go Wild Designer Series Paper Stack.  And the ribbon?  I loved the Stitched Satin Ribbon in the last catalog.  I was so glad to see them get 5 fresh colors for it this catalog.  

PRODUCTS USED:
 
Built for Free Using: My Stampin Blog

My Demonstrator Website

Thursday, June 25, 2015

Layered Letters --Day 4

The great part about alphabet stamp sets is that you can spell anything you want.  LOVE, HELLO, or THANKS are popular.  Another favorite is BABY!


I mentioned yesterday that the Layered Letters Stamp Set comes with two different shapes to layer the letters onto.  This is the circle image.  I stamped it full strength in So Saffron today.  I stamped the letters in Calypso Coral and Pear Pizzazz.  Did you check out the Weekly Deals yesterday?  I used another one today.  The Large Polka Dot Embossing Folder is on sale this week.  (hard to see in photo--it is embossed on the Whisper White background)

The "Welcome" is from a stamp in the And Many More Stamp Set.  I inked only the word I needed and stamped it on my So Saffron cardstock before punching it out with the Word Window Punch.  I advise getting any stamp set with small words in wood.  It makes it much easier to handle the words, clean them, keep them from getting lost, and stamping them straight without ink marks from rocking a block.

PRODUCTS USED:
Built for Free Using: My Stampin Blog


My Demonstrator Website

Wednesday, June 24, 2015

Layered Letters--Day 3

The stamp set is called Layered Letters, but I haven't showed you the layered part yet this week.  Today I have LAYERED letters meets Weekly Deals.  This stamp set is perfect for making monogrammed projects for your friends.  It can be easily adapted to place cards or name tags also.


There are two shapes in the stamp set that you can "layer" the letters on top of.  There is the rectangle shown on this project and a circle shape.  To give it the layered look I stamped off the rectangle on my Grid Paper (#130148) and stamped the letter full strength with Melon Mambo Ink.
I used a few of the products from the Weekly Deals this week.  The Mini Treat Bag Thinlets (#137547) are on sale and make this cute little bag.  There are also thinlets in the set to punch 3 different trims, I used the hearts trim on the tag.  There are several other thinlets in the set to add to your projects.  The Silver Glimmer Paper (#135314) used for the tag is also on sale this week.

TIP:  The tag is tied at the top with the Jute Ribbon.  I cut a 6" length of Jute and trimmed off about 6 of the strands in one strip.  After looping it to the tag I pulled apart the rest of the Jute strands.

PRODUCTS USED:
Built for Free Using: My Stampin Blog


WEEKLY DEALS:  Update automatically to show the current deals.
Built for Free Using: My Stampin Blog


My Demonstrator Website

Tuesday, June 23, 2015

Layered Letters--Day 2

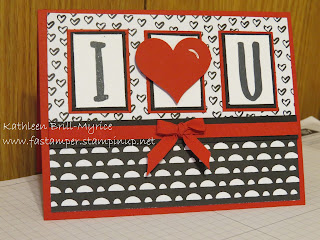
One of my favorite color combinations for everything is Black & White with that splash of Red.  I love how all three colors stand out to one another.  It is crisp, clean and makes me smile.  It is also timeless and never goes out of style.  So when I saw the Everyday Chic Designer Series Paper (#138445) in the new catalog I just had to have it.


Designer Series Paper from Stampin' Up! comes with 12 sheets: 2 each of 6 double sided designs.  Each sheet is 12"x 12" so there are many uses.  I cut one of the papers into a 4" wide strip.  I cut a 5-1/4" piece from the strip for my card front.  I cut my 4"x 5-1/4" piece at the 1-1/4" line and turned the bottom part over.  The letter pieces are 1-1/2" x 1" and layered on my favorite color combination.  I wrapped the Real Red Cotton Ribbon (#134563) to the back of the Basic Black strip and tied a Fork Tie Bow to attach to the front.  The Sweetheart Punch (#133786) is put on a couple dimensionals to make it pop forward.

PRODUCTS USED:
  
Built for Free Using: My Stampin Blog


My Demonstrator Website

Monday, June 22, 2015

Layered Letters Week--Day 1

I shared the Layered Letters Stamp Set with you during the sneak peek weeks.  If you missed my first post with this stamp set you can see it HERE.  I enjoyed that project so much, I thought I would share a weeks worth of projects using the stamp set.  With yesterday being Father's Day, what better way is there to start the week than with a card for DAD.


This card came together in less than 15 minutes.  It is also perfect for having a little craft time with the kids.  The # symbol on the second layer comes in the stamp set.  What a great way to make your own background.  I embossed the top layer and added a simple ribbon tie.  No bows on the DAD card.  The fun part about this card is the way it opens. 

The two panels fold open to reveal a place for your message.  The card base is only 5-1/2" x 4-1/4".  The middle layer is 8-1/2" x 3-1/2" (scored at 4-1/4").  The top layer is 8-1/2" x 2-3/4" (scored at 4-1/4").  The Whisper White insert is 3-1/4" x 2-1/2".

PRODUCTS USED:
Built for Free Using: My Stampin Blog


My Demonstrator Website

Friday, June 19, 2015

End of Birthday Blossoms Week

This is the last day of my Birthday Blossoms Stamp Set week.  I hope you have enjoyed the card set I made with this stamp set.  To finish off the week, I have a box to hold the 4 cards.
The box is 4-3/4" x 6-1/4" x 1/2".  I used another sheet from the Pretty Petals Designer Series Paper Stack to decorate the front.  I cut the 6"x6" sheet at 4-1/2".  I then turned over the strip to use the other side.  

The Venetian Lace Trim is thread through the sides and around the back of the box.  I cut small slits on the edges of the box to thread the trim through.  This helps keep the trim from falling out of place when the box is untied.

Enjoy your weekend and I will see you on Monday with another stamp set.

PRODUCTS USED:
Built for Free Using: My Stampin Blog


My Demonstrator Website
Thursday, June 18, 2015

Birthday Blossoms--Day 4

Today, I have my final card with the Birthday Blossoms Stamp Set.  I do think it is my favorite card this week.

Again, I kept with the color pallet from the Pretty Petals Designer Series Paper Stack (#138442), but I didn't use any of the prints.  The large flower in the stamp set fits the Pansy Punch (#130698).  I punched out the flower and then trimmed it closer with my Paper Snips (#103579).  I layered the trimmed flower on one punched out of Basic Black cardstock.  To dress up the background I stamped the lower half tone-on-tone with the Brushstrokes Stamp Set (#138952) and Mint Macaron ink.  The top is embossed with the Decorative Dots Embossing Folder (#133520).

Tomorrow I finish up my week with the Birthday Blossoms Stamp Set.

PRODUCTS USED:
Built for Free Using: My Stampin Blog


My Demonstrator Website

Wednesday, June 17, 2015

Birthday Blossoms--Day 3

We continue our week with the Birthday Blossoms Stamp Set and Pretty Petals Designer Series Paper Stack.

I like the way the image of small flowers can be a semi-focal image.  It can easily be used as a background image or in the main area.  I really like to stamp them in a solid color.  They are stamped in Calypso Coral here to match the DSP color scheme.  The DSP print used here is the back side of the Print I used yesterday.  With 24 different prints in the paper stack, there is something for everyone.  


And how about those new accessories?  The Blossom Accent (#138383) comes with 4 of each of the 2015-2017 In Colors.  The Gold Metallic Thread (#138401) comes in a 50 yard spool for only $3.00.  That is a bargain if I ever saw one.  I used about 12" here.  I wound it around two of my fingers and glued it to the circle with a little dab of Multipurpose Liquid Glue (#110755).  

PRODUCTS USED:
Built for Free Using: My Stampin Blog


My Demonstrator Website

Tuesday, June 16, 2015

Birthday Blossoms-Day 2

This stamp set has some easy to use flowers stamps.  Yesterday, I used the large flower and the leaf stamp.  Today, I have the image with lots of smaller flowers.  
I used another sheet from the Pretty Petals Designer Series Paper Stack.  I didn't want to use as many of the colors, so I focused on three.  The card base, flowers, and sentiment are in Pacific Point.  The DSP sheet is in Old Olive.  The bow and mats are done in Calypso Coral.  I carried the color trio into the Candy Dots also.  Since the card base is a darker color I have a Very Vanilla insert in the card.  It is stamped with the same flower image and has an additional "happy birthday" sentiment from the stamp set.

PRODUCTS USED:
Built for Free Using: My Stampin Blog


My Demonstrator Website

Monday, June 15, 2015

Birthday Blossoms Week

This week I am going to focus on the stamp set Birthday Blossoms.  It is new to this catalog and can be found on page 8 of the Stampin' Up! 2015-2016 Catalog.  It is available in wood mount (#139167) or clear mount (#139471).


The color scheme for this week comes from the Pretty Petals Designer Series Paper Stack (#138442).  The paper stack has 48 sheets: 4 each of 12 double sides designs, 6" x 6".  I chose the design with the tiny butterflies and then flipped it over for the pattern behind the oval.  The "HAVE A BEAUTIFUL" banner is colored in with a Mint Macaron Marker.  The large flower in the stamp set fits the Pansy Punch (#130698).  I was so glad to see that the Venetian Crochet Trim (#134581) carried over to the new catalog and equally glad to see five new colors of Thick Baker's Twine, including the Calypso Coral Twine (#138412) used here.

Be sure to check back tomorrow for another card showcasing this great new stamp set.

PRODUCTS USED:
Built for Free Using: My Stampin Blog


My Demonstrator Website

Friday, June 12, 2015

Final day for Butterfly Basics

I have enjoyed sharing this stamp set with you this week.  I have one more card to show you.  This one has a more traditional look to it.


I kept with the same color scheme as the others, but didn't stamp in the vintage collage style.  I really like this flower image.  It is delicate and has a soft feel to it.  I stamped the image in Soft Suede ink and then colored it in with my Pear Pizzazz and Blushing Bride Markers.  The leaves make an appearance in the background again.  I stamped off before stamping onto the cardstock for all of them this time.  The Blushing Bride layer behind the sentiment is a straight cut piece of cardstock.  I then used my bone folder to bend the fibers in the cardstock and pull the two layers apart.  I used the edge of my scissors to rough the edge of the cardstock.  It is attached with the inside fiber side of the cardstock showing.

I hope you have enjoyed my Butterfly Basics cards this week.  Have a happy weekend and I will be back on Monday.

PRODUCTS USED:
Built for Free Using: My Stampin Blog


My Demonstrator Website

Thursday, June 11, 2015

Butterfly Basics cont.

Sorry for the late posting today.  We had internet problems.  1.5 hours on hold and it is back up and running.  On with the card sharing.....

Today I have another vintage style card with the Butterfly Basics Stamp Set (#137154).  I used the same general color scheme as yesterday.  The mess was stamped in So Saffron.  I wanted to help the tag stand out a little and not blend into the card front area.  The smaller butterflies are done in Blushing Bride to match the card base.  The leaves are a bit harder to see in this photo.  They are under the butterflies and were stamped multiple times in Pear Pizzazz without reinking.  The lines on the left are Wild Wasabi and the sentiment and postmarked symbol are done with Soft Suede.

THE BUTTERFLY:  I cut it out of Vellum using the coordinating Butterfly Thinlet (#137360), then I stamped it with the mesh image in So Saffron and Blushing Bride.

RIBBON TIP:  I like to adhere my ribbon with snail adhesive to the back of the cardstock.  I put snail on the cardstock and press the ribbon/trim down.  I cut my ribbon 2" longer than the card length.  Then I cut another 2-3" piece to tie onto the first giving an impression of a tied ribbon.  I find it saves ribbon and makes it easier to get the ribbon tight and straight.  I can also more easily place the knot where would like.

PRODUCTS USED:
Built for Free Using: My Stampin Blog


My Demonstrator Website

Wednesday, June 10, 2015

Trying a new style with Butterfly Basics

Yesterday, I focused on the thinlet.  Today, I focus on the stamp set.  I am normally not a vintage style stamper.  I actually am intimidated that it will look too jumbled or just weird.  Something about the Butterfly Basics Stamp Set (Wood #138813, Clear #138816, Photopolymer #137154) told me to just try it for once.  So glad I did!


This stamp set makes it so easy.  First, I went to my cardstock cabinet and picked out a few colors that I thought would go with the images.  I wanted to pick soft colors that felt like spring.  I stamped the mesh image across the bottom in So Saffron.  Then I stamped the leaves twice in Pear Pizzazz, without reinking in between.  I also stamped the leaves in Wild Wasabi.  The butterfly is stamped in Blushing Bride and cut with the coordinating Butterfly Thinlets (#137360).  For the sentiment I used Soft Suede.  The Subtle Button (#130030 and Gold Metallic Bakers Twine (#132975) finish off the card.  If you like this style, be sure to check back tomorrow for another card using this stamp set.

PRODUCTS USED:
Built for Free Using: My Stampin Blog


My Demonstrator Website

Tuesday, June 9, 2015

Thinlets Overlay card

I have gotten several new stamp sets in the last month or so (shhhhh, don't tell my hubby).  I am a sucker for stamp sets with a coordinating thinlit die.  Sometimes I use the stamp set first, but this time it was all about the thinlets.

The Butterfly Basics Stamp Set (#137154) from the Occasions Catalog carried over into the 2015-2016 Stampin' Up! Catalog.  If you purchase it with the coordinating thinlets (#137360) you save 15% with the bundle (#138865).  This card is easy to duplicate and I have seen many a version on Pinterest.  Cut your Designer Series Paper at 4" x 5-1/4".  I used Bohemian DSP (#138446).  Then cut your top layer at 3-3/4" x 5".  Using your Big Shot(#113439) and Magnetic Platform (#130658) to keep the framelit from shifting, place the framelit on your cardstock and cut.  When you assemble the card, simply use a few Mini Glue Dots(#130683) to attach the die cut shape in the center.  When I cut my shape I felt it was too low, so I balanced it by stamping an image from the set across the top.  I sentiment at the bottom and a coordinating piece of ribbon and I was done.

PRODUCTS USED:
Built for Free Using: My Stampin Blog


PAPER PUMPKIN REMINDER:  June 10th is the last day for new subscribers to get 50% off the first two months of a subscription.  Use Promo Code SAVE50 when subscribing at PAPER PUMPKIN.


My Demonstrator Website

Monday, June 8, 2015

Sweet and Simple Thank You

A good friend of mine had her home all but destroyed by the flood waters that came through Oklahoma.  Thankfully, she had a lot of people in the community step forward and help with the aftermath.  We cleaned, hauled trash, piled up downed tree limbs and boxed up her family things for storage while they rebuild their life.  Over the course of the week, the family had over 40 people help with their home.  She loves to give cards to people, but lost most all of her stamping supplies in the flood.  I gave her my entire stash of Thank You cards to hand out to people who helped.  I was glad to give them to her, but it left me without any for my own use.  Time to start a new collection.


This Thank You card is quick, easy and can be done to suit any personality.  I chose more masculine colors this time.  The Bohemian Borders Stamp Set (#138938) has 9 versatile images.  There are 6 long border designs that stretch the shorter length of a card.  Because the stamps are photopolymer, they can easily be lined up to stamp the long side of a card.  The sentiment is from my go to thank you set, Another Thank You (#136835).

PAPER PUMPKIN REMINDER:  June 10th is the last day for new subscribers to get 50% off the first two months of a subscription.  Use Promo Code SAVE50 when subscribing at PAPER PUMPKIN.

PRODUCTS USED:
Built for Free Using: My Stampin Blog


My Demonstrator Website

June Card Shoppe

Join me on Friday, June 12th from 1-3 or 6-8 and go home with a stack of cards for only $15 or FREE with a qualifying order.  

Participants will make 8 cards (2 each of 4 designs-portion of card image shown below, alternate sentiments will be available at Card Shoppe to suit card giving needs)

RSVP is required by Thursday, June 11th @ 5:00.  You can RSVP for this class on  My Demonstrator Website Calendar OR by emailing me directly.

You can view my class flyer HERE.


Can't make it to class?  Order my Class To Go for $25 (including shipping).  Receive all the consumable supplies to stamp the cards in the comforts of your own home.  Full card photos, step by step instructions and a full list of supplies are included so you can finish the cards like the sample photo.  To Go Class must be ordered by June 11th @ 5:00 (central time).  To order class please email me a class request and I will send you a paypal invoice.


Friday, June 5, 2015

Sprinkles of Life --6x3

I have one more Sprinkles of Life card to share with you this week.  I wanted to make a nice tall ice cream cone and figured what better way than to make a tall card.


The inspiration for this one also came from the sentiment.  The card base itself is 6x6 scored in half at 3".  I used Chocolate Chip, Whisper White (stamped with Smoky Slate), Watermelon Wonder, and Cucumber Crush (with Chocolate Chip sprinkles).  The cone is tone on tone Delightful Dijon.  I cut the cone out with scissors and the ice cream with the Tree Builder punch.  Two pieces of the Lace Trim are put together for the lower band.  You can easily step up this card further with a cherry on top (Tree Builder Punch) and a small button with twine next to sentiment.

Tomorrow is my Catalog Kick-off Party.  If you are in Lawton, OK look on my demonstrator website event page for more information.

My Demonstrator Website

PRODUCTS USED:
Built for Free Using: My Stampin Blog

Thursday, June 4, 2015

Sprinkles of Life --cont.

This stamp set is popular.  Stampin' Up! truly put a lot of thought into the design on this one.  The fact that $3 is donated to Ronald McDonald House Charities every time someone purchases the stamp set, really puts the cherry on top.

I love that the images have so many obvious multiple uses.  Yesterday I used the image as the top of a cupcake, today it is easily used as the clouds.  I wanted my clouds to be less stated, so I stamped the Smokey Slate ink off on my works space before stamping on the card.  They are really light in the photo, but show perfectly in person.  We have had a lot of rain here and I didn't want my clouds to look like they may bring forth a storm randomly.

The tree trunk was stamped in Chocolate Chip on the Whisper White cardstock.  The top of the tree is Cucumber Crush stamped tone on tone and then punched out with the Tree Builder punch.  The punch does punch out the tree truck, but I chose not to do that this time.  The little flowers stamp with the leaves and grass in a bunch of three.  Then the flower itself is stamped one at a time, so you can change up the color or placement easily.  The set contains a bird and an apple that can also be punched out with the tree builder punch.  As I sad yesterday, there are so many sentiments in this set of 22 photopolymer stamps.  I have plans for this card.

PRODUCTS USED:
Built for Free Using: My Stampin Blog


WEEKLY SPECIALS:
Built for Free Using: My Stampin Blog


My Demonstrator Website

Wednesday, June 3, 2015

Ronald McDonald House Charities


Every year Stampin' Up! creates a new stamp set to support the Ronald McDonald House Charities.  Each time someone purchases the stamp set Stampin' Up! donates $3 to RMHC.  I can promise you it is going to be a great year for RMHC this year.  This  photopolymer stamp set has 22 stamps and is so wonderfully called Sprinkles of Life (#139971).  Just take a look at this stamp set and some of the projects the creative minds at Stampin' Up! has done with it.


The variety of uses for this stamp set is amazing.  There is even a coordinating punch available called Tree Builder (#138295).  I found it super easy to sit down and start creating with this set.  Just a quick read of the sentiments and I was ready to stamp an idea.  

I started with the sentiment.  This one led to a simple cupcake.  This card is 4-1/4" x 4-1/4".  The image panel is 4 x 4.  I stamped the images in Momento Ink (#132708) so that I could color it in with Stampin' Write Markers and not bleed the image lines.  I added the candle because it just makes me smile.  Why are candles reserved for birthdays?  Put a candle on your next cupcake and make a small wish or prayer for someone.  Can you believe it, the DSP strip on the left is from the Cherry on Top Paper Stack (#138443)?  You didn't think I missed an opportunity to use it did you?  The end of the tag was punched with the Scallop Tag Topper (#133324) and a couple pieces of ribbon tied on.  

PRODUCTS USED:
Built for Free Using: My Stampin Blog


My Demonstrator Website

Tuesday, June 2, 2015

New Catalog Ordering Available Today

It is here!  One of the most loved days of the year.  It is the beginning of a New Catalog for Stampin' Up!  If you do not have a copy of the New 2015-2016 SU! Catalog and would like one please EMAIL me your address and I will gladly send you a copy.  You can also DOWNLOAD the catalog HERE.  It is filled with lots of wonderful new things.  If you are in the Lawton area, please come to my Catalog Kick-Off Party on Saturday, June 6th.

You can place an order from the catalog online 24/7 at My Demonstrator Website.


Would you like to receive 2 FREE Stamp Sets of your choice from the catalog?

Join my team as a Stampin' Up! Demonstrator for ONLY $99 between now and June 30th and you will get just that.

Here are a few of the things you will receive as a new demonstrator.
$125 worth of current product (of your choice) from the catalog
A Business pack of materials including a box of New Catalogs to share with your friends
Free shipping on your starter kit
30% off your first order over $150 (within 45 days)
2 Free Stamp Sets of your choice (sign up before June 31)
Team website full of tips and ideas.
Monthly gatherings with me to talk about project ideas, your business, and of course STAMPING!

For more information or to Join My Team now, click on the tab at the top of the page.


Monday, June 1, 2015

Bohemian Tribal Pattern

We are one day away from the New Stampin' Up! Catalog going LIVE!  Have you decided what you want first.  As a demonstrator, I love being able to order a few things early.  Let me know if you would like more information about becoming a SU! Demonstrator, so the you can take advantage of pre-ordering from the Holiday Catalog.  You can also click the Join My Team tab at the top of this page.

Today I have another card using the Bohemian Borders Stamp Set (#138938).  You can use all the little pieces separately or layer them on top of one another as I did here.  This color combination and pattern reminds me of early Aztec tribal fabric.  I picture it on woven tapestries handing in the village.  I stamped the different images in Rich Razzleberry, Bermuda Bay and Delightful Dijon onto Very Vanilla Cardstock.  The Delightful Dijon boarder on the left is stamped onto Delightful Dijon cardstock for a simple tone on tone look.  The strip on the right is Rich Razzleberry 1/4" Cotton Ribbon (#134564).  It adds just the right amount of texture to an otherwise masculine card.

TIP FOR THE TAG:  Don't recognize the punch background for the tag?  I made it using the Decorative Label Punch (#120907)  I punched out a piece of Bermuda Bay scrap and then using a post it note to help hold the piece I put it back in the punch.  When you punch it twice it gives the perfect little end tabs to attach to your card with some Silver Mini Brads (#122941) leaving the perfect space for the Word Window Punch (#119857) sentiment.  The sentiment is from the And Many More Stamp Set (Wood #134273, Clear #134276).  I do recommend getting this stamp set in wood.  It helps with the mounting and cleaning of small sentiments.  It also helps to keep them from getting lost.

PRODUCTS USED:
Built for Free Using: My Stampin Blog


My Demonstrator Website