Showing posts with label Blog Hop. Show all posts

Friday, August 28, 2015

Stampin' Addicts 2015 Holiday Catalog Fall Blog Hop

Hello hoppers!  Most of you just came from Tanya's Blog.  Wasn't that a cute stamp set?  So much fun and so many uses.  If you came here directly, don't worry, just follow the links on the hop and it will loop you all the way around back to here.  We love to hear from you about our hops and projects.  You can leave a comment on any of the stops or leave a comment on the discussion thread at Stampin' Addicts.

I am featuring the Sweet Hauntings Stamp Set (#139705) from page 47 of the 2015 Holiday Catalog.  I have had so much fun showing this stamp set on my blog last week and have 3 more projects just for this hop.  There are so many uses for this stamp set.  There are 3 images that fit the Note Tag Punch (#135860), 4 different potion bottles, and 2 sayings that tie everything together.  My family LOVES Halloween.  We enjoy having our friends (of ALL ages) over for a night of spooky food and fun.


First I have a great party invitation for you.  I stamped all of the potion bottles on the front of my card, then colored them in with various Stampin' Write Markers.  TIP:  I used my grid paper to line up all the stamps, then put them on one block so they will be straight when I stamp them.  Under the bottles is a piece of the bat print washi tape from the Happy Haunting Designer Washi Tape (#139608).  I stamped one of the sayings from the stamp set in Cucumber Crush on the bottom.  A few quick tid bits to decorate the upper corner, my party information on the inside and I am ready to invite my guests.

I love to have cute little treats for my kids to take to school.  This is the medium size treat bag from the Gift Bag Punch Board (#135862).  NOTE: The size of the bag refers to the size of the bottom of the bag.  You can make the bag as tall or as short as you like to fit your treats.  Again I stamped several of the bottles at once on the bag, then put another print from the Washi Tape around the bag.  I made a simple topper for the bag.  I folded a piece of Tangerine Tango cardstock in half and attached a Spider Web Doily (#139622) with a glue stick.  I wrapped the extra edges of the doily around the cardstock.  This is the other sentiment from the stamp set, stamped in Rich Razzleberry to match the bag.  The back of the topper is attached to the bag and I used a small bit of velcro to hold the front closed.  


For my party guests I have a treat basket.  I used my markers to color certain parts of the Note Tag shaped stamps.  They make cute tombstone images.  The center one was stamped again on cardstock and cut out to raise it up on dimensionals.  The basket was made with the Berry Basket Die (#137366) from the Annual Catalog.  I tied a piece of Rich Razzleberry Cotton Ribbon (#134564) around the top of the basket.  You can see a piece of Rich Razzleberry cardstock peaking through the slits near the bottom.  I took a 5-1/2" square piece of cardstock, scored it on all four sides at 1-1/4", folded on the score lines, made a few quick slits to shape it into an open box.  I punched a circle in the center of the insert to hold a cupcake.  
I know a picture would be great, but there was an "accident" with the cupcake.  You could of course fill the basket with a bag filled with candy or other treats.  

I hope you enjoyed my projects with the Sweet Haunting Stamp Set.  If you did, please leave me a message below before going to the next stop on the hop.  The next stop is Carmen with some Hall-O-Ween Treats.



My Demonstrator Website

Friday, July 10, 2015

It's Blog Hop Time with the Stampin' Addicts!!

I hope everyone has been enjoying the new Stampin' Up! 2015-2016 Catalog.  The Stampin' Addicts have put together a blog hop to showcase some of the newest stamp sets available.  You may have come from Rhonda's Blog, The Stampin' Bunny, or you may have started here.  Either way don't worry, the hop will loop you back to the beginning.  Just follow the links below and you will see everyone's projects.  If you would like to see all the links or chat about the hop, you can go to the discussion thread on Stampin' Addicts HERE.  Now on to my projects.......

I am featuring the From Land to Sea stamp set on page 83 in the catalog.  I immediately fell in love with the turtle.  It reminds me of the Hawaiian Honu.  The Honu is the Hawaiian symbol for luck, endurance, and a long life.  After stamping the image in Momento Black ink, I colored mine with Mossy Meadow, Old Olive and Crumb Cake markers.  I chose the Decorative Dots embossing folder to resemble the spots on the turtles body.

Next, I have the swordfish stamp.  It just called out "I caught a fish THIS BIG!".  I can picture it mounted on a fisherman's wall.  It makes a perfect masculine image.  I layered my image several times to give it the feeling of being mounted on the wall.  He is colored with a Smokey Slate marker.  The Silver 1/8" Ribbon gives the card that little prize winning touch without taking away the masculine feel of the card.

The Boat Wheel image has always been a fun nautical image.  I love the idea of being out on the open sea steering a boat, just being calm with my thoughts.  I have had the Typeset Specialty Designer Paper in my stash for awhile now and it just called out to me for this project.  The Mini Treat Bags are so easy to make with the thinlets die.  I wrapped my bag with a piece of Very Vanilla cardstock before adding my tag.  The stamp set has a jellyfish image.  Do you see it?  I turned it over and used the tentacles to make the seaweed at the bottom of the tag and insert.

Lastly, I have the lighthouse stamp.  Lighthouses shine their beacons to help ships find their way home.  When I see one it makes me think of a loved one on the shore waiting for their sailor to come home.  I used sponges and several shades of blue and green to create the see and land.   The sky is done with Soft Sky pounced to give a cloudy look.  The sand is Hello Honey.  Of course the beacon is shining to help guide our loved ones home and the sentiment sends my feelings to the person who is far from me.  I wish this picture was hanging on my wall, so I framed out the area with the Hardwood background stamp.  I cut out the center of the frame so it sits on top of the image area.

I hope you have enjoyed my projects with the From Land to Sea stamp set.  I love to receive comments, so please leave one below.  The next stop on the hop is sure to brighten your day.  Yapha is featuring the You're Sublime stamp set.


PRODUCTS USED:
Built for Free Using: My Stampin Blog


My Demonstrator Website

Friday, August 9, 2013

Stampin' Addicts Fall Blog Hop

Welcome to stop #7 on this hop.  If you have been following the Hop you just came from Rhonda's Blog.  Isn't she great!  She is a great stamper and I am so blessed to call her my friend too.  If you started here, you can stay here and follow the Hop until it loops its way back around.  If you want to start at the beginning please go to Heidi's Blog.

If you have never seen a Blog Hop before you are in for a treat.  11 Demonstrators from Stampin' Addicts have brought you projects featuring the Fall Products from the 2013 Stampin' Up! Holiday Catalog.  I have 4 projects featuring the Halloween Bash Stamp Set, so lets get started.

What is the first thing we do when having a BASH?  We send out invitations.  I colored the image with my Stampin' Write Markers in Basic Gray, Basic Black and Pumpkin Pie.  The torn edges were colored with the NEW Smokey Slate Marker.  It is hard to see in the photo, but the black background area has a fuzzy texture to it.  Come back next week for tips on how to do that.  The little creepy crawly fellow is from my Halloween decorations.  A cheap embellishment this time of year.  And how about that envelope?  The NEW Envelope Liners Framelit Dies can make any envelope just jump out at you.

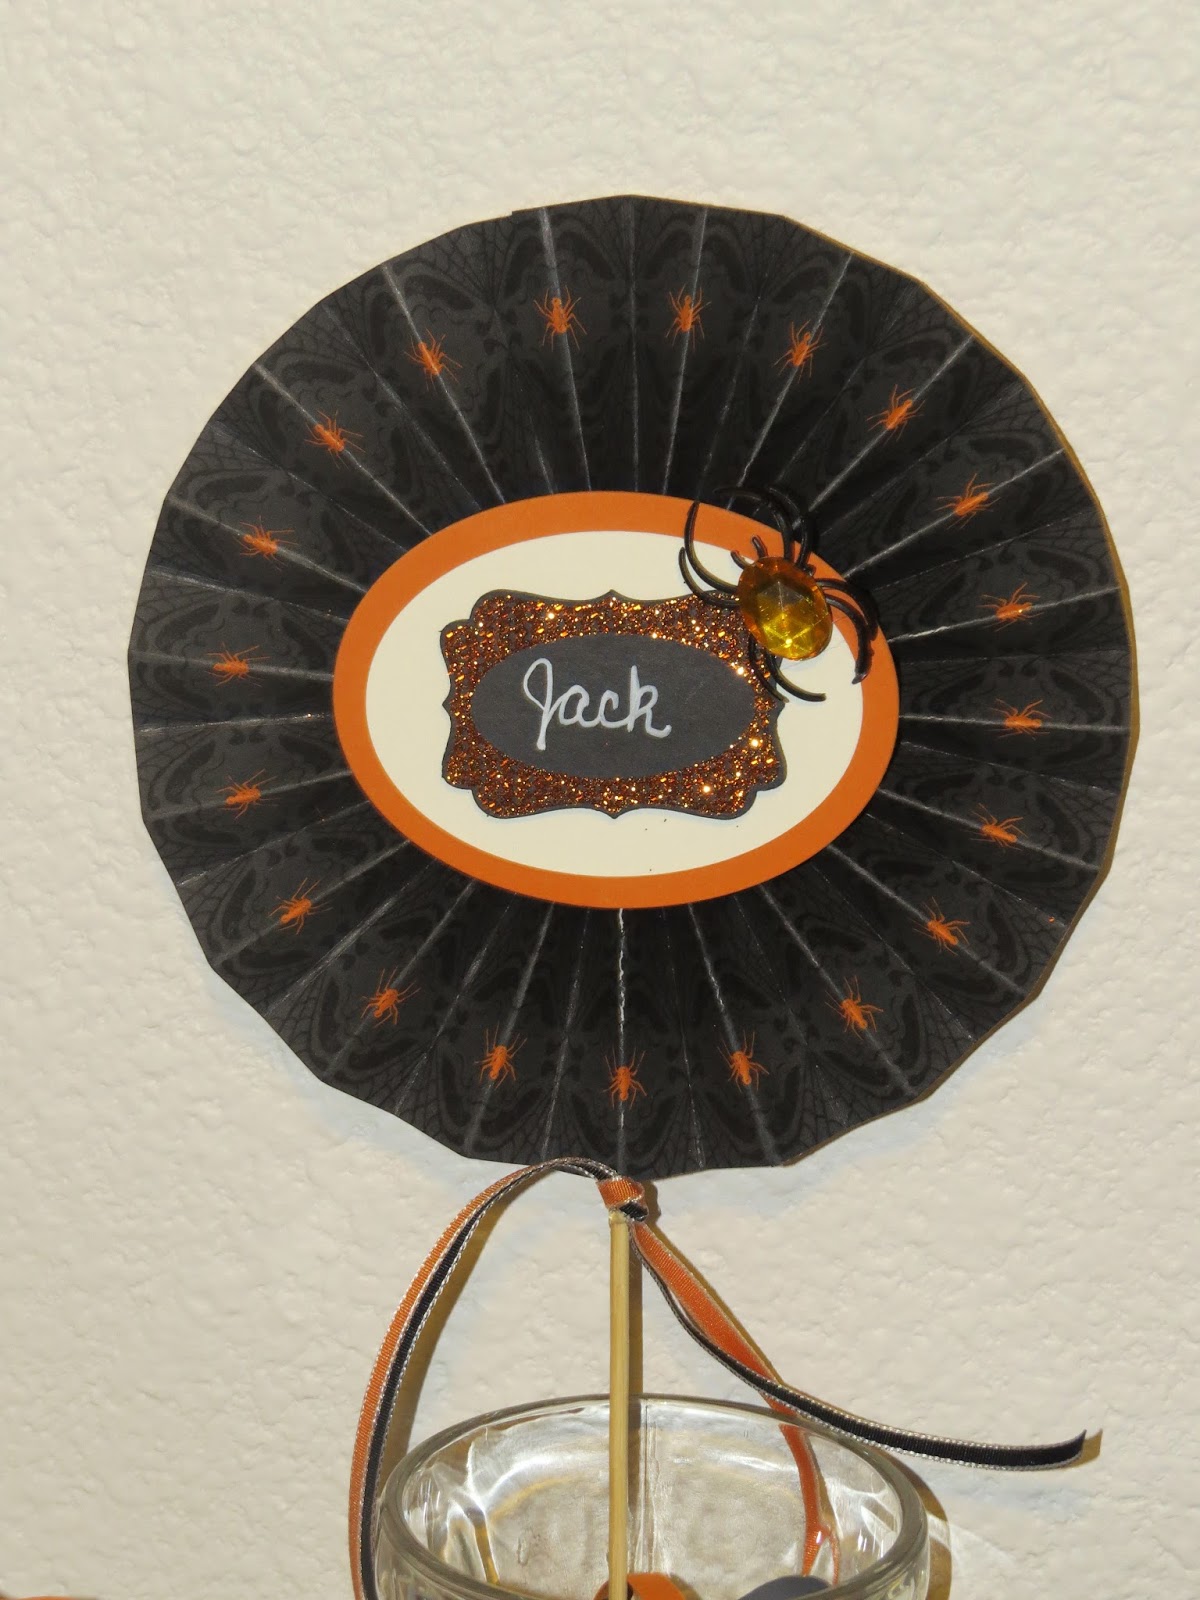
We want everyone to find their place at the party.  Here is a fun decor project.  I made the rosette using the Witches' Brew Designer Series Paper.  I lined up the paper in my Paper Cutter, so they spiders on the print were near the outer edge.  I then used my scoring tool to score the fold lines.  There is no perfect measurement to score this at.  I moved the DSP around so the groove of the tool was in the center of the spider or his web area.  I stamped the label in versamark ink, then used heat and stick powder to adhere the orange glitter.  The name is hand written with the NEW Chalk Marker.

Once everyone has found their seat you want to have a little treat for them.  The treat topper features the Label Framelits turned both directions.  Again, I colored the stamp with my Stampin' Write Markers.  Add a little something with a glitter covered background.  (More details on that next week).  For those looking for the worms, I found them in the Hawaiian treat section of my store.  They are Li Hing covered Sour Worms.  "Eat If You DARE!"

To round out our table setting, we have a simple little package for holding the silverware.  A little distress marks from the Gorgeous Grunge Stamp Set.  Be sure to check back next week for more photos and details on how to make these projects yourself.  But now, it is on to the next stop at Mary's Blog where she is going to show you some fabulous uses for the Witches' Brew Designer Series Paper and Washi Tape.

Friday, December 28, 2012

Stampin' Addicts Blog Hop for 2013 SU! Spring Catalog

Welcome to this stop on the Stampin' Addicts Blog Hop.  This Blog Hop features stamp sets from the Stampin' Up! 2013 Spring Catalog with projects from Stampin' Addicts Demonstrators.  If you have been following the hop you came from Debra's page where she was "Just Thinking".  If you started here, welcome.  You can view the entire hop by following the links at the bottom of each post.  They will take you through all 14 stops.

ON WITH THE SHOW--I am featuring the "Feels Good" Stamp Set found on page 21 of the Spring Catalog.  There are 5 stamps in this set and I have 3 projects to show you today.  The catalog was previously known as the Occasions Mini Catalog and this stamp set is perfect for those non-holiday OCCASIONS that fill our lives.

My first project is a Twisted Card for a CONGRATULATIONS OCCASION.  It was originally created by a member of my extended SU! family, Kelly Gettelfinger.  I have several friends who train to run in marathons.  A couple of them have completed their first half-marathon (13.1 miles).  On the inside pocket I put a 13.1 sticker for them to proudly display on their car window.


My second project is a Treat Bag made from one sheet of 12"x12" cardstock and perfect for a THANK YOU OCCASION.  It features the Window Frame Framelits that will carry over into the Spring Catalog.  Any of the stamps in this set would work wonderfully on this bag.  The bag can also be easily made to form a 6"wide x 2"deep x 5"high gift box.


My last project is a Clear Case Photo Box for the OCCASION WHEN YOU NEED A SMILE.  These are the same clear cases that Stampin' Up! uses for their wonderful stamp sets.  You can purchase them separately from your demonstrator in a pack of 4.  It is best to keep the front flat and put any 3-dimensional embellishments inside.  I made this box for the OCCASIONS when my soldier husband is away from home and misses our kids.  They are also great for grandma or long distance friends.

For more details on any of these projects, check back this coming week.  I will have measurements, tips and more photos.  The next stop on the blog hop will take you to Sara's for "A Little Bit of Spring".


BLOG CANDY--No blog hop would be complete without a little bit of Blog Candy.  I recently Celebrated two OCCASIONS.  First I passed my 7 year anniversary as a demonstrator in November and then I passed my $50K in career sales milestone this month.  I am giving away the "Bootiful Occasions" stamp set from page 50 of the SU! Annual Catalog to a random winner.  You can enter once by leaving a comment here on this blog post.  You can get a second entry by following me on my Facebook Page.  I will draw a random winner on Monday.

Friday, February 24, 2012

It's A Party Blog Hop

Sorry my post is so late today.  We are down to the last few days before the big move.  Since I have nothing of mine to show you today, I thought I would tell you what my friends at Stampin' Addicts are doing.

This is the 3rd Anniversary of the Stampin' Addicts website.  To celebrate they are hosting a Party Themed Blog Hop.  Simply go to STOP # 1 at Yapha's blog to start the hop, then follow the links at the bottom of each post to go to the next stop.  If you get lost along the way or want to chat about the hop go to the Stampin' Addicts Chat Thread.
Have fun hopping.    

Friday, October 14, 2011

Big Shot Blog Hop

For those who don't know, my husband has received orders for a new assignment.  I have spent the last few weeks getting our home ready to put up for sale.  For this reason I have not had any time to stamp.  I thank you for your patience and I hope to be back to stamping very soon.
I do have a very special treat for you today though.  My wonderful friends at Stampin' Addicts are doing a Big Shot Blog Hop.  These are some very talented ladies and I know you will find all of their projects truly inspirational.  Each person on the Hop is focusing on a different Big Shot Die, so be sure to go through the entire Hop.  You simply need to click on the icons at the end of each posting.

To get started click HERE.  It will take you to the first stop on the Stampin' Addicts Big Shot Blog Hop, where Rhonda is waiting to show you the new Embossing Frames.  If you would like to learn more about Stampin' Addicts, please go to the website www.stampinaddicts.com

FREE BIG SHOT!!  If you would like to learn how you can get your own Big Shot for FREE, please contact me or any of the fine ladies on the Hop.  We would all love to share the world of Stampin' Up! with you.


Friday, August 27, 2010

Stampin' Addicts Winter Mini Blog Hop

Welcome to the Stampin' Addicts Winter Mini Blog Hop. If you came directly from the Stampin' Addicts Blog Hop Thread you found stop #1. You will be guided through all the stops on the hop by simply following along. This Blog Hop will feature products from the Stampin' Up! Winter Mini Catalog, available to customers Sept. 1, 2010 thru Jan 3, 2011.


If you found us some other way or started in the middle, you just came from Tanya's Blog with some great ideas for the "Filled With Love" Stamp Set, and looped back to the beginning of the Hop.

My Featured Product for the first stop on the hop is the EMBOSSING FOLDERS.

There are two embossing folders in the Winter Mini Catalog. The first is the "Spider Web" Embossing Folder (#120889) found on page 6. I ran the embossing folder through with a piece of Velumn Cardstock (#101856). I turned the velumn over and with a Basic Gray Stampin' Write Marker (#120966) I colored in the groove left by the embossing folder. I attached the velumn to the card with little bits of snail adhesive in the corners. I put the velumn onto Whisper White Cardstock to help the image stand out. The bottom of the card is Basic Gray Cardstock. If you look closely the Basic Black strip at the bottom looks a little fuzzy. Stampin' Up! Cardstock is known for it's durability. This is because the cardstock is actually two halves together that are solid throughout. If you crumple the paper up many times or run it along the side of your table over and over it will break the fibers between the two layers. You can then very gently peal them apart leaving a soft feathered look to the cardstock. I piece of the new Raven 1/2" Lace Trim finishes off the card.
Products Used:
Stamps: Teeny Tiny Wishes (#115730), Batty For You (#116576)
Cardstock: Basic Black, Basic Gray, Whisper White, Velumn Cardstock
Ink: Basic Black Classic Ink, Basic Gray Stampin' Write Marker
Accessories: SPIDER WEB EMBOSSING FOLDER (#120889), Big Shot, Modern Label Punch, Raven 1/2" Lace Trim, Silver Brads, Paper Snips

The next set of projects also features the "Spider Web" Embossing Folder. This time I used the Embossing Folder Like a STAMP. First I cut my Pumpkin Pie Cardstock into the dress shape with the use of the Scallop Circle Die, the Big Shot, and a pair of paper snips. I inked up the raised side of the embossing folder with versamark ink and carefully layed it onto the dress shape. I rubbed on the embossing folder to make sure the ink transfered to the cardstock, then carefully lifted it back up. With Basic Black Embossing Powder I heat embossed the image left by the embossing folder. Since the embossing folders are made of plastic you will not get a perfect stamped image as you do with a rubber stamp. Still, for the web, it works just fine and gives you many more options for using this embossing folder. I love the little spider from the Batty For You Stamp Set. I used him again here. This card is perfect for an invitation to a Halloween costume party. Change the color of the dress or embossing powder and you have a prom dress, Christmas outfit or even a Wedding dress.
The luminary shown with the Invitation Card uses the same technique. This time I stamped the embossing folder onto Velumn Cardstock and heat embossed with Basic Black Powder. The Spider Web was then placed behind a hole I cut in the Basic Black Fancy Favor Box. A simple tea light candle to illuminate the box and presto and easy decoration. Put a pumpkin scented candle and have an October themed way to make your home smell great.
Products Used:
Stamps: Sincere Salutations (#115068), Batty For You (#116576)
Cardstock: Pumpkin Pie, Basic Black, Velumn Cardstock, Whisper White
Ink: Versamark, Basic Black
Accessories: Scallop Circle Die, Big Shot, Basic Black 1/8" Taffeta Ribbon, SPIDER WEB EMBOSSING FOLDER (#120889), Scallop Oval Punch, Large Oval Punch, Fancy Favor XL Die

The last project I have for you uses the other embossing folder found in the Winter Mini Catalog. It is the "Northern Flurry" Embossing Folder (#120902) found on page 26. The common way to use an embossing folder is as a background to a card. I embossed it the same way as you would with a card, but instead of using the entire embossed image, I cut out the snowflakes with paper snips and various punches. I then sprayed the snowflakes with the Vanilla Shimmer Smooch Spritz (#118772). It is difficult to see in the photo, but the shimmer mist gives them a nice sparkle. For those interested in sizes, each page is 12x12, the large photo mat will fit a 5x7 photo and the smaller ones on the right side page will fit a wallet (2x3).

Products Used:
Cardstock: Pacific Point, Marina Mist, Bashful Blue, Whisper White
Accessories: NORTHERN FLURRY EMBOSSING FOLDER (#120902), Top Note Die, Big Shot, Paper Snips, Circle Punches (3/4", 1", 1-3/8"), Timeless Type Junior Alphabet (#115951), Dimensionals, Vanilla Shimmer Smooch Spritz.
Thank You for stopping in on my blog. I hope you enjoy the Winter Mini Blog Hop this weekend. Please leave your comments of feedback below. Your next stop is Holly's for some great uses for the "Dark & Dreary" Stamp Set.