Showing posts with label christmas. Show all posts

Tuesday, August 27, 2013

Stampin' Addicts now on Pinterest- Recycled Challenge #1

You have heard me mention my friends at Stampin' Addicts many times.  I just love this group of ladies.  We have started our own page on Pinterest so you can easily find projects by these wonderful stampers.  There are boards for our most recent Blog Hop and a few challenges we sponsor.  More boards for past Blog Hops will be added, so you can see all the talented projects in one place.

Simply type Stampin' Addicts into the pinterest search engine and look for our logo.

Here is the projects I did for the Recycled Challenges #1 board.

The challenge was to use the sketch to create your own card.  I used the Festive Flurry Stamp Set from the Holiday Catalog.  I stamped the 3 smaller images in Pool Party, Coastal Cabana, and Silver Encore Ink.  Check out that envelope too.  I used a sheet of the Winter Frost Paper Stack and cut it out with the Envelope Liners Die.


PRODUCTS USED:
STAMPS: Festive Flurry (WM#131778, CM#131781), Tags 4 You (WM#131820, CM#131823)

COLORS: Pool Party, Coastal Cabana, Bermuda Bay, Silver Encore (#132142), Whisper White, Silver Glimmer Paper (#124005), Winter Frost Paper Stack (#132183)
ACCESSORIES:  Label Bracket Punch (#132153), 1-3/4" Circle Punch (#119850), Bermuda Bay 1/8" Taffeta Ribbon (#131206), Dimensionals (#104430), Envelope Liners Die (#132172)


Order online 24/7 at My Demonstrator Website

Monday, August 26, 2013

UPCOMING BANNER CLASSES

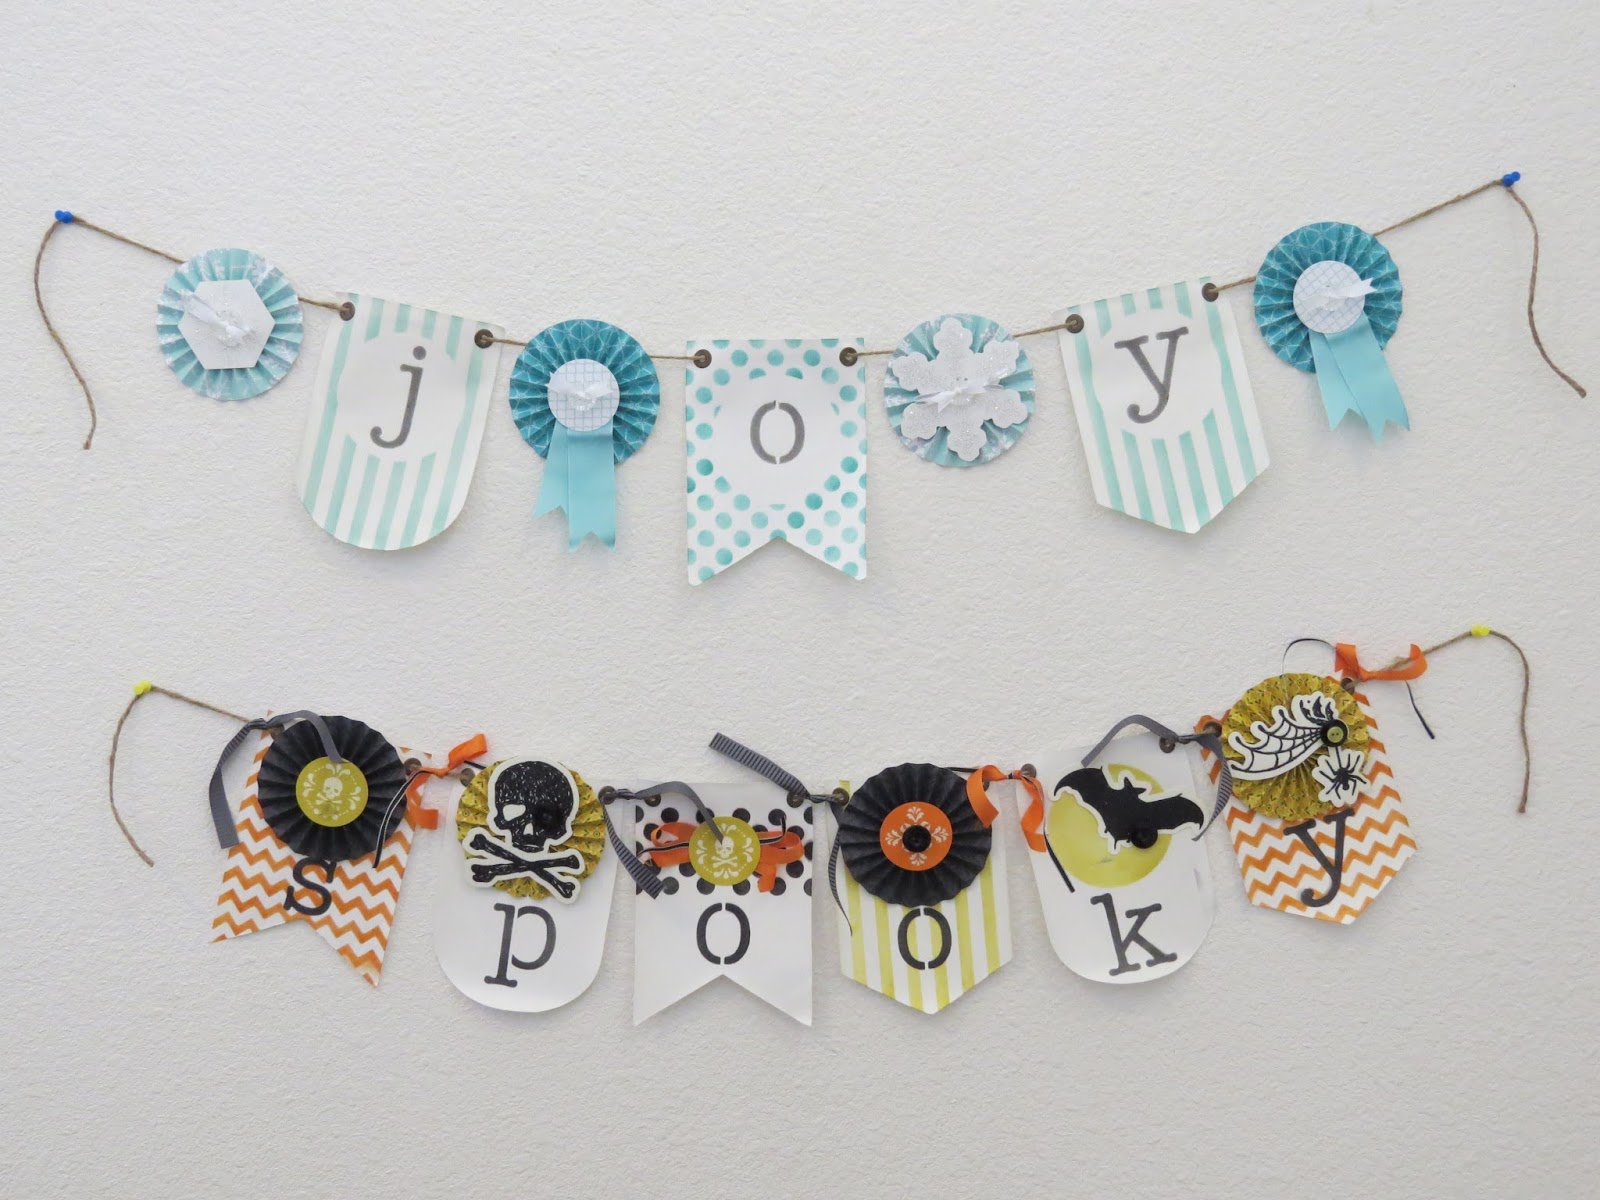
Have you seen the Build-A-Banner products in the Holiday Catalog.  How totally cute are these?  I could not resist and got all of the items, then sat down over the weekend and made 3 banners.  One each for Halloween, Thanksgiving, and Christmas.  I had so much fun making mine, that I thought it would be great to have a class for everyone to make their own.

Each banner is Approximately 3 Feet long.  Each flag measures 5" by 7".
December 7th--"Joy" Banner
October 5th--"Spooky" Banner
November 2nd-- "Thanks" Banner
"Give" additional $5 
WHEN:  These classes will be held as a 3 part series on the first Saturday of each month (Oct-Dec) @ 1:00pm.  Please give approximately 2 hours to assemble your banner at the class.  Some people may work faster, others slower, and some supplies need to be shared.  You can sign up for one, two or all three classes. 

WHERE:  All classes are held in my home on AMR.  Classes will be limited to 8 participants at each class. 

COST:  Each class is $25* (see November class note below) with payment due 10 days before the class date.  Prepay for all three classes by September 25th for only $70 and receive the “give” banner tier for free.

*November class is for the “thanks” tier.  You can add the “give” tier for an additional $5 or receive it for free with prepayment for all three classes by September 25th.


THINGS TO BRING:  Absolutely nothing.  All supplies will be provided at the class. 

HOW TO REGISTER:  You can email me at fa_stamper@sbcglobal.net, call me at (580)483-3758 or leave me a message on my business FACEBOOK page.  Search for Kathleen Brill-Myrice Demonstrator.  I will then contact you for your payment.  Your registration cannot be confirmed until payment is received. 


PRIVATE CLASSES for these banners are available.  Contact me for available dates.  Private classes must have a minimum of 6 people and must be prepaid in full 10 days before class date. 

My Demonstrator Website

Wednesday, July 31, 2013

Holiday Catalog Sneak Peek--Santa's List

August 1st marks the official start of the SU! Holiday Catalog.  Here is a sneak peek at one of the stamp sets you will find in this fantastic publication.  It is called "Santa's List" and can be found on page 31 of the 2013 Holiday Catalog.  It is a 3 piece set with the main image of Santa checking his list and two saying stamps.

Two other new products to point out.  Do you like those diagonal embossed lines in the background?  They are from the Stylish Stripes Embossing Folder.  How about that little ribbon on a clip? That is the Old Olive Simply Styled Embellishment.  They come in a pack of 12 clips.  TIP:  I cut a small slit near the corner of the whisper white and put my bow clip in the slot.  It helped it to lay flat on the card.   

Inside view
The "Merry Christmas" is from the More Merry Messages stamp set.  Do not fear, you can still purchase this stamp set.  It is on a carry-over list of stamp sets not shown in a catalog, but available for purchase.
Here is that list:

CARRYOVER STAMP SETS

  • Evergreen Stamp Set (available in French)
  • Greetings of the Season Stamp Set (available in French)
  • Jewish Celebrations Stamp Set
  • More Merry Messages Stamp Set (available in French)
  • Ornament Keepsakes Stamp Set
  • Snowflake Soiree Stamp Set (available in French and Spanish)
These stamp sets can be ordered in the online store.


PRODUCTS USED:
Stamps: Santa's List (WM#131808, CM#131811), More Merry Messages (WM#126400, CM#126402)
Colors: Cherry Cobbler, Old Olive, Whisper White, Crumb Cake, Early Espresso Ink
Accessories:  Stylish Stripes Embossing Folder #132174, Old Olive Simply Styled Embellishments #132148, Dimensionals #104430

LAST DAY TO GET JULY DESIGNER SERIES PAPER SPECIAL
BUY 3 GET 1 FREE


ORDER PRODUCTS ONLINE 24/7 at My Demonstrator Website

Friday, October 26, 2012

Christmas Card Stamp-A-Stack

This year I am offering two sessions for my Christmas Card Stamp-A-Stack.


Each session includes the following:

  • 16 Cards with Envelopes
  • All adhesive
  • Written instructions for each card
  • Use of all tools necessary to complete cards at stamp session
Cost of each session is $32--That is $2 per card.
BONUS: Register for both sessions and get 8 bonus cards, giving you a total of 40 cards for $64--($1.60 per card).

You can register for the class by going to My Demonstrator Website.  Click on RSVP under the description of the class you wish to take.


Thursday, October 20, 2011

Christmas Card Class

This Saturday is the second session of my Christmas Card Class.  Class participants will make 10 cards (5 each of 2 designs) with envelopes for $25.00.  This is one of the designs for this month.  I have a couple more spots in the class.  It is at 11:00 in my stamping room.  Please RSVP on my Class Calendar.
This card features the "Dear Santa" Stamp Set from the current Holiday Mini Catalog along with the Two Tags Die and some punch art cookies.


Products Used:
Stamps: Dear Santa (wm#123823, cm#123824)
Cardstock: Old Olive, Real Red, Confetti White, Chocolate Chip, Crumb Cake
Ink: Stampin' Write Markers (Real Red, Chocolate Chip, Old Olive
Accessories: Color Spritzer, Scallop Circle Punch, Paper Snips, Two Way Glue Pen, 1 3/4 Circle Punch, Real Red Satin Ribbon, Petals-A-Plenty Embossing Folder


Tuesday, October 18, 2011

Christmas Card without a Christmas Image

It is getting closer.  Have you been thinking about your Christmas cards for this year?  Do you have your stamp  set picked out yet?  Maybe you don't have any Traditional Christmas images or don't want to use the same one as last year.  Maybe your budget is just tight and you want a stamp set you can use all year long.
I have the answer for you.  "Delicate Doilies"  (wm#122590, cm#122592) found on page 127 of the 2011-2012 Idea Book and Catalog.  This stamp set can be used for just about any occasion.  All you need is a sentiment for whatever purpose you need a card.

All three of these cards use the Delicate Doilies Stamp Set along with the Curly Cute Stamp Set.  A simple change of the colors and presto.  The colors are all from the Bold Brights Color Collection and the buttons are all found in the Bold Bright Designer Buttons Pack.  If you don't have a lot of ink pads yet, I would suggest the Stampin' Spots.  You get an entire color collection of 1" ink pads for a fraction of the cost of a set of full size ink pads.  Later, when you find yourself using one color more often, you can purchase the full size pad.  It is a great way to start when you are not sure what colors you will use the most.
Here are some close-ups of the cards.  Each one also uses an embossing folder on the right hand side.  You could just as easily stamp this area in a tone on tone manner or even leave it blank.  As always my favorite way to step up a card is with dimensionals.  I used them under the sentiment strip.  The button is held on with a mini glue dot.


Products Used:
Stamps : Delicate Doilies (wm#122590, cm#122592), Curly Cute (wm#117014, cm#120510)
Cardstock: Bold Brights (#119706), Whisper White (#100730)
Ink: Bold Brights Classic Ink (Full size #119694, Stampin' Spots #119714)
Accessories:  Bold Bright Designer Buttons (#119747), Linen Thread (#104199), Dimensionals (#104430), Mini Glue Dots (#103683), Big Shot (#113439), Embossing Folders--Stripes (#123128), Vintage Wallpaper (#120175), Petals-a-Plenty (#116824)

Sign-up to become a Stampin' Up! Demonstrator by October 31, 2011 and get a FREE Big Shot!  Already have a Big Shot, select $100 worth of Stampin' Up! Products of your choice.  Contact me today with questions about becoming a Stampin' Up! Demonstrator or go to my Demonstrator Website to sign up today.  

Thursday, September 22, 2011

Christmas Card Class this Saturday

"Joy to the World", it is time for Christmas Card Classes.  "The Sounding Joy" is a new stamp set by Stampin' Up! in the 2011 Holiday Mini Catalog.  This set has so many possibilities.  It is perfect for those elegantly embossed Christmas cards like this one.  This will be one of the two cards we are doing at this month's Christmas Card Class on Saturday.
Only need a few cards this year?  No problem.  Need 30 cards this year?  No problem.  Come one month, two months or all three.  Each month we will be making 10 cards (5 each of 2 designs).  30 cards in all (5 each of 6 designs).  This is the first month, so you have not missed anything.  Each month is $25.00 and includes all 10 cards and envelopes.  Future class dates are October 22nd and November 19th.  Classes start at 11:00 in my home.  Call me with any questions or to register today.
Registration for this month's class closes at 6:00pm TODAY. (Sept. 22nd)


Order Stampin' Up! products online 24/7 by clicking on "Shop Now" in the upper right hand corner of My Demonstrator Website.

Products Used:
Stamps:  The Sounding Joy (wm #121967, cm #121979)
Colors:  Cherry Cobbler, Whisper White, Brushed Silver (#100712)
Accessories: Cherry Cobbler Embossing Powder (#122949), Silver EP (#109131), Dimensionals (#104430), VersaMark ink pad (#102283) , Heat Tool (#100005), Ticket Corner Punch (#119867), Cherry Cobbler Dotted Scallop Ribbon (#124138)

Thursday, July 29, 2010

Gift Tag & Candy Box

I made this with the idea of doing it at the Christmas in July class, but we already had a lot of other things to do. Still I had it to show and think I will add it to the next gift class I do.
The box is made from Cherry Cobbler Cardstock and holds 4-- 3x3 Gift Cards and Envelopes. You could probably fit 6 card with tags, but I just happen to only do 4 this time. The cards were done with textured Basic Gray Cardstock, little strips of Cherry Cobbler and a small piece of Jolly Holiday Designer Series Paper. I also wrapped the nugget candy in Jolly Holiday DSP.
The penguin is one of the images from this years Ronald McDonald House Stamp Set called "Tag Alongs." So cute and $2 from the purchase of each stamp set goes to the RMHC.
I don't have the measurements of the box for you today. I want to tweak the box a little so the candy fits differently. Maybe I just need bigger candy. I will work on that and post it in the future. I covered the box using the Medium Window Sheets.

Wednesday, July 28, 2010

Pinecone Ornaments

All of the participants at the Christmas in July class got to make a pinecone ornament. Here is a picture of two of them. These are simple to make and only take a few supplies. To learn how to make your own, keep an eye out for future classes or book a class with your friends today. Contact me for available dates.
Materials needed: 12x12 Designer Paper (Jolly Holiday used here), Ribbon (5/8" Old Olive Satin used here), pins, styrofoam ball, and lots of finger strength.

Tuesday, July 27, 2010

"JOY" Banner

Here is one of the projects I had for everyone to get decorating ideas from.
The penant banner is made using the Pennant Banner Die for the Big Shot. This is the larger of the two penants that come on the die. The Old Olive scallop circles are also on the die. They are slightly bigger than the ones made with the scallop circle punch. The letters were cut with the Big Shot using the Timeless Type Alphabet.
To hang the banner I punched holes and attached Antique Brass Jumbo Eyelets with the Crop-A-Dile. The tassle at the bottom is 5/8" Grosgrain Ribbon. When you cut the ribbon there is one end that will naturally unravel if you pull at the strings. The other end I cut the side of the ribbon off to make the threads easier to remove. The Designer Paper in the background is from the current Idea Book & Catalog. It coordinates with the Cherry Cobbler, Old Olive and Very Vanilla cardstocks. I cut it with the Pennant Banner Die to get the shape just right, then cut off the scallops.

Products Used:
Stamps: NONE
Cardstock: Cherry Cobbler, Old Olive, Very Vanilla, Jolly Holiday DSP
Ink: NONE
Accessories: Pennant SU! Bigz XL Die, 1-3/4" Circle Punch, Antique Brass Jumbo Eyelets, 1/4" Old Olive Grograin Ribbon, Crop-a-Dile, 2-way glue pen, 5/8" Old Olive Grograin Ribbon

Monday, July 26, 2010

Christmas in July

Fun was had by all at Saturday's class. Here is one of the simple projects we did. It is a wine bottle tag. You could also make it as a doorknob hanger. The wreath could be used to embelish any number of projects.
BASICS: The Real Red Cardstock is 8-1/2" x 4". Score the tag at 2-1/2" and punch a 1-3/4" Circle. The Whisper White piece is 5-1/2" x 3-1/2" I decorated my tag with the "Sweet Season" stamp set. I received the stamp set for FREE at Stampin' Up! Convention last year. (Contact me to learn about the FREE things you can get from Stampin' Up!) I stamped the image onto the tag with Basic Black ink, then onto a scrap piece with Real Red. I punched just the house out with the Small Oval Tag and mounted it with a dimensional directly over the black house.
The wreath at the top was so fun to make. I got the instructions from Lynn Pratt here. You have to wait a bit for the video to load.
I made this wreath with some retired ribbon from last years winter mini catalog I had hanging around. We made them with 1/4" Grosgrain ribbon at the class. It takes a little bit to get the hang of it, but they are easy when you do. I embelished mine with a red 1/4" Grosgrain bow and a mini tag tied with some linen thread.

To order products contact me or order online 24/7 at My Stampin' Up Website
Products Used:
Stamps: Sweet Season, Teeny Tiny Wishes
Cardstock: Real Red, Whisper White
Ink: Basic Black, Real Red
Accessories: Real Red Grosgrain Ribbon, Jewlery Tag Punch, Linen Thread, Dimensional, Mistletoe (Retired Ribbon)

Sunday, December 13, 2009

Ghirardelli Box

I personally am not one for Ghirardelli chocolates, but I know many people who are. There is a tutorial on SCS to make these boxes. The tutorial fits 4 Ghirardelli chocolates. For the craft fair, I altered the size of the box to fit 3 chocolates. 1) to make the bag stretch and get more projects. 2) because 3 pieces is one serving size.
My cardstock was 3-3/4" wide scored at 3/4" & 3" by 7-1/2" tall scored at 2", 2-3/4", 4-3/4", 5-1/2". I cut of the excess cardstock next to the top and front flap. It is held together with a little bit of sticky strip on the sides. I wrapped a band 3/4" wide around the box to hold the front flap down. The front flap slips out from behind the band.
The stamped label is attached to the band. It is stamped from the Level 1 Hostess Set "Holiday Best". I inked the image in Chocolate Chip. Then using a que-tip, took off the chocolate ink where I wanted it to be red. Using a Stampin' Write Marker I colored in the red portion. I "huffed" on the stamp to wet the ink and then stamped it onto Very Vanilla. It is punched out with the large oval punch. I attached a strip of Wide Grosgrain Ribbon to the sides inside the box.


Friday, December 11, 2009

Snowman Soup

Snowman Soup is always a favorite of mine do make as small gifts for people. It is perfect for co-workers, neighbors, or your child's teacher. The basic idea is to give someone all the makings of the perfect cup of cocoa. You need the cocoa packet, some mini marshmallows, a couple hershey kisses and a candy cane to stir it all with.

Some people put it all in a mug as a cute little present. In my experience everyone has more holiday mugs than they will ever need. So I wanted to do something a little different. I saw a few pictures on SCS where people made little boxes to hold their items. This could work for me. I got out my Box #2 Big Shot Die and tried it out. Worked like a charm. To help the cocoa packet fit a little better I cut a small portion of the left tab off. I also punched a hole in the tab to stand the candy cane into. I made 18 of these for the craft fair last weekend and they were gone within a few hours.
TIP WHEN USING THE BIG SHOT: It will cut through thick layers and this will allow you to multiple sheets of cardstock into the machine at once. However, when cutting with a die that has fold lines, DO NOT put too many sheets of cardstock in. The part of the die that puts in the fold lines will cut through your layers of cardstock if there are too many. Hard lesson learned.

The image on the front is from the Hostess Level 3 Stamp Set "The More The Merrier". I colored it in with some Stampin' Write Markers. The tag I printed on my computer onto Whisper White Cardstock. The whole package is tied up with some Real Red Grosgrain Ribbon.
There are several variations for the poem. The one I used is...
When it’s so cold that,
You holler and whoop.
It’s time to bring out,
The Snowman Soup!

Pour the packet in a mug,
Add the snowballs too.
Throw in the kisses
From the snowman to you.

Now add some hot water,
Stir with the peppermint stick.
If you want to warm up,
This will do the trick.

Tuesday, December 8, 2009

Christmas Matchbox

Yet another project I did for the craft fair. This time I used the Matchbox Die for the Big Shot. It is super simple. You just run the cardstock through the die, fold on the marks and the box is ready to go. You don't even have to tape it down. 4 Hershey nugget pieces fit into it perfectly. I put clear acetate around the box so the nuggets slide in and out. I then wrapped the box with some Gold Elastic cord. The tag is from the Christmas Punch Hostess Set. Then puched out with the Curly Label Punch. These were quick and simple to make and who doesn't love chocolate gifts.

Wednesday, December 2, 2009

Kids items for the craft fair

Here are a couple of things I made for kid gifts. I original thought of the pencil pouch to give to the kids in my daughters Kindergarden class. When I decided to do the craft fair I figured I would try and sell them. Who knows? Maybe I will catch the eye of a teacher or room mother.

I worked out the dimentions so I could get 4 pouches out of one sheet of cardstock. I had to cut the bottom portion so it folded over instead of up. They are 8-1/2" tall. I used a bit of sticky strip and the crimper at the bottom. The DSP is retired (great chance to use up some scraps). The red band in the middle wraps all the way around to help hold the thing shut. The pencils fit tight and put a lot of stress on the side that it taped shut. The tag is from the hostess level 2 stamp set.

The other project for the craft fair is a little Build-A-Bear Coloring Set. There are 8 sheets of primary color cardstock with the plain images on them. I also included a small box of 4 crayons. The tag was made with the Two Tags Big Shot Die. I put the small embossed paw print on the tag and left the rest blank for people to write what they want to on there.

I have been working almost non-stop on things for this event. I am exhausted already. It runs for two days. Saturday from 10-6 and Sunday from noon-5. If you are in the Lawton area you should stop by. I am in the back corner by the food. (Where the band normally sets up for ceremonies)

Monday, November 30, 2009

Craft Fair Items

I am participating in a craft fair this week on the army post. I have been working hard the last couple weeks planning and making items. Here are a few of the things I have done. They are great for stocking stuffers, coworker gifts or just anyone you are thinking of this time of year.

The spare reindeer noses are red M&M's and the grinch pills are green M&M's. The elf pillows are little mints. I put them into little bags I got at the store. The topper is from the "Two Tags" Big Shot Die. The images are from "Holiday Lineup". The Grinch is a few simple punches. They are on the scallop circle punch.

Anyone in the Lawton area this weekend should come by Reinhart Gym and see my booth. I hope to show more of my items this week, but have been busy just getting them done.