Wednesday, August 28, 2013

Envelope Bag--SA Recycled Challenge #2

Stampin' Up! has a fantastic new product coming out on September 1st, an Envelope Punch Board.  You can make 66 different sized envelopes from a piece of paper.  The measurements are right on the Punch Board for all the envelope sizes.  So easy to use and the tools are all part of the system, no changing things in and out to finish your custom envelope.

It is fantastic for making envelopes, but you can make other things with it as well.  I made a custom 5" by 7" envelope and turned that into packaging for some cards.  You can see a wonderful video for this on Stampin' Addicts.  First I closed all the seams of my custom envelope with sticky strip.  Then, I scored three sides of the envelope 1/2".  The forth side I cut off just enough for it to open.  When you fold it open you get this cute little 4-1/2" x 6" x 1" box.  Fits standard cards and envelopes perfectly.    I then stamped all over the front with my Gorgeous Grunge Stamp Set and Off the Grid Stamp in Crumb Cake, Early Espresso and Illuminate Glimmer Ink (shows better in person).    A quick torn belly band and a simple Thanks! label with the Window Frames Collection Framelits.
You can see more Envelope Bags on Pinterest.  Go to the Recycled Challenge #2 board on the Stampin' Addicts Page.

PRODUCTS USED: 
STAMPS: Gorgeous Grunge (WM#130514, CM#130517), Yippee-Skippee (WM#131341, CM#131344), Off the Grid (#130736)
COLORS: Pumpkin Pie, Crushed Curry, Crumb Cake, Early Espresso, Soft Suede, Very Vanilla, Illuminate Glimmer (136857)
ACCESSORIES: Crushed Curry Chevron Ribbon (#130019), Window Frames Collection Framelits (#129021), Big Shot (#113439) 

Order Online 24/7 at My Demonstrator Website

Tuesday, August 27, 2013

Stampin' Addicts now on Pinterest- Recycled Challenge #1

You have heard me mention my friends at Stampin' Addicts many times.  I just love this group of ladies.  We have started our own page on Pinterest so you can easily find projects by these wonderful stampers.  There are boards for our most recent Blog Hop and a few challenges we sponsor.  More boards for past Blog Hops will be added, so you can see all the talented projects in one place.

Simply type Stampin' Addicts into the pinterest search engine and look for our logo.

Here is the projects I did for the Recycled Challenges #1 board.

The challenge was to use the sketch to create your own card.  I used the Festive Flurry Stamp Set from the Holiday Catalog.  I stamped the 3 smaller images in Pool Party, Coastal Cabana, and Silver Encore Ink.  Check out that envelope too.  I used a sheet of the Winter Frost Paper Stack and cut it out with the Envelope Liners Die.


PRODUCTS USED:
STAMPS: Festive Flurry (WM#131778, CM#131781), Tags 4 You (WM#131820, CM#131823)

COLORS: Pool Party, Coastal Cabana, Bermuda Bay, Silver Encore (#132142), Whisper White, Silver Glimmer Paper (#124005), Winter Frost Paper Stack (#132183)
ACCESSORIES:  Label Bracket Punch (#132153), 1-3/4" Circle Punch (#119850), Bermuda Bay 1/8" Taffeta Ribbon (#131206), Dimensionals (#104430), Envelope Liners Die (#132172)


Order online 24/7 at My Demonstrator Website

Monday, August 26, 2013

UPCOMING BANNER CLASSES

Have you seen the Build-A-Banner products in the Holiday Catalog.  How totally cute are these?  I could not resist and got all of the items, then sat down over the weekend and made 3 banners.  One each for Halloween, Thanksgiving, and Christmas.  I had so much fun making mine, that I thought it would be great to have a class for everyone to make their own.

Each banner is Approximately 3 Feet long.  Each flag measures 5" by 7".
December 7th--"Joy" Banner
October 5th--"Spooky" Banner
November 2nd-- "Thanks" Banner
"Give" additional $5 
WHEN:  These classes will be held as a 3 part series on the first Saturday of each month (Oct-Dec) @ 1:00pm.  Please give approximately 2 hours to assemble your banner at the class.  Some people may work faster, others slower, and some supplies need to be shared.  You can sign up for one, two or all three classes. 

WHERE:  All classes are held in my home on AMR.  Classes will be limited to 8 participants at each class. 

COST:  Each class is $25* (see November class note below) with payment due 10 days before the class date.  Prepay for all three classes by September 25th for only $70 and receive the “give” banner tier for free.

*November class is for the “thanks” tier.  You can add the “give” tier for an additional $5 or receive it for free with prepayment for all three classes by September 25th.


THINGS TO BRING:  Absolutely nothing.  All supplies will be provided at the class. 

HOW TO REGISTER:  You can email me at fa_stamper@sbcglobal.net, call me at (580)483-3758 or leave me a message on my business FACEBOOK page.  Search for Kathleen Brill-Myrice Demonstrator.  I will then contact you for your payment.  Your registration cannot be confirmed until payment is received. 


PRIVATE CLASSES for these banners are available.  Contact me for available dates.  Private classes must have a minimum of 6 people and must be prepaid in full 10 days before class date. 

My Demonstrator Website

Tuesday, August 13, 2013

MDS Tuesday Downloads

Each week Stampin' Up! offers new downloads for My Digital Studio.  If you enjoyed my Halloween Bash projects for the Stampin' Addicts Fall Blog Hop, then you are in for a treat this week.  Stampin' Up! has the Halloween Bash stamp set offered as a digital download now.  You can also get the Witches' Brew Designer Series Paper Digital Download.

Schools are starting back.  Make a cut memory of your child's first day with this cute download.
Have a tropical vacation (or maybe live in Hawaii....lol)?  Check out the Paradise Found Photobook Template.
New downloads available each week.  Check them and all the great Stampin' Up! Products out 24/7 at My Demonstrator Website Store.

Friday, August 9, 2013

Stampin' Addicts Fall Blog Hop

Welcome to stop #7 on this hop.  If you have been following the Hop you just came from Rhonda's Blog.  Isn't she great!  She is a great stamper and I am so blessed to call her my friend too.  If you started here, you can stay here and follow the Hop until it loops its way back around.  If you want to start at the beginning please go to Heidi's Blog.

If you have never seen a Blog Hop before you are in for a treat.  11 Demonstrators from Stampin' Addicts have brought you projects featuring the Fall Products from the 2013 Stampin' Up! Holiday Catalog.  I have 4 projects featuring the Halloween Bash Stamp Set, so lets get started.

What is the first thing we do when having a BASH?  We send out invitations.  I colored the image with my Stampin' Write Markers in Basic Gray, Basic Black and Pumpkin Pie.  The torn edges were colored with the NEW Smokey Slate Marker.  It is hard to see in the photo, but the black background area has a fuzzy texture to it.  Come back next week for tips on how to do that.  The little creepy crawly fellow is from my Halloween decorations.  A cheap embellishment this time of year.  And how about that envelope?  The NEW Envelope Liners Framelit Dies can make any envelope just jump out at you.

We want everyone to find their place at the party.  Here is a fun decor project.  I made the rosette using the Witches' Brew Designer Series Paper.  I lined up the paper in my Paper Cutter, so they spiders on the print were near the outer edge.  I then used my scoring tool to score the fold lines.  There is no perfect measurement to score this at.  I moved the DSP around so the groove of the tool was in the center of the spider or his web area.  I stamped the label in versamark ink, then used heat and stick powder to adhere the orange glitter.  The name is hand written with the NEW Chalk Marker.

Once everyone has found their seat you want to have a little treat for them.  The treat topper features the Label Framelits turned both directions.  Again, I colored the stamp with my Stampin' Write Markers.  Add a little something with a glitter covered background.  (More details on that next week).  For those looking for the worms, I found them in the Hawaiian treat section of my store.  They are Li Hing covered Sour Worms.  "Eat If You DARE!"

To round out our table setting, we have a simple little package for holding the silverware.  A little distress marks from the Gorgeous Grunge Stamp Set.  Be sure to check back next week for more photos and details on how to make these projects yourself.  But now, it is on to the next stop at Mary's Blog where she is going to show you some fabulous uses for the Witches' Brew Designer Series Paper and Washi Tape.

Thursday, August 8, 2013

Blog Hop Sneak Peak

It is one of my favorite times of the year.  BLOG HOP TIME with Stampin' Addicts.  This weekend me and many other fellow Stampin' Up! Demonstrators will be sharing Fall projects with products from the Holiday Mini Catalog.  I just got done with the last project I am showing on this hop.  What does your craft area look like after some fun stamping time?  Here is mine.

Oh you wanted a sneak peak of the projects?  Well?  ........OK!  Here is a glimpse of my projects.  I am featuring the Halloween Bash stamp set.

Be sure to come back on Friday for this fantastic Fall Blog Hop by the Stampin' Addicts.


My Demonstrator Website

Friday, August 2, 2013

Stamp Set of the Month Club--August--"Flower Shop"

I am starting a new class in the mail.  It is the STAMP SET OF THE MONTH CLUB.  Each month I will send out a Kit including a Clear Mount Stamp Set with a value between $16.95-$18.95, three completed cards using that stamp set, and the full instructions (including photos, dimensions and a complete list of products) to make the cards again on your own.

August Stamp Set of the Month--  Flower Shop 

WHAT IS THE COST?  The Stamp Set of the Month Kit costs $30 per month--includes all items listed above, all taxes and shipping in a small priority flat rate box to you.

HOW DO I JOIN?  Simple send an email to fa_stamper@sbcglobal.net  Put "Stamp Set of the Month" in the subject line.  Viola, you have joined.  If you wish to stop you can send another email at anytime.  

WHAT WILL HAPPEN NEXT?  Each month members of the club will receive an email to verify they wish to participate that month.  Respond to that email by the deadline and I will send you an invoice by Paypal to send payment for your membership that month.  If you do not respond to the email or send in payment by the deadline, you will not receive the stamp set of the month kit.  You are always welcome to order the stamp set at anytime, but the monthly kit is only available until the deadline.

WHAT IF I ALREADY HAVE THAT STAMP SET?  You can select an alternative stamp set of equal value that month.  The cards and instructions will still be for the Stamp Set of the Month.

I PREFER WOOD MOUNT STAMPS, IS THIS AN OPTION?  Yes.  There is an additional cost if you would like wood mount stamps.  The cost difference is based on the stamp set retail price that month.  Please notate when you accept the kit of the month that you prefer wood mount stamps.

WHAT IF I NEED OTHER STAMPIN' UP! PRODUCTS WITH MY KIT?  In your email response to accept that months kit, notate any additional products you need.  I will recalculate your order to reflect the additional cost of those products with your kit.  I will send this to you in an email for you to approve before sending you an invoice for payment.

I AM LOCAL TO HONOLULU AND WOULD LIKE TO PICK UP MY KIT.  CAN I SAVE ON SHIPPING THIS WAY?  Please contact me directly for local cost.


My Demonstrator Website

Thursday, August 1, 2013

NEW PRODUCTS START TODAY!

The Holiday Catalog starts today.  Get all your needs for the Fall and Winter Holidays in one place.  This catalog is packed with great products and even better ideas for projects to make with them.  CHECK IT OUT HERE>

Today also marks the start of a NEW PRODUCT for Stampin' Up!  Thinlits Card Dies.  I got the chance to see these in action at Convention.  Oh My Goodness!!  I am ordering mine today.

They've been called flip cards, flip flop cards, swing cards, and more-but they have always been a bit tricky to create. Not anymore! The amazing new Thinlits Card Dies cut and score to create a card that flips in just one step.
ItemDescriptionPrice
133479Label Card Thinlits Die$32.95
133480Circle Card Thinlits Die$32.95


These Thinlits come with more then just the card form die.  Check out the FULL FLYER HERE.


ORDER PRODUCTS ONLINE 24/7 or Check out my Class Calendar at My Demonstrator Website

Wednesday, July 31, 2013

Holiday Catalog Sneak Peek--Santa's List

August 1st marks the official start of the SU! Holiday Catalog.  Here is a sneak peek at one of the stamp sets you will find in this fantastic publication.  It is called "Santa's List" and can be found on page 31 of the 2013 Holiday Catalog.  It is a 3 piece set with the main image of Santa checking his list and two saying stamps.

Two other new products to point out.  Do you like those diagonal embossed lines in the background?  They are from the Stylish Stripes Embossing Folder.  How about that little ribbon on a clip? That is the Old Olive Simply Styled Embellishment.  They come in a pack of 12 clips.  TIP:  I cut a small slit near the corner of the whisper white and put my bow clip in the slot.  It helped it to lay flat on the card.   

Inside view
The "Merry Christmas" is from the More Merry Messages stamp set.  Do not fear, you can still purchase this stamp set.  It is on a carry-over list of stamp sets not shown in a catalog, but available for purchase.
Here is that list:

CARRYOVER STAMP SETS

  • Evergreen Stamp Set (available in French)
  • Greetings of the Season Stamp Set (available in French)
  • Jewish Celebrations Stamp Set
  • More Merry Messages Stamp Set (available in French)
  • Ornament Keepsakes Stamp Set
  • Snowflake Soiree Stamp Set (available in French and Spanish)
These stamp sets can be ordered in the online store.


PRODUCTS USED:
Stamps: Santa's List (WM#131808, CM#131811), More Merry Messages (WM#126400, CM#126402)
Colors: Cherry Cobbler, Old Olive, Whisper White, Crumb Cake, Early Espresso Ink
Accessories:  Stylish Stripes Embossing Folder #132174, Old Olive Simply Styled Embellishments #132148, Dimensionals #104430

LAST DAY TO GET JULY DESIGNER SERIES PAPER SPECIAL
BUY 3 GET 1 FREE


ORDER PRODUCTS ONLINE 24/7 at My Demonstrator Website

Tuesday, July 30, 2013

New Downloads in Full Bloom

Have you tried My Digital Studio yet?  I can't say enough wonderful things about MDS2.  And as if MDS2+ doesn't come with enough fantastic stamp sets, designer papers and features.....Stampin' Up! comes out with additional downloads each Tuesday you can purchase to enhance your My Digital Studio experience.

This week they have outdone themselves.  They have everything you need to complete those summer scrapbook pages.  Here is the About to Blossom August Kit available starting today.
About to Blossom August Kit --#134860  $9.95


We all love something free too.  How about the About to Blossom August Wallpaper.
About to Blossom August Wallpaper---#134861--FREE
Download a FREE 30 day trial of My Digital Studio today. 
Purchase the MDS full software download #130646 for only $19.95  See the included digital content HERE
OR 
Learn more about MDS HERE.

ORDER ONLINE 24/7 at My Demonstrator Website

Monday, July 29, 2013

New Catalog Card Swap--Perfect Blend

There are all different types of swaps demonstrators can participate in at convention.  I joined a group of 34 ladies interested in swapping cards with stamp sets new to the 2013-2014 Annual Catalog.  Here is mine.  When I first say the "Perfect Blend" stamp set it immediately went on my first order wish list.  Something about it just called out to me.

I knew I wanted to use watercolor paper for the main image area.  I stamped the image in stazon black and then using my aqua painters, colored it in with Summer Starfruit and Crumb Cake.  The lipstick blotch is Raspberry Ripple to match the DSP print.

I encourage everyone to really look at all the prints in a DSP collection.  This print is on the back of one print in Birthday Basics.  I wasn't sure what to do with the large area in the background, so I made my own print.  I used a tone on tone effect and randomly stamped to cup a few times.  The label on the cup was stamped and cut out from Gumball Green.

PRODUCTS USED:
Stamps: Perfect Blend WM #130745, CM #131392
Cardstock:  Early Espresso #119686, Watercolor Paper #122959, Gumball Green #126840, Crumb Cake #120953
Ink: Stazon Black #101406, Summer Starfruit #126991, Crumb Cake #126975, Raspberry Ripple #126859, Early Espresso #126974
Accessories: Birthday Basics DSP #130145, Dimensionals #104430, Aqua Painters #103954, Raspberry Ripple Stitched Satin Ribbon #126845, Glue Dot #103683


ORDER ONLINE 24/7 at My Demonstrator Website

Sunday, July 28, 2013

3D Swap for Convention

I found myself all packed, ready to go to convention with 8 hours to spare this year.  All my card swaps were done and I was just waiting out the time till I could go to the airport.  What is a stamper to do?  Make more swaps.  I sat at my work table, got out my Big Shot and went through my dies.  The Petite Purse Die has been sitting there patiently until I was ready to use it.  So Glad I Did!!

These were a hit at convention.  I thought it was so simple.  Maybe that is what appealed to everyone.  My only problem.....I forgot to put my name on them.  As you can see again, I am in love with this years In Colors.  The Stretch Ruffle Trim is fabulous also.  You can stretch it out for a less ruffled look if you like.  I used it in its unstretched full ruffle form.

The flower on front was made with three punched out 1-1/4" Scallop Circles.  I used the In Color Designer Series Paper Stack.  I crunched them up by hand and held it to the purse with a brad.

The Ruffle Trip was put on in two strips that shared the handle space with some sticky strip.  These are fast to make and perfect for just about any occasion.  I'm thinking wedding favors, baby shower or little girl birthday.  They hold a few pieces of small candy.  I put Chocolate Covered Macadamia Nuts in mine.

PRODUCTS USED:
Stamps: None
Cardstock: 2013-2015 In Colors #131200
Accessories:  Big Shot #113439, Petite Purse Bigz L Die #125606, 2013-2015 In Color Designer Series Paper Stacks #130136, sticky strip #104294, 1-1/4" Scallop Circle Punch #127811, Ruffle Stretch Trim (available in all 5 In Colors)

Ruffle Stretch Trim Product Order Numbers
Pistachio Pudding #130020
Crisp Cantaloupe #130021
Baked Brown Sugar #130022
Strawberry Slush  #130023
Coastal Cabana #130024


Order products online 24/7 at My Demonstrator Website

Saturday, July 27, 2013

Happy Birthday CASE!

CASE--Copy And Share Everything.  This is a great way to make cards.  I had received a wonderful card, while swapping at convention, from Cathy Seal.  I loved her color use and design.  I do have this fascination with this years In Colors.  I changed my card to use more of the colors.  I also added some spritzer to the flowers.  You can see my card on the left and Cathy's on the right.  Both stamped sentiments are from the same stamp set.


A close up of the flower details.  


The best part of making cards is giving them away.  I made this one for my friend Rie's birthday.  Here she is celebrating at the Cheesecake Factory in Waikiki, HI.


Of course we had to have cheesecake.  I had the carrot cake cheesecake.  Yummmmmm!!


PRODUCTS USED:
Stamps: Bring on the Cake (WM #128490, CM #121958)
Colors: Crisp Cantaloupe, Strawberry Slush, Pistachio Pudding, Coastal Cabana, Whisper White, Black Stazon Ink #101406
Accessories:  Ovals Collection Framelits #129381, Perfect Polka Dots Embossing Folder #117335, Coastal Cabana Ruffled Stretch Trim #130024, Sticky Strip#104294, Dimensionals #104430, Blossom Party Originals Die #115971, Bird Builder Punch #117191, Itty Bitty Shapes Punch Pack #118309, Pearl Basic Jewels #119247

Friday, July 26, 2013

Convention Swap #2

I LOVE SWAPPING!  I participated in a few organized swaps this year.  This is my card for the Stampin' Addicts Birthday Card Swap.

I did a little twist with the focal image.  You could stamp the image on Whisper White and then punch it out with the Scallop Circle Punch.  Instead I punched through the Crisp Cantaloupe Cardstock and put the image behind the space.  All of the colors were chosen to go with the designer paper from the Birthday Basics DSP.

PRODUCTS USED:
Stamps: Sketched Birthday (WM #130423, CM #130426)

Colors Cardstock and Markers: Bermuda Bay, Crisp Cantaloupe, Gumball Green, Raspberry Ripple, Summer Starfruit, Whisper White, Black Stazon Ink Pad
Accessories:  Birthday Basics DSP #130145, 2-3/8" Scallop Circle Punch #118874, Silver Brad, Crisp Cantaloupe Ruffle Stretch Ribbon #130021, Dimensionals #104430

DON'T MISS OUT --Offer Ends: July 31st
Offer Details: Buy three packs of select Designer Series Paper and get one for free!


Order Online 24/7 at My Demonstrator Website.

Thursday, July 25, 2013

25th Anniversary of Stampin' Up!

I have enjoyed my 7-1/2 years as a demonstrator for Stampin' Up!  I have been blessed to attend several major events, but nothing compares to the 25th Anniversary Convention in Salt Lake City.  My friend Paula snapped this photo of me near the main stage.


Demonstrators love Stampin' Up! events for all the tips and training we get for our business.  Still, the freebies are kind of nice.  This year they went all out.  Here is a photo of all the stamp sets and kits I received at convention.  Be on the lookout for more information about that little brown bag marked "Undefined" in the lower left corner.

Of course we needed something to carry it all in, so they gave each of us a backpack.  It is white with silver printing in the modern mosaic pattern.  Sorry for the photo quality, I took it with my phone just after we got our bags.

Have you been thinking about becoming a demonstrator?  There is never a bad time to sign up with Stampin' Up!  All new demonstrators can sign up for only $99 and you get to select $125 worth of Stampin' Up! products of your choice.  You will also receive a business pack worth over $65 of catalogs, forms and everything needed to get started right away.

From now thru August 31st Stampin' Up! is having a special for those who sign up.  You can select a project kit from the list below.
You can sign up and become part of my Stampin' Up! team online 24/7 on My Demonstrator Website.

Kit Options:
The first three project kits are from the holiday catalog and the last option is from the annual catalog.
OptionKit DescriptionItemTotal Value
1
Build a Banner Simply Created Kit AND
Halloween Banner Simply Created Accessory Kit
133507
132698
$29.90
2
Build a Banner Simply Created Kit AND
Christmas Banner Simply Created Accessory Kit
133507
132697
$29.90
3
Thankful Tablescape Simply Created Kit
133463
$19.95
4
Tag a Bag Bundle AND
Tag a Box Bundle
131371
131372
$22.45


Wednesday, July 24, 2013

Convention Swap #1

I got back a couple days ago from Stampin' Up! Convention 2013 in Salt Lake City.  I have finally gotten a few hours of solid sleep and can think more clearly.  I have so many ideas it has been hard to decide where to begin.  I have updated my class schedule and uploaded all my photos to my computer.  I took over 700.

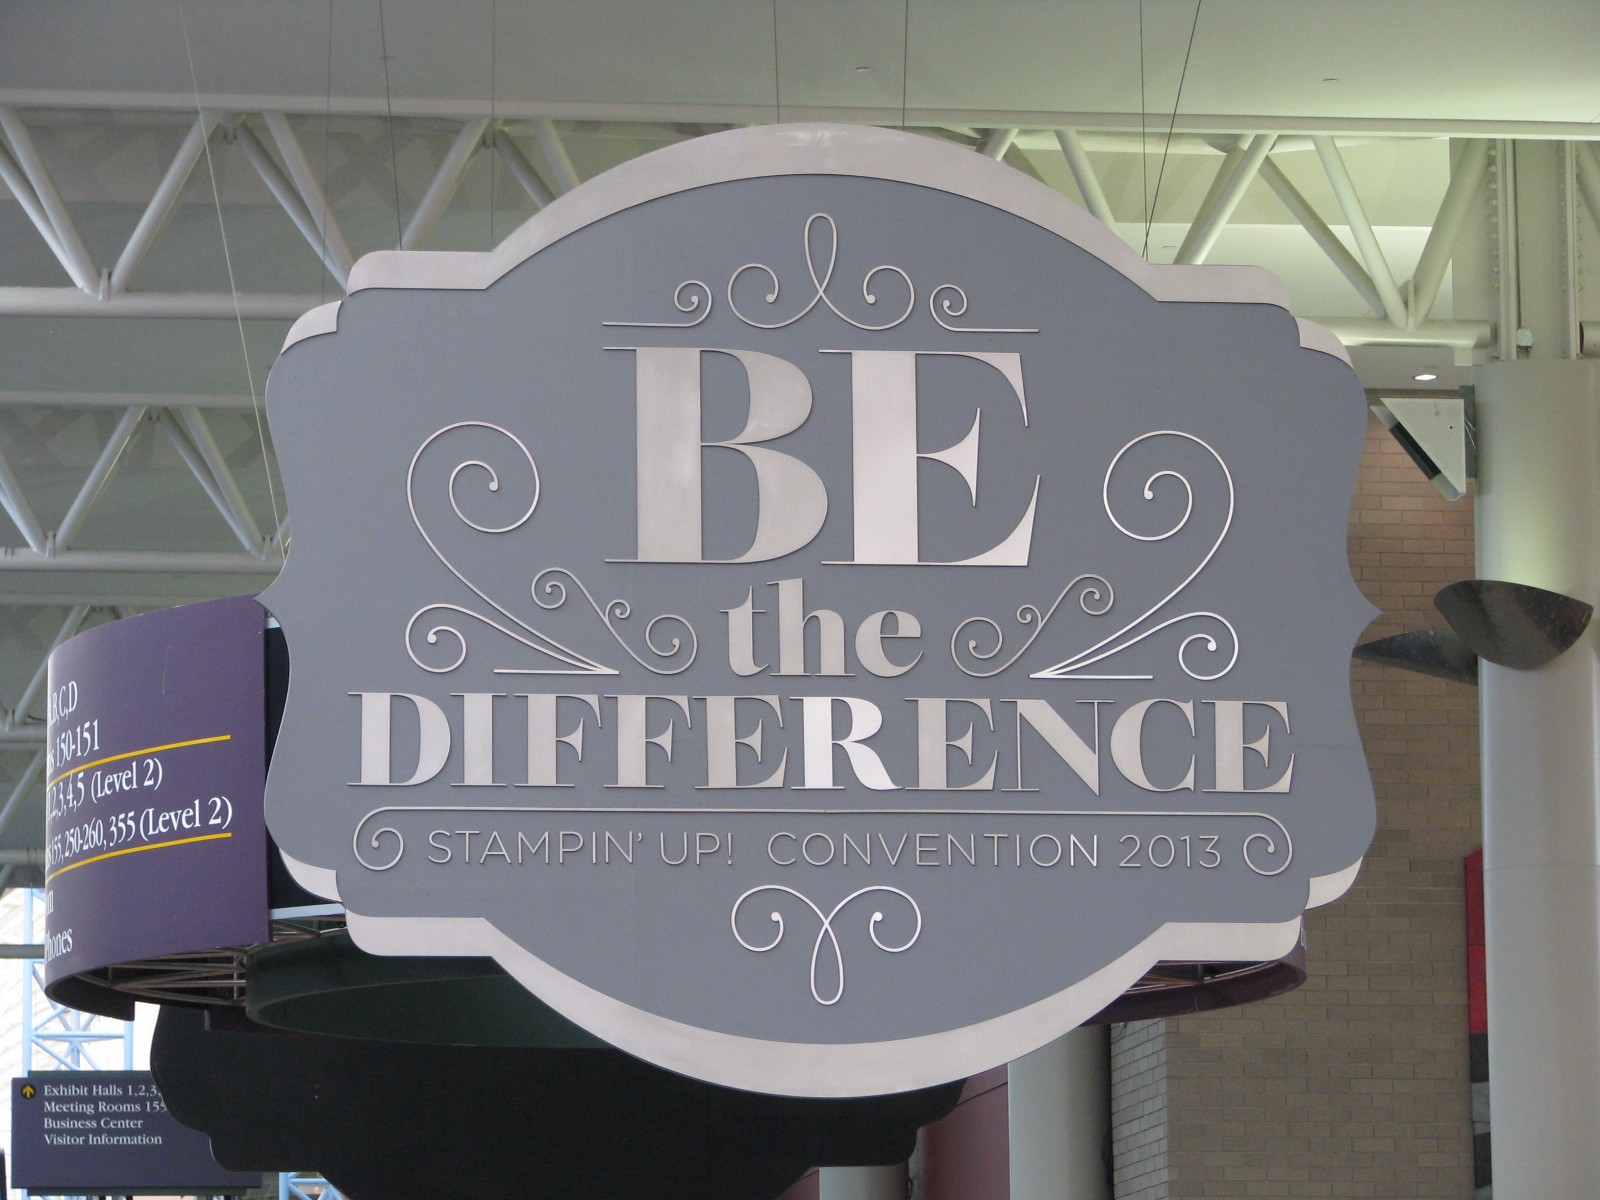
"Be the Difference" was the theme of this years convention.  It has encouraged me to think out of my comfort zone in my business and community.  Over the next week or so I will share more of the photos I took at convention.  For now, how about a card.


This is one of the 5 cards I made to swap with other demonstrators at convention.  This was my largest group as I made 216 of this card.  That is 432 flowers stamped and punched, 432 dimensionals, 216 stamped sentiments, 216 cuts of ribbon, 216...of my gosh it was tiring the first time to remind myself again.  I made this card for swapping with my StampersExpress Family, the shoebox swap with my Stampin' Addicts friends, and for general floor swaps with anyone with a card to trade.

It is a fantastic card and the saying can have so many meaning and uses.  It is from the "Feel Goods" stamp set in the Annual Catalog.  You can easily change the card for any color collection.  Just use the coordinating buttons, pack of DSP, and ink.  The coolest thing about this card is the ease of making them in bulk.  There are 72 buttons in a pack of Designer Buttons (available in all 4 color collections--I used Bold Bright).  The beautiful chevron ribbon (I used Marina Mist) cuts into exactly 72 five inch pieces.  You can get 48 cuts from one sheet of Designer Series Paper (Polka Dot Parade DSP) and 28 cuts from one sheet of cardstock (Real Red embossed piece).

PRODUCTS USED:
Stamps:  Feel Goods (WM #131916, CM #129684), Flower Shop (WM #130939, CM #130942)
Ink: Real Red #126949, Dafodil Delight #126944, Stazon Black #101406
Cardstock:  Whisper White #100730, Daffodil Delight #119683, Real Red #102482
Accessories:  Pansy Punch #130698 (available as a bundle with the coordinating stamp set on pg 95), Polka Dot Parade Designer Series Paper #126902, Bold Bright Buttons #130028, Rhinstone Basic Jewels #119246, Dimensionals #104430, Marina Mist 3/4" Chevron Ribbon #130016, Fancy Fan Embossing Folder #127751, Big Shot #113439

Monday, July 22, 2013

Paper Pumpkin On SALE!!

Offer Dates: Thru August 31, 2013

Offer Details: Use the promotion code PUMPKINDEAL to join Paper Pumpkin before August 31, 2013, and pay only $10 a month* for the first two months.
*plus tax, where applicable. Shipping included!


The Fine Print:
  • For new subscribers only.
  • Promotion applies only to the first two months of a new subscription. After receiving two month's worth, the price for each month's kit will go to the regular price: $19.95.
  • You need to visit mypaperpumpkin.com to join.
  • You must click "Add Promo Code" and then enter the promo code PUMPKINDEAL in the "Promo Code" field when you sign up on the mypaperpumpkin.com website to take advantage of this promotion.
  • You must join by Saturday, August 31, 2013; 11:50 PM (MT).

More nitty gritty about Paper Pumpkin:
  • Each month we send you a unique, surprise kit with a project-cards, journals, décor, and more! (We've even color-coordinated, measured, and cut everything for you!)
  • Each kit includes stamps, ink, paper, and accessories-everything but adhesive.
  • Each kit gives you a 30-minute creativity escape.
  • We will ship your Paper Pumpkin on or around the 15th of the month. 
  • You need to sign up for a kit by the 10th of the month to get that month's kit. If you sign up on the 11th of the month, your first kit will come the next month. (Let's say you sign up on August 10, we'll send your kit around August 15. If you sign up on August 11, we'll send your first kit around the September 15.)
  • There's no commitment, you can cancel your monthly Paper Pumpkin at anytime. You can also skip a month if you want.

SPECIAL OFFER FROM ME:
Sign up by August 10th and be entered into a drawing to receive a kit from a past month.  I will draw one name from those who start a new subscription by August 10th and designate me as their demonstrator.