Showing posts with label punches. Show all posts

Friday, August 21, 2015

Quick Haunting Favor Boxes

I wanted to show up a few more of the prints in the Happy Haunting Designer Series Paper.  What better way than with a quick project.


I made these boxes with the Gift Box Punch Board.  I used a 6x6 piece of cardstock to make a 1.75" box.  They are simply tied shut with a piece of ribbon.  I made the tags with the Sweet Haunting Stamp Set.  By using markers to color the stamp I was able to use just the decorative border on the stamp.  This let me write my own tombstone names on the tag.  Simple and fast for personalized classroom or party favors.

Thank you for joining me this week for a sneak peek at some Halloween themed products coming soon in the Holiday Catalog.

PRODUCTS USED:
Built for Free Using: My Stampin Blog


My Demonstrator Website

Thursday, August 20, 2015

Boo Card

Many times when making a project I make some of the parts more than once.  For yesterday's doorknob banner I made the "BOO" pumpkins a couple times.  I didn't want the other one to go to waste, so I looked around on my desk for more things to use.  I found a Rich Razzleberry oval (from a project I have yet to share) and the following card was born.


I am in love with the Happy Haunting DSP (#139584).  The prints are so much fun.  The bat was made with the Sweetheart Punch (#133786).  I punched out a heart then moved the punch up to cut out just the top part to look like wings.  The grass at the bottom is done with the Fringe Scissors (#133325).  This would make a great card for your child's teacher or grandchildren who live far away.
PRODUCTS USED:
Built for Free Using: My Stampin Blog


My Demonstrator Website

Tuesday, August 18, 2015

Candy Bar Halloween Treat

I have another project today with the Sweet Haunting Stamp Set.  Just like the title of the stamp set, this project is sweet.  One of the Note Tag Punch shaped stamps in the set says "DEATH BY CHOCOLATE", so of course we need a chocolate treat.  How about a full size Hershey bar?  I can think of lots of people who would want one of these everyday.


I first wrapped the chocolate bar with another piece (5-1/2" x 5-1/2") from the Happy Haunting Designer Series Paper.  The new Tear and Tape adhesive is wonderful for holding bent papers closed.  This is the other half of the Spider Web Doily from yesterday's project.  I then layered a 1/2" strip of Rich Razzleberry on the bottom and put a couple pieces behind the Tangerine Tango tag piece.  (Exciting New Product Coming--The black ink is a new Archival Black Ink Pad.  Stamps a true black color for those who have been getting a purple tint from our standard Basic Black Classic Ink Pad).  There is a long piece of Black Stitched Satin Ribbon that loops around the candy bar to pull it out of the sleeve.   


Here is the set of projects together.  I love how you can cut the Spider Web Doilies into two pieces to get even more projects and still have a good size impact on your project.  I forgot to mention you get 24 of those doilies in a pack for only $4.50.  What a deal for making a classroom full of treats.  Cut them in half and get two classes of treats for your kids.

PRODUCTS USED:
Built for Free Using: My Stampin Blog


My Demonstrator Website

Friday, June 5, 2015

Sprinkles of Life --6x3

I have one more Sprinkles of Life card to share with you this week.  I wanted to make a nice tall ice cream cone and figured what better way than to make a tall card.


The inspiration for this one also came from the sentiment.  The card base itself is 6x6 scored in half at 3".  I used Chocolate Chip, Whisper White (stamped with Smoky Slate), Watermelon Wonder, and Cucumber Crush (with Chocolate Chip sprinkles).  The cone is tone on tone Delightful Dijon.  I cut the cone out with scissors and the ice cream with the Tree Builder punch.  Two pieces of the Lace Trim are put together for the lower band.  You can easily step up this card further with a cherry on top (Tree Builder Punch) and a small button with twine next to sentiment.

Tomorrow is my Catalog Kick-off Party.  If you are in Lawton, OK look on my demonstrator website event page for more information.

My Demonstrator Website

PRODUCTS USED:
Built for Free Using: My Stampin Blog

Thursday, June 4, 2015

Sprinkles of Life --cont.

This stamp set is popular.  Stampin' Up! truly put a lot of thought into the design on this one.  The fact that $3 is donated to Ronald McDonald House Charities every time someone purchases the stamp set, really puts the cherry on top.

I love that the images have so many obvious multiple uses.  Yesterday I used the image as the top of a cupcake, today it is easily used as the clouds.  I wanted my clouds to be less stated, so I stamped the Smokey Slate ink off on my works space before stamping on the card.  They are really light in the photo, but show perfectly in person.  We have had a lot of rain here and I didn't want my clouds to look like they may bring forth a storm randomly.

The tree trunk was stamped in Chocolate Chip on the Whisper White cardstock.  The top of the tree is Cucumber Crush stamped tone on tone and then punched out with the Tree Builder punch.  The punch does punch out the tree truck, but I chose not to do that this time.  The little flowers stamp with the leaves and grass in a bunch of three.  Then the flower itself is stamped one at a time, so you can change up the color or placement easily.  The set contains a bird and an apple that can also be punched out with the tree builder punch.  As I sad yesterday, there are so many sentiments in this set of 22 photopolymer stamps.  I have plans for this card.

PRODUCTS USED:
Built for Free Using: My Stampin Blog


WEEKLY SPECIALS:
Built for Free Using: My Stampin Blog


My Demonstrator Website

Monday, June 1, 2015

Bohemian Tribal Pattern

We are one day away from the New Stampin' Up! Catalog going LIVE!  Have you decided what you want first.  As a demonstrator, I love being able to order a few things early.  Let me know if you would like more information about becoming a SU! Demonstrator, so the you can take advantage of pre-ordering from the Holiday Catalog.  You can also click the Join My Team tab at the top of this page.

Today I have another card using the Bohemian Borders Stamp Set (#138938).  You can use all the little pieces separately or layer them on top of one another as I did here.  This color combination and pattern reminds me of early Aztec tribal fabric.  I picture it on woven tapestries handing in the village.  I stamped the different images in Rich Razzleberry, Bermuda Bay and Delightful Dijon onto Very Vanilla Cardstock.  The Delightful Dijon boarder on the left is stamped onto Delightful Dijon cardstock for a simple tone on tone look.  The strip on the right is Rich Razzleberry 1/4" Cotton Ribbon (#134564).  It adds just the right amount of texture to an otherwise masculine card.

TIP FOR THE TAG:  Don't recognize the punch background for the tag?  I made it using the Decorative Label Punch (#120907)  I punched out a piece of Bermuda Bay scrap and then using a post it note to help hold the piece I put it back in the punch.  When you punch it twice it gives the perfect little end tabs to attach to your card with some Silver Mini Brads (#122941) leaving the perfect space for the Word Window Punch (#119857) sentiment.  The sentiment is from the And Many More Stamp Set (Wood #134273, Clear #134276).  I do recommend getting this stamp set in wood.  It helps with the mounting and cleaning of small sentiments.  It also helps to keep them from getting lost.

PRODUCTS USED:
Built for Free Using: My Stampin Blog


My Demonstrator Website

Monday, May 25, 2015

Celebrate Baby!

I pulled out the Celebrate Today Stamp Set (#137138) from the occasions catalog.  This stamp set is wonderful for birthday cards and other reasons to celebrate.  The stamp set contains words useful for wedding, graduation, and baby also.  I decided to go with a baby card today.


I stamped the solid balloon image in So Saffron and stamped the "baby" banners in Calypso Coral on top.  The set also comes with the accessories to put a bow, string, tail or basket on the balloon.  There is a coordinating set of framelits (#137362) to help cut out many of the shapes.  You can save 15% by purchasing the stamp set and framelits as a bundle (#138869).  I created the stars side with the Confetti Stars Boarder Punch (#135861) and put a piece of Gold Foil Sheet (#132622) behind to show through instead of the Pear Pizzazz card base.

While I made this card in a gender neutral color scheme, it could very easily be done with pinks, blues, or nursery colors.  All of the products I used are available today and will carry over into the new catalog starting June 2nd.

PRODUCTS USED:
Built for Free Using: My Stampin Blog


My Demonstrator Website

Wednesday, July 24, 2013

Convention Swap #1

I got back a couple days ago from Stampin' Up! Convention 2013 in Salt Lake City.  I have finally gotten a few hours of solid sleep and can think more clearly.  I have so many ideas it has been hard to decide where to begin.  I have updated my class schedule and uploaded all my photos to my computer.  I took over 700.

"Be the Difference" was the theme of this years convention.  It has encouraged me to think out of my comfort zone in my business and community.  Over the next week or so I will share more of the photos I took at convention.  For now, how about a card.


This is one of the 5 cards I made to swap with other demonstrators at convention.  This was my largest group as I made 216 of this card.  That is 432 flowers stamped and punched, 432 dimensionals, 216 stamped sentiments, 216 cuts of ribbon, 216...of my gosh it was tiring the first time to remind myself again.  I made this card for swapping with my StampersExpress Family, the shoebox swap with my Stampin' Addicts friends, and for general floor swaps with anyone with a card to trade.

It is a fantastic card and the saying can have so many meaning and uses.  It is from the "Feel Goods" stamp set in the Annual Catalog.  You can easily change the card for any color collection.  Just use the coordinating buttons, pack of DSP, and ink.  The coolest thing about this card is the ease of making them in bulk.  There are 72 buttons in a pack of Designer Buttons (available in all 4 color collections--I used Bold Bright).  The beautiful chevron ribbon (I used Marina Mist) cuts into exactly 72 five inch pieces.  You can get 48 cuts from one sheet of Designer Series Paper (Polka Dot Parade DSP) and 28 cuts from one sheet of cardstock (Real Red embossed piece).

PRODUCTS USED:
Stamps:  Feel Goods (WM #131916, CM #129684), Flower Shop (WM #130939, CM #130942)
Ink: Real Red #126949, Dafodil Delight #126944, Stazon Black #101406
Cardstock:  Whisper White #100730, Daffodil Delight #119683, Real Red #102482
Accessories:  Pansy Punch #130698 (available as a bundle with the coordinating stamp set on pg 95), Polka Dot Parade Designer Series Paper #126902, Bold Bright Buttons #130028, Rhinstone Basic Jewels #119246, Dimensionals #104430, Marina Mist 3/4" Chevron Ribbon #130016, Fancy Fan Embossing Folder #127751, Big Shot #113439

Wednesday, October 31, 2012

Happy Halloween--Boo Wreath

Happy Halloween everyone.  I have been wanting to make one of these wreaths for sometime now.  I was able to sit down for 4 hours the other day and make this one.  Now that I have done one, I am sure the next won't take quite as long.  Most of my time was spent planning and getting my kids out of my craft space.

All of the rosettes were done with the Designer Rosette Die.  Though I didn't use the decorative edge area of the die, it made scoring all the fold lines much faster.  The larger of the rosettes were all made with solid colored pieces of cardstock cut at 2" x 11".  Each rosette used two strips of cardstock.  The smaller rosettes were made with two strips of 1-1/2" x 12" pieces of Howlstooth & Scaringbone Designer Series Paper from the Holiday Mini Catalog.

Here are a few close ups of the details on the rosettes.  I used a variety of accessories to decorate each rosette, including ribbons, glimmer brads, and buttons.  The "BOO" Banner was cut with a retired set of Big Shot Alphabet.  I chose this one as I wanted larger letters.  I have another wreath in the works that will use the current Big Shot Alphabet in the catalog.  I used the center  piece left from the "O" to make the eye.  I put a smaller black circle on top of the center and cut it down to be at the bottom of the eye area.  The Large Basic Pearl finishes off the detail.  The straw is Crumb Cake cut into thin strips and crumpled up.  There are also bits of Crumb Cake Tulle stuck under the edges of some rosettes.


The entire thing is held together with some two way glue pen and a whole lot of Hot Glue.  The new Silicone Mat makes this a much easier process.  I found the wreath form at the holiday sale area of a local big box retailer.  Think big red and white circles.


PRODUCTS USED: *Denotes Holiday Mini Catalog
Stamps: NONE
Colors: Basic Black, Basic Gray, More Mustard, Tangerine Tango, Very Vanilla, Crumb Cake, *Howlstooth & Scaringbone DSP (#126906).
Accessories:  *1/2" Striped Satin Ribbon (#127937), Linen Thread, 1/8" Taffeta Ribbon, Seam Binding, *Crumb Cake Tulle (#127840), Brights Designer Buttons, Basic Glimmer Brads, Brights Glimmer Brads, Circle Punches (3/4", 1", 1-1/4", 1-3/4", *1-1/4" Scallop (#127811), 1-3/4" Scallop), Piercing Tool
 

Wednesday, February 8, 2012

Cupcake Valentine

This could easily be a Birthday card, but was created as a Valentine Card.  A friend of mine loves cupcakes.  The layout is a classic one for any 2x2 sized image.

To put a little more focus on the cupcake I matted it onto a small piece of chocolate chip set into the embossed Designer Frame.  The frame comes as a set of two, the other one being an oval.  The base of the cupcake was stamped with the Create A Cupcake stamp set before being punched with the coordinating punch.  The top and cherry is punched straight from the colored cardstock, though there are corresponding images in the stamp set.  If you have not tried the Baker's Twine, you should add some to your next order.  For only $2.95 you get 25 yards of twine.  It comes in 8 great colors including all of the 2011-2013 In Colors.  I used the Cherry Cobbler for this card.  The word Love! is part of a saying in the Loads of Love stamp set.
Valentine's Day is a week away.  Make one for your special friend today.

Products Used:  
Stamps: Create A Cupcake (wm#121915, cm#121982), Loads of Love (wm#115022)
Colors: Pink Pirouette, Cherry Cobbler, Confetti White
Accessories: Perfect Polka Dots Embossing Folder (#117335), Cherry Cobbler Baker's Twine (#123125), Cupcake Punch (#121807), Word Window Punch (#119857), Modern Label Punch (#119849), Big Shot (#113439), Set Designer Frames (#123130), Dimensionals (#104430)


Tuesday, February 7, 2012

Bird Punch Artwork

One of my club members and friend, Carol, brought these to my workshop the other day.  She works for the Wildlife Refuge in Comanche County.  She made all of these using the Two Step Bird Punch.  She punched the pieces from various colors of cardstock scraps and then added highlights and details with markers.  I don't know the names of all the types of birds, but they are done to be somewhat realistic in nature.
She did such a fabulous job, I had to show all of you.  Please leave a comment for Carol here and I will be sure to pass them on. 


Friday, January 21, 2011

Stamp Club Valentine Scrapbook Page

Each month my Stamping Club makes one card, one 12x12 scrapbook page and one 3-D item. I showed you the card yesterday and the 3-D item will be posted tomorrow. That leaves the scrapbook page for today.
This month's scrapbook page featured the Lots of Love Letterpress Plate found in the Winter and Occasions Mini Catalog. It is best used with watercolor paper, but I have gotten good results with the naturals cardstock shown here. The Letterpress Plates give a DEBOSSED image. This means the image is pressed into the cardstock, as opposed to am embossed image where you raise the cardstock image.
TIPS: When using the Letterpress Plates it is advised that you use a clean cutting plate. This is because the plate will press into the cardstock to make the impression. If the cutting plate has a lot of scratches on it from previous cutting, they could transfer to the debossed image. Since the naturals cardstock is thinner than the advised watercolor paper, I placed a shim of cardstock between my project paper and the cutting plate. The sandwhich I used is (from the bottom up)...multi purpose platform, Letterpress Plate, project cardstock (face down), cardstock shim, clear cutting plate.
The letterpress plates are also best used with Craft Ink. You can use the Stampin' Spots to single out small areas. To cover the entire plate you may wish to make your own large craft pad with a Craft Ink refill and an uninked stamp pad. Since the craft ink dries slower, you have time to transfer the ink from the letterpress plate to the project. All of the areas without ink will still deboss into the cardstock. The decoration in the close up photo was made with two scallop circles. To learn how to make these easy accents, consider hosting your own workshop or joining my Stampin' Up! Team. They can be made in several sizes and have a limitless number of uses.
The bottom of the page features a Pinking Hearts Border Punch and an Extra-Large Tag Punch. The stamps used are from the "XOXO" stamp set found in the Occasions Mini Catalog.

Products Used:
Stamps: XOXO(#121909 Wood, #121973 Clear)
Cardstock: Natural White, Pretty in Pink, Rose Red
Ink: Rose Red, Pretty in Pink
Accessories: Big Shot, Lots of Love Letterpress Plate (#120983), Extra-Large Tag Punch (#119866), Scallop Circle Punch (#119854), 1-3/8" Circle Punch (#119860), Pretty in Pink Satin Ribbon (#117289), Dimentionals (#104430), 3/4" Circle Punch (#119873), Small Heart Punch (#117193), Bone Folder (#102300), Pinking Hearts Border Punch ((#117649)


Thursday, September 23, 2010

Spooks-Scrapbook Page

Before we get started with todays project, don't forget to enter my BLOG CANDY. The winner will be drawn on Friday night.
This is the scrapbook page we made at stamping club last weekend. I placed it in a shadowbox frame I got at the local craft store. Below you will find a couple tips for the techniques on this page.
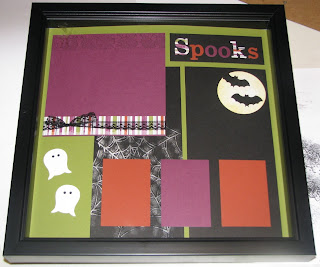
The scrapbook page is 12x12. I wanted to incorporate a few things I have learned recently. I have had a lot of fun working with the Web Embossing Folder. I was having some problems figuring out how to use it on a scrapbook page. My problem is that it is only the size of a card front. I didn't want to have a web that led to nowhere. To solve the probem, I cut the black cardstock into two pieces. The original design was going to follow a somewhat progressive page layout, so the black piece was 8-1/2 x 11. I decided it would be better as a more square shape. Instead of going with an 8-1/2 by 8-1/2, I compensated for the extra gap between the two halves and cut it 9 x 8-1/2. Then cut in half at 4-1/4". This way I could emboss one portion of the area with the embossing folder and feel like the web didn't stop abruptly. To make the web stand out a little more, and have a shimmer to it I coated it with some shimmer paint.
TIP #1: To coat the web with shimmer paint, I used a spounge dauber. I first dabbed the paint onto my scrap paper then onto my web area. Don't dab too hard or you will get circle marks from the dauber. You could try a spounge, but I felt like it covered to much area for me and I didn't have enough control. By dabbing it on the scrap paper first it help to tone down the paint. It is always easy to add more, but once it is there you are stuck with it. I did want more in the center of the web.
To make the moon is simple. I punched out a 2-1/2" Circle with the new punch in the Winter Mini Catalog. Then using a stampin' spounge I added some Daffodil Delight Classic Ink to the edges. The bats were punched with the bat punch. In retrospect they should be on dimensionals.
The ghosts are one of my favorite things that creative demos have come up with. It is actually the owl punch upside down and his feet cut off. I punched a couple of eye holes with my crop-a-dile and then put a scrap of black behind his head to show through the eyes. I also love to use my wheels when I get a chance, so there is a strip of the Web Stampin' Around Wheel at the top of the 6x6 area.
TIP #2: This has to do with the title letters. I made them with my Big Shot and Timeless Type Junior Alphabet. Whichever print you want to show on our page, needs to face the die when you cut the letters out. Personally, I cut with my die facing up. It makes it easier to place my scraps of cardstock on the area I want to cut. So the design I want to show on my projects, must go down on my die.

Products Used:
Stamps: Web Stampin' Around Wheel (#115666)
Ink: Daffodil Delight (#119667), Black Stampin' Around Cartridge (#104581), Platinum Shimmer Paint (#116807)
Cardstock: 12x12 Old Olive (#119934), Basic Black (#121045), Rich Razzleberry (#115316), Cajun Craze (#119684), Whisper White (#100730), Wicked Fun Specialty Designer Series Paper (#117400)
Accessories: Timeless Type Junior Alphabet (#115951), Raven Lace Trim (#120988), Bitty Bat Punch (#119279), Two Step Owl Punch (#118074), Web Embossing Folder (#120889), Spounge Daubers (#102892), Stampin' Spounges (#101610)

Wednesday, April 16, 2008

Life's A Breeze

Here are two simple cards that look complicated. They both have the same concept and used the same stamp set.
The card base is Sky Blue. I then wheeled the "Something Fishy" jumbo wheel onto the Ballet Blue cardstock using Ballet Blue ink. I placed the wheel so it was somewhat off the bottom of the strip. I didn't want that wide of a strip to be on my card. I then tore the top edge to mimic the top of the water.
Little by little I tore a piece of Creamy Caramel cardstock to form the beach. I tore a little bit and then a little more so it lined up where I wanted it to. It is always easier to tear more than to start over, so don't tear too much the first time.
Using my markers, I colored in the various objects from the "Life's A Breeze" stamp set. I stamped them out on Whisper White cardstock before cutting them out. I drew a few lines on the beach with my Creamy Caramel marker to simulate sand edges. On the second card I also edged the beach with Close to Cocoa.
The sun is simple. Take a small square of Summer Sun and stamp the words in the corner. Then punch it out with the scallop circle punch to form the sun edges.
It sounds complicated and lots of steps, but these cards came together very quickly. You can do as much or as little as you like. It can also be easily expanded into an entire scrapbook page.

Wednesday, April 9, 2008

Same card--Three openings

For club the other night we used chipboard for one of the projects. I was done making the sample and laid it down on the table. When I looked at it, the card was now facing a new direction. I thought, well that could work also. I couldn't decide which way I liked better. I figured why not let the club members choose which way they want to make the card face. One of the members mentioned to me that she missed the month we did center opening cards. This one was perfect so I made a third sample really quick and all are pleased.
The only real difference in the three openings is which side you stamp the stars and where the score line goes.
For the first two the score line is in the middle at 4-1/4". The stars are stamped at the top by the fold (card #1-bottom opening) or by the opening on the side (card #2-side opening).
For the third card (center opening) score the card base twice, 2-1/8" from each side. Now the two sides should meet in the middle. The blue and red panel covers up the small gap in the center. The card is shown slightly open.
For all the cards I used the corner rounder with the guide taken off to make the scallop edge. The wide strip of red is 5/8" Red Grosgrain Ribbon. The star chipboard piece was coated in Whisper White Craft ink. There is a small star rub-on in the center of the red star punched out with the large star punch and then adheared to the chipboard piece. The stamped stars are from the set "Classic Backgrounds".
Try taking one of your cards today and turning it or making a center fold.

Monday, April 7, 2008

Last Baby post for awhile

I know it has been all baby this last week here. This is the last item I have to show you. It was a card I made quickly one morning to go with her gift. I had a few of the "Nursery Necessities" stars on scallops left over after making the diaper cake. This one came together very fast. This layout is classic and works for any quick card.
The pattern paper is from "Spring Fling". I like the color combination of the bashful, celery and banana. I folded down the edge to reveal the other side of the paper. A quick sentiment from the same stamp set, two brads and done.

Thursday, April 3, 2008

Diaper Cake

Stamping can be used in many decorative ways and this was fun to make. It is the centerpiece at a baby shower I am hosting this weekend. It is made entirely of diapers. Some plans for diaper cakes show them as being unfolded, placed around the wheel of diapers and then held together with rubber bands. For this one I kept the diapers folded in half and held each round with cardstock strips and sticky strip. I also liked how it gave a ruffled edge look to the cake.
Most diaper cakes are then decorated with small baby items. I decorated mine with stamped images. I stamped the star from "Nursery Necessities" in three different colors (Barely Banana, Certainly Celery and Almost Amethyst). I punched them out with the large star punch and layered it on a Bashful Blue 1-3/8" circle and a Whisper White Scallop Circle. The stars are up on dimensionals and the whole thing is attached to the Bashful Blue strips around the cake with dimensionals.
I can't tell you how many diapers are in the cake as that is one of the games this weekend. I will tell you that each layer is a different size diaper. I started at the top with a few of the smallest size. On my table I layed out the strip of cardstock to go around the next layer and then layed down the diapers in a long fan. I rolled the diapers around the center with the aid of the cardstock. I had to do this several times to get them just right. For each tier I started the same way and then just added more layers of diapers and cardstock strips to hold it in place.

Saturday, March 8, 2008

baby shower invites

I haven't posted in awhile, but I sure have been stampin' a lot. I have been working for the better part of the last few days on my good friends baby shower invitations. I am one of the hostesses of her party and wanted to make these invites special. I made the trial one before starting mass production. I didn't feel like it took too long, so I thought 20 wouldn't be too bad. Yeah, I was wrong. Still, I love them and wouldn't have changed a thing even if I knew they would have taken even longer.
There are two pictures. One is a close up of the closed invite. The other you have to imagine what is behind the envelope (also stamped). I didn't want to reveal any personal information of the other hostess, so the envelope covers the open invite. You can still see the tag coming out of the top and how the sailboat folds up to reveal the time and place of the party. The mom-to-be's registry information and such is on the back of the invite.
The sail boat was colored with markers and stamped onto Whisper White cardstock, then cut out and layered on Confetti White and Barely Banana. The back of the card is Confetti White, which is also revealed when the tag is pulled up. The stars on the front are stamped in the Sky Blue Classic Ink. The full tutorial for how to make one of these cards can be found here.
Stamps: Nursery Necessities, Sincere Salutations
Paper: Bashful Blue, Barely Banana, Confetti White, Whisper White
Ink: Sky Blue, Bashful Blue, Barely Banana, Mellow Moss, Basic Black
Accessories: Scallop Circle Punch, 1 3/8" circle punch, Paper cutter with scoring blade, Jumbo Pewter Eyelets, Bashful Blue Striped Grosgrain Ribbon, Dimensionals

Sunday, March 2, 2008

Stamp Club Projects

WHAT A BLAST!!! It was a crazy night, but we all had fun. Saturday night was stamp club. All us had our kids due to various reasons. There were 14 kids from the age of 1 1/2 years to 16 years in my back yard and one infant in the pack-n-play inside. The 7 ladies in attendance seemed to have a good time while their kids played. Here are the three projects we made.
The easter card I showed you last week. It took us some time to share the markers and color our eggs, but we got through it. The Leprachaun I got from someone on SCS. It was fun to make a card with all punches and a wheel. The last project was a scratch-n-sniff sticker. We made the little tag and then tied it to bags of jelly beans before quickly hiding them from our kids.
For those in the area our next club workshop is on April 5th. You are welcome to join us for a small project fee. I will refund your project fee if you place a $30 product order. I also have a scrapbook class coming up on March 15th. Check out my SU! website calendar (http://www.fastamper.stampinup.net/) or send me an email (fa_stamper@sbcglobal.net) for more info.

Friday, February 29, 2008

March Card Kit --"Priceless"

Images Copyright Stampin’ Up! 1990-2008, Designed by Jackie Bolhuis

Do you love having cardstock pre-cut for you? Then this is for you!

I am expanding my business into monthly card kits. With the Monthly Card Kit Program you will receive crisp, new ideas that are sure to inspire your creativity. This month’s card kit items are listed below, and the price of the Card Kit is $15. This kit includes all of the consumable supplies you will need to create 12 cards. Shown above is just 1 example of a card you can make with your kit. Purchase the kit, and receive 3 additional full color samples for “alternative” cards you can make with the contents of your kit! In addition, you’ll receive detailed, step by step instructions on how to complete each of the 4 card designs.

Already have the inkpads and stamp set needed to make the cards in this kit? Just buy the Card Kit! Don’t have some (or any) of these items? See the “Add-on Products” list to pick out and order what you need to complete the cards. Just want the Card Kit to make your own designs? Go for it!

Orders for the Card Kits must be received by March 15th. You will receive your kits by the end of the month.

Special Offer for March! Purchase the Card Kit and receive the Coordinating Set at 15% off!

The Card Kit ($15) Includes:
§ 12 Pieces of 5 ½“ x 8 1/2” Kraft Cardstock
§ 12 Pieces of 4” x 2 ¼” Wild Wasabi Cardstock
§ 12 Pieces of 3 ¾” x 2” Groovy Guava Designer Paper (Patterns may vary)
§ 12 Pieces of 2 ½” x 3 ½” Purely Pomegranate CS
§ 24 Pieces of 2 ¼” x 3 ¼” Whisper White Cardstock
§ 12 – 4 ½” Pieces of Wild Wasabi Striped Ribbon
§ 12 – Whisper White Medium Envelopes
§ Step by Step Instructions to complete 4 different card designs using the kit pieces


Add-on Products:
§ Wild Wasabi Classic Ink Pad ($5.25)
§ Purely Pomagranite Classic Ink Pad ($5.25)
§ Groovy Guava Classic Ink Pad ($5.25)
§ Key Tag Punch ($15.95)
§ Priceless Stamp Set ($25.95) $22.06 with the purchase of the Card Kit

Other Optional Purchases:
§ Stampin’ Dimensionals: for raising images for a 3-D effect


Please Note: I am glad to ship kits directly to you! If the kit needs to be shipped, there will be an extra $3 shipping charge.

Contact me (fa_stamper@sbcglobal.net) today to order your Card Kit and see how quick and easy card making can be right in the comforts of your home!