Wednesday, August 28, 2013

Envelope Bag--SA Recycled Challenge #2

Stampin' Up! has a fantastic new product coming out on September 1st, an Envelope Punch Board.  You can make 66 different sized envelopes from a piece of paper.  The measurements are right on the Punch Board for all the envelope sizes.  So easy to use and the tools are all part of the system, no changing things in and out to finish your custom envelope.

It is fantastic for making envelopes, but you can make other things with it as well.  I made a custom 5" by 7" envelope and turned that into packaging for some cards.  You can see a wonderful video for this on Stampin' Addicts.  First I closed all the seams of my custom envelope with sticky strip.  Then, I scored three sides of the envelope 1/2".  The forth side I cut off just enough for it to open.  When you fold it open you get this cute little 4-1/2" x 6" x 1" box.  Fits standard cards and envelopes perfectly.    I then stamped all over the front with my Gorgeous Grunge Stamp Set and Off the Grid Stamp in Crumb Cake, Early Espresso and Illuminate Glimmer Ink (shows better in person).    A quick torn belly band and a simple Thanks! label with the Window Frames Collection Framelits.
You can see more Envelope Bags on Pinterest.  Go to the Recycled Challenge #2 board on the Stampin' Addicts Page.

PRODUCTS USED: 
STAMPS: Gorgeous Grunge (WM#130514, CM#130517), Yippee-Skippee (WM#131341, CM#131344), Off the Grid (#130736)
COLORS: Pumpkin Pie, Crushed Curry, Crumb Cake, Early Espresso, Soft Suede, Very Vanilla, Illuminate Glimmer (136857)
ACCESSORIES: Crushed Curry Chevron Ribbon (#130019), Window Frames Collection Framelits (#129021), Big Shot (#113439) 

Order Online 24/7 at My Demonstrator Website

Tuesday, August 27, 2013

Stampin' Addicts now on Pinterest- Recycled Challenge #1

You have heard me mention my friends at Stampin' Addicts many times.  I just love this group of ladies.  We have started our own page on Pinterest so you can easily find projects by these wonderful stampers.  There are boards for our most recent Blog Hop and a few challenges we sponsor.  More boards for past Blog Hops will be added, so you can see all the talented projects in one place.

Simply type Stampin' Addicts into the pinterest search engine and look for our logo.

Here is the projects I did for the Recycled Challenges #1 board.

The challenge was to use the sketch to create your own card.  I used the Festive Flurry Stamp Set from the Holiday Catalog.  I stamped the 3 smaller images in Pool Party, Coastal Cabana, and Silver Encore Ink.  Check out that envelope too.  I used a sheet of the Winter Frost Paper Stack and cut it out with the Envelope Liners Die.


PRODUCTS USED:
STAMPS: Festive Flurry (WM#131778, CM#131781), Tags 4 You (WM#131820, CM#131823)

COLORS: Pool Party, Coastal Cabana, Bermuda Bay, Silver Encore (#132142), Whisper White, Silver Glimmer Paper (#124005), Winter Frost Paper Stack (#132183)
ACCESSORIES:  Label Bracket Punch (#132153), 1-3/4" Circle Punch (#119850), Bermuda Bay 1/8" Taffeta Ribbon (#131206), Dimensionals (#104430), Envelope Liners Die (#132172)


Order online 24/7 at My Demonstrator Website

Monday, August 26, 2013

UPCOMING BANNER CLASSES

Have you seen the Build-A-Banner products in the Holiday Catalog.  How totally cute are these?  I could not resist and got all of the items, then sat down over the weekend and made 3 banners.  One each for Halloween, Thanksgiving, and Christmas.  I had so much fun making mine, that I thought it would be great to have a class for everyone to make their own.

Each banner is Approximately 3 Feet long.  Each flag measures 5" by 7".
December 7th--"Joy" Banner
October 5th--"Spooky" Banner
November 2nd-- "Thanks" Banner
"Give" additional $5 
WHEN:  These classes will be held as a 3 part series on the first Saturday of each month (Oct-Dec) @ 1:00pm.  Please give approximately 2 hours to assemble your banner at the class.  Some people may work faster, others slower, and some supplies need to be shared.  You can sign up for one, two or all three classes. 

WHERE:  All classes are held in my home on AMR.  Classes will be limited to 8 participants at each class. 

COST:  Each class is $25* (see November class note below) with payment due 10 days before the class date.  Prepay for all three classes by September 25th for only $70 and receive the “give” banner tier for free.

*November class is for the “thanks” tier.  You can add the “give” tier for an additional $5 or receive it for free with prepayment for all three classes by September 25th.


THINGS TO BRING:  Absolutely nothing.  All supplies will be provided at the class. 

HOW TO REGISTER:  You can email me at fa_stamper@sbcglobal.net, call me at (580)483-3758 or leave me a message on my business FACEBOOK page.  Search for Kathleen Brill-Myrice Demonstrator.  I will then contact you for your payment.  Your registration cannot be confirmed until payment is received. 


PRIVATE CLASSES for these banners are available.  Contact me for available dates.  Private classes must have a minimum of 6 people and must be prepaid in full 10 days before class date. 

My Demonstrator Website

Tuesday, August 13, 2013

MDS Tuesday Downloads

Each week Stampin' Up! offers new downloads for My Digital Studio.  If you enjoyed my Halloween Bash projects for the Stampin' Addicts Fall Blog Hop, then you are in for a treat this week.  Stampin' Up! has the Halloween Bash stamp set offered as a digital download now.  You can also get the Witches' Brew Designer Series Paper Digital Download.

Schools are starting back.  Make a cut memory of your child's first day with this cute download.
Have a tropical vacation (or maybe live in Hawaii....lol)?  Check out the Paradise Found Photobook Template.
New downloads available each week.  Check them and all the great Stampin' Up! Products out 24/7 at My Demonstrator Website Store.

Friday, August 9, 2013

Stampin' Addicts Fall Blog Hop

Welcome to stop #7 on this hop.  If you have been following the Hop you just came from Rhonda's Blog.  Isn't she great!  She is a great stamper and I am so blessed to call her my friend too.  If you started here, you can stay here and follow the Hop until it loops its way back around.  If you want to start at the beginning please go to Heidi's Blog.

If you have never seen a Blog Hop before you are in for a treat.  11 Demonstrators from Stampin' Addicts have brought you projects featuring the Fall Products from the 2013 Stampin' Up! Holiday Catalog.  I have 4 projects featuring the Halloween Bash Stamp Set, so lets get started.

What is the first thing we do when having a BASH?  We send out invitations.  I colored the image with my Stampin' Write Markers in Basic Gray, Basic Black and Pumpkin Pie.  The torn edges were colored with the NEW Smokey Slate Marker.  It is hard to see in the photo, but the black background area has a fuzzy texture to it.  Come back next week for tips on how to do that.  The little creepy crawly fellow is from my Halloween decorations.  A cheap embellishment this time of year.  And how about that envelope?  The NEW Envelope Liners Framelit Dies can make any envelope just jump out at you.

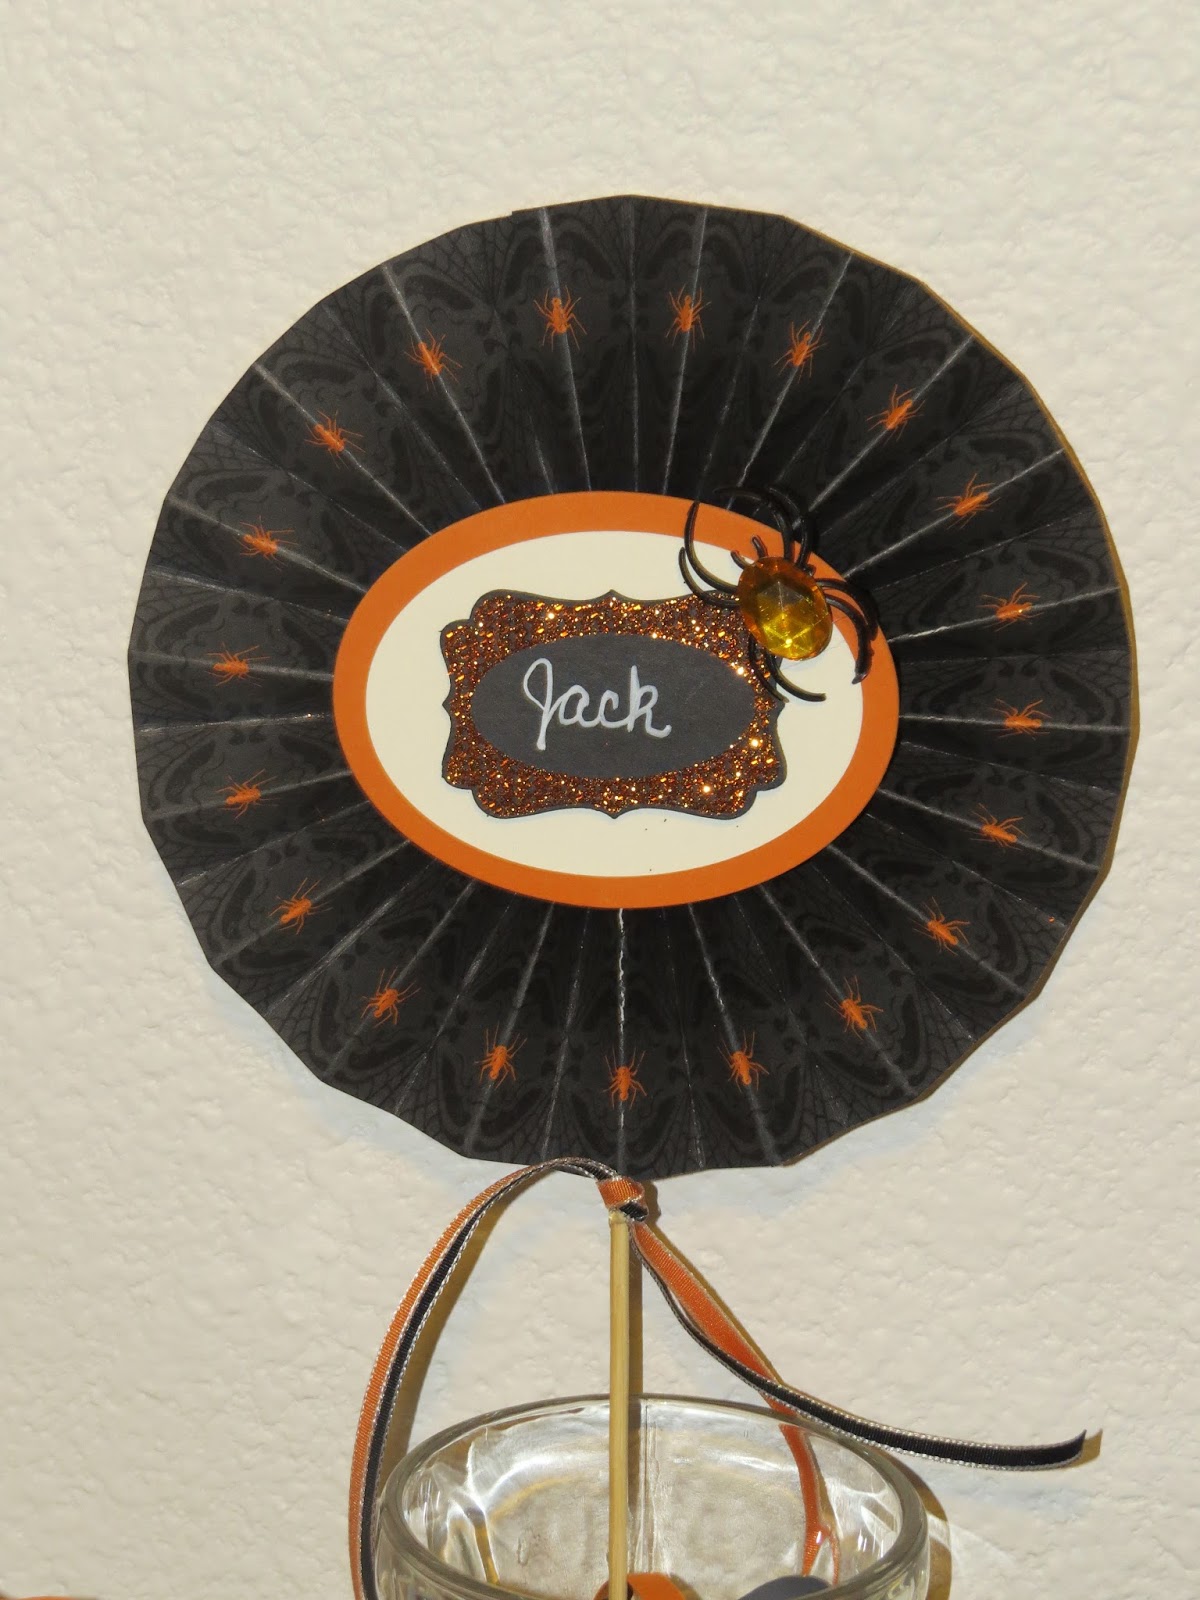
We want everyone to find their place at the party.  Here is a fun decor project.  I made the rosette using the Witches' Brew Designer Series Paper.  I lined up the paper in my Paper Cutter, so they spiders on the print were near the outer edge.  I then used my scoring tool to score the fold lines.  There is no perfect measurement to score this at.  I moved the DSP around so the groove of the tool was in the center of the spider or his web area.  I stamped the label in versamark ink, then used heat and stick powder to adhere the orange glitter.  The name is hand written with the NEW Chalk Marker.

Once everyone has found their seat you want to have a little treat for them.  The treat topper features the Label Framelits turned both directions.  Again, I colored the stamp with my Stampin' Write Markers.  Add a little something with a glitter covered background.  (More details on that next week).  For those looking for the worms, I found them in the Hawaiian treat section of my store.  They are Li Hing covered Sour Worms.  "Eat If You DARE!"

To round out our table setting, we have a simple little package for holding the silverware.  A little distress marks from the Gorgeous Grunge Stamp Set.  Be sure to check back next week for more photos and details on how to make these projects yourself.  But now, it is on to the next stop at Mary's Blog where she is going to show you some fabulous uses for the Witches' Brew Designer Series Paper and Washi Tape.

Thursday, August 8, 2013

Blog Hop Sneak Peak

It is one of my favorite times of the year.  BLOG HOP TIME with Stampin' Addicts.  This weekend me and many other fellow Stampin' Up! Demonstrators will be sharing Fall projects with products from the Holiday Mini Catalog.  I just got done with the last project I am showing on this hop.  What does your craft area look like after some fun stamping time?  Here is mine.

Oh you wanted a sneak peak of the projects?  Well?  ........OK!  Here is a glimpse of my projects.  I am featuring the Halloween Bash stamp set.

Be sure to come back on Friday for this fantastic Fall Blog Hop by the Stampin' Addicts.


My Demonstrator Website

Friday, August 2, 2013

Stamp Set of the Month Club--August--"Flower Shop"

I am starting a new class in the mail.  It is the STAMP SET OF THE MONTH CLUB.  Each month I will send out a Kit including a Clear Mount Stamp Set with a value between $16.95-$18.95, three completed cards using that stamp set, and the full instructions (including photos, dimensions and a complete list of products) to make the cards again on your own.

August Stamp Set of the Month--  Flower Shop 

WHAT IS THE COST?  The Stamp Set of the Month Kit costs $30 per month--includes all items listed above, all taxes and shipping in a small priority flat rate box to you.

HOW DO I JOIN?  Simple send an email to fa_stamper@sbcglobal.net  Put "Stamp Set of the Month" in the subject line.  Viola, you have joined.  If you wish to stop you can send another email at anytime.  

WHAT WILL HAPPEN NEXT?  Each month members of the club will receive an email to verify they wish to participate that month.  Respond to that email by the deadline and I will send you an invoice by Paypal to send payment for your membership that month.  If you do not respond to the email or send in payment by the deadline, you will not receive the stamp set of the month kit.  You are always welcome to order the stamp set at anytime, but the monthly kit is only available until the deadline.

WHAT IF I ALREADY HAVE THAT STAMP SET?  You can select an alternative stamp set of equal value that month.  The cards and instructions will still be for the Stamp Set of the Month.

I PREFER WOOD MOUNT STAMPS, IS THIS AN OPTION?  Yes.  There is an additional cost if you would like wood mount stamps.  The cost difference is based on the stamp set retail price that month.  Please notate when you accept the kit of the month that you prefer wood mount stamps.

WHAT IF I NEED OTHER STAMPIN' UP! PRODUCTS WITH MY KIT?  In your email response to accept that months kit, notate any additional products you need.  I will recalculate your order to reflect the additional cost of those products with your kit.  I will send this to you in an email for you to approve before sending you an invoice for payment.

I AM LOCAL TO HONOLULU AND WOULD LIKE TO PICK UP MY KIT.  CAN I SAVE ON SHIPPING THIS WAY?  Please contact me directly for local cost.


My Demonstrator Website

Thursday, August 1, 2013

NEW PRODUCTS START TODAY!

The Holiday Catalog starts today.  Get all your needs for the Fall and Winter Holidays in one place.  This catalog is packed with great products and even better ideas for projects to make with them.  CHECK IT OUT HERE>

Today also marks the start of a NEW PRODUCT for Stampin' Up!  Thinlits Card Dies.  I got the chance to see these in action at Convention.  Oh My Goodness!!  I am ordering mine today.

They've been called flip cards, flip flop cards, swing cards, and more-but they have always been a bit tricky to create. Not anymore! The amazing new Thinlits Card Dies cut and score to create a card that flips in just one step.
ItemDescriptionPrice
133479Label Card Thinlits Die$32.95
133480Circle Card Thinlits Die$32.95


These Thinlits come with more then just the card form die.  Check out the FULL FLYER HERE.


ORDER PRODUCTS ONLINE 24/7 or Check out my Class Calendar at My Demonstrator Website