Showing posts with label cards. Show all posts

Friday, August 28, 2015

Stampin' Addicts 2015 Holiday Catalog Fall Blog Hop

Hello hoppers!  Most of you just came from Tanya's Blog.  Wasn't that a cute stamp set?  So much fun and so many uses.  If you came here directly, don't worry, just follow the links on the hop and it will loop you all the way around back to here.  We love to hear from you about our hops and projects.  You can leave a comment on any of the stops or leave a comment on the discussion thread at Stampin' Addicts.

I am featuring the Sweet Hauntings Stamp Set (#139705) from page 47 of the 2015 Holiday Catalog.  I have had so much fun showing this stamp set on my blog last week and have 3 more projects just for this hop.  There are so many uses for this stamp set.  There are 3 images that fit the Note Tag Punch (#135860), 4 different potion bottles, and 2 sayings that tie everything together.  My family LOVES Halloween.  We enjoy having our friends (of ALL ages) over for a night of spooky food and fun.


First I have a great party invitation for you.  I stamped all of the potion bottles on the front of my card, then colored them in with various Stampin' Write Markers.  TIP:  I used my grid paper to line up all the stamps, then put them on one block so they will be straight when I stamp them.  Under the bottles is a piece of the bat print washi tape from the Happy Haunting Designer Washi Tape (#139608).  I stamped one of the sayings from the stamp set in Cucumber Crush on the bottom.  A few quick tid bits to decorate the upper corner, my party information on the inside and I am ready to invite my guests.

I love to have cute little treats for my kids to take to school.  This is the medium size treat bag from the Gift Bag Punch Board (#135862).  NOTE: The size of the bag refers to the size of the bottom of the bag.  You can make the bag as tall or as short as you like to fit your treats.  Again I stamped several of the bottles at once on the bag, then put another print from the Washi Tape around the bag.  I made a simple topper for the bag.  I folded a piece of Tangerine Tango cardstock in half and attached a Spider Web Doily (#139622) with a glue stick.  I wrapped the extra edges of the doily around the cardstock.  This is the other sentiment from the stamp set, stamped in Rich Razzleberry to match the bag.  The back of the topper is attached to the bag and I used a small bit of velcro to hold the front closed.  


For my party guests I have a treat basket.  I used my markers to color certain parts of the Note Tag shaped stamps.  They make cute tombstone images.  The center one was stamped again on cardstock and cut out to raise it up on dimensionals.  The basket was made with the Berry Basket Die (#137366) from the Annual Catalog.  I tied a piece of Rich Razzleberry Cotton Ribbon (#134564) around the top of the basket.  You can see a piece of Rich Razzleberry cardstock peaking through the slits near the bottom.  I took a 5-1/2" square piece of cardstock, scored it on all four sides at 1-1/4", folded on the score lines, made a few quick slits to shape it into an open box.  I punched a circle in the center of the insert to hold a cupcake.  
I know a picture would be great, but there was an "accident" with the cupcake.  You could of course fill the basket with a bag filled with candy or other treats.  

I hope you enjoyed my projects with the Sweet Haunting Stamp Set.  If you did, please leave me a message below before going to the next stop on the hop.  The next stop is Carmen with some Hall-O-Ween Treats.



My Demonstrator Website

Monday, August 24, 2015

Haunting Fun Fold card

I have a fun card for you today.  The Sweet Haunting Stamp Set has 3 images that resemble tombstones.  So of course I had to make a little graveyard card.


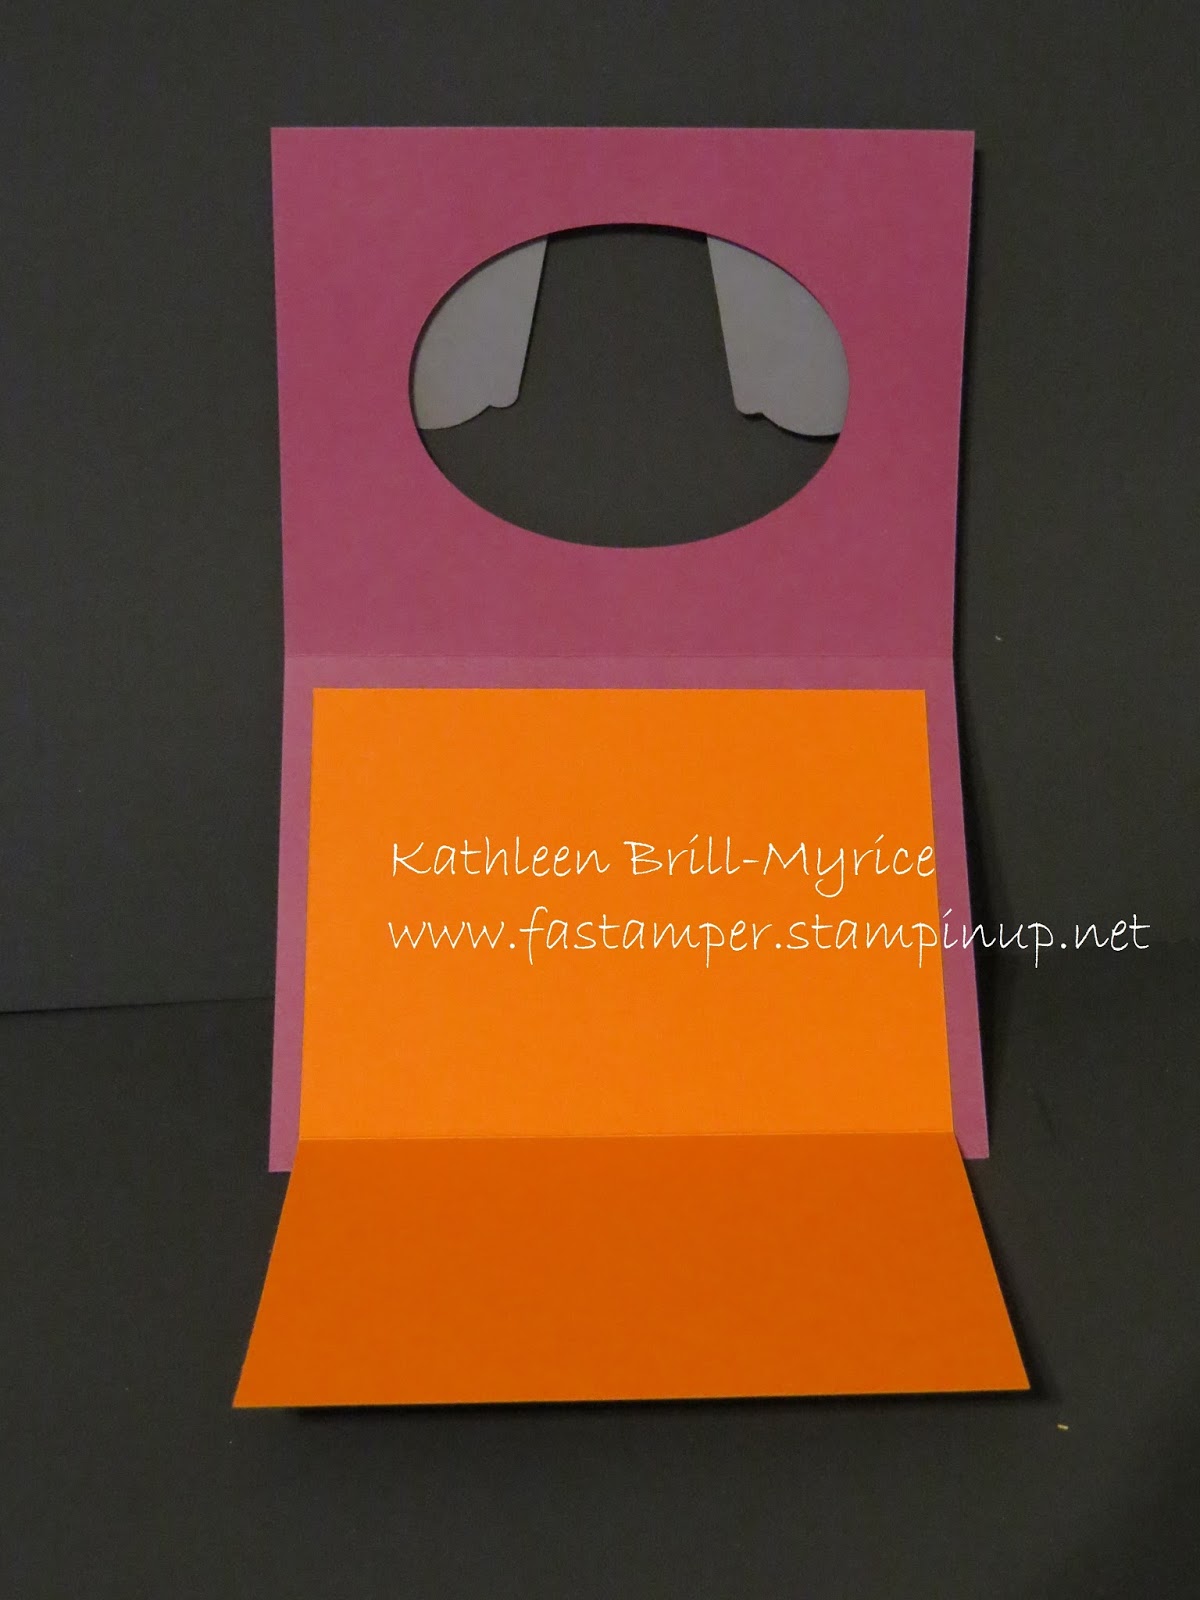
Again, I used a marker to ink just the area I wanted.  Then I wrote in the space.  I first cut the oval in the Designer Series Paper.  I attached it to the card front and cut the oval from the Rich Razzleberry cardstock.  I have another bat made with the Sweetheart punch.  

When you open the card the Happy Halloween tombstone is layered on another print from the Happy Haunting DSP.  But where do you write your message without it showing through the oval?


Well you make it open one more time of course.  The Tangerine Tango panel fold open to reveal a large space for a message.


I hope you have been enjoying my Sweet Haunting projects.  I will be back on Friday with more as part of the Stampin' Addicts Holiday Catalog --Fall Blog Hop.  Many talented stampers will be sharing their creations with Fall/Halloween themed products from the Holiday catalog that comes out next week.

PRODUCTS USED:
Built for Free Using: My Stampin Blog


My Demonstrator Website

Thursday, August 20, 2015

Boo Card

Many times when making a project I make some of the parts more than once.  For yesterday's doorknob banner I made the "BOO" pumpkins a couple times.  I didn't want the other one to go to waste, so I looked around on my desk for more things to use.  I found a Rich Razzleberry oval (from a project I have yet to share) and the following card was born.


I am in love with the Happy Haunting DSP (#139584).  The prints are so much fun.  The bat was made with the Sweetheart Punch (#133786).  I punched out a heart then moved the punch up to cut out just the top part to look like wings.  The grass at the bottom is done with the Fringe Scissors (#133325).  This would make a great card for your child's teacher or grandchildren who live far away.
PRODUCTS USED:
Built for Free Using: My Stampin Blog


My Demonstrator Website

Monday, August 17, 2015

Sweet Hauntings

We don't normally start to think about Halloween too much in August, but it is fast approaching.  As always, Stampin' Up! is here to help.  September 1, 2015 is the start of the new Holiday Catalog and there are LOTS of new things just for the fall season.  So how about a sneak peek?

Sweet Hauntings is a new 9 piece stamp set coming out.  There are 3 images that fit the Note Tag Punch, 2 sayings and 4 bottles of spooky brews.  It is the ultimate set for your quick party treats.  The tag punch images can be punched out and then attached to any box or bag filled with goodies.  Add in the Happy Haunting Designer Series Paper, Washi Tape, and Spider Web Doilies and you have endless possibilities.


Today I have a simple card using one of the Note Tag images.  The patterns in the DSP are too cute.  I just love the little crows atop of the tombstones and the little jack-o-lantern faces are too cute hiding in the print.  I cut a Spider Web Doily in half and glued it on with a glue stick.  I used a Basic Black, Rich Razzleberry and Tangerine Tango marker to ink the stamp.  I punched it out and trimmed it close to the lines, so it could be layered on the shape punched from Rich Razzleberry. The Razzleberry strip across the card is one of the Washi Tape patterns.

This card would be great for a party invitation or to accompany a gift for a co-worker or neighbor.  Be sure to check back all week for more ideas for your Halloween projects.

PRODUCTS USED:
Built for Free Using: My Stampin Blog


My Demonstrator Website

Wednesday, August 12, 2015

"Thank You" Workshop Cards--Day 2

Yesterday I share a couple of the cards from a private workshop I had last week.  Here are the last two cards we made.

I turned to the catalog for inspiration on the next card.  I found this card on page 17 in the 2015-2016 Stampin' Up! Catalog.  If you used the Happy Patterns Decorative Masks (#138313) you will get wonderfully spaced dots.  With 10 people rotating through the card making stations, I didn't want to be cleaning the mask between stampers.  Instead we used the eraser on a standard pencil.  I labeled each pencil for the color of ink used.  We used 5 colors from the Subtles Collection.  Calypso Coral, Marina Mist, So Saffron, Wild Wasabi, and Wisteria Wonder.


The last card uses my new favorite background stamp Watercolor Wash (#138704).  We inked the stamp in Mint Macaron and stamped it on the Whisper White Note Cards (#131527). The die cuts are from the NEW Greetings Thinlets (#138275) and the NEW Bold Butterfly Framelits (#138135).

I had a wonderful time with her team.  If you would like to have a workshop with your group, please contact me.  It can be a church group, a scout group or any group who would love to give handmade cards to someone.

PRODUCTS USED:
Built for Free Using: My Stampin Blog


My Demonstrator Website

Tuesday, August 11, 2015

"Thank You" workshop cards

As I mentioned last week, I had the pleasure of doing a workshop for a long time friend of mine.  She is a consultant for Tastefully Simple and asked me to make thank you cards with her team.

We made 5 cards.  I used a past Paper Pumpkin Kit for the first card.  Remember as a subscriber you can order past kits.  The second card was a pinwheel card.  Here is the original one I posted a couple months back.  This time we made the card using the Everyday Chic Designer Series Paper (#138445).

The third card was a twist on a previous card I shared in June.  The original card had stamped images from the Bohemian Borders stamp set.  This time we used the Bohemian Designer Washi Tape (#138386).

Check back tomorrow for the other two cards we made.

PRODUCTS USED:
Built for Free Using: My Stampin Blog


My Demonstrator Website

Friday, July 24, 2015

Feel Goods Stamp Set--Final Day

I have enjoyed sharing the Feel Goods Stamp Set with you this week.  I have one last card to show you.  This card was a Plan B design.  I originally wanted to show you a new technique today, but it was just not cooperating.  So this is a twist on that technique.  It is also simple, so if you  need a card in a flash this is one for you.


I took my Circle Framelits and cut the 4 smallest shapes out of a piece of transparency.  I then laid the transparency onto a Whisper White Note Card and sponged several circles in So Saffron.  I modes the sheet around and sponged circles in Calypso Coral and Wisteria Wonder.  I tried to overlap several and have some hanging off the page.  The final sentiment from the Feel Goods Stamp Set is stamped in Momento Black Ink.  I then added a piece of Calypso Coral Thick Bakers Twine and some Rhinestone Accents to finish of the note card.  These cards are wonderful.  You get 20 Note Cards and Envelopes in the package.  Being slightly smaller than a standard card (5" x 3-1/2") they are perfect for a quick thank you or simple note to anyone.

PRODUCTS USED:
Built for Free Using: My Stampin Blog


My Demonstrator Website

Thursday, July 23, 2015

Feel Goods Stamp Set--Day 4

Sunshine and Rainbows!  They just go together.  Have you checked out Pals Paper Arts yet?  They have helped me a lot this week.  We all get into those little ruts of not knowing where to start.  The sketches have been a great tool for me.  Here is the sketch for today's project.  It was posted back in October 2014.  Again, it had a large area for my sentiment and the horizontal strips played perfect for my Sunshine and Rainbows thinking.

First, I knew I wanted more than 4 horizontal strips.  I went straight to my brights and pulled the colors of my rainbow.  A little bit of math and I cut 5"x 4" strips of each color.  I then pulled the coordinating markers to color my stamp.  I used the font within the stamp to decide how to color the words.  To dress up the sentiment I cut it out with the Deco Labels Framelits (#130102).  


I laid the sentiment down and decided it needed a border.  Since the Daffodil Delight strip would be cover the most I cut a Daffodil mat the next size larger from my Deco Label Framelits.  It still needed a little something and what goes better with Sunshine and Rainbows than some flowers in bloom.  I punched them out with my Itty Bitty Punch Pack (#133787) and embellished them with a few Pearl Basic Jewels (#119247).  

I hope this card has brightened your day.  Thanks for stopping by and be sure to check back tomorrow for my final Feel Goods project of the week.

PRODUCTS USED:
 
Built for Free Using: My Stampin Blog


My Demonstrator Website

Wednesday, July 22, 2015

Feel Goods Stamp Set--Day 3

Today is sweet and simple.  I recently sent several cards out in the mail.  I had some cute little buttons on them and a few layers that made the envelope somewhat bulky.  The post office had to charge me additional so they could be hand fed.  Not a big deal, except I mailed over 20 of them.....adds up over time.
This card, inspired again by a Pals Paper Arts Sketch, was purposely made without the frills so it could be mailed easily.  The card is fairly straight forward, but I will give one note.  The white panel with the sentiment is longer than you see.  I left a space between the Navy strip and the Cucumber DSP to slide the white panel into.  This way I could line up the panel with the edge of the card.


PRODUCTS USED:
Built for Free Using: My Stampin Blog

My Demonstrator Website

Tuesday, July 21, 2015

Feel Goods Stamp Set--Day 2

Today I continue my showcase of the Feel Goods Stamp Set with the help of the talented ladies at Pals Paper Arts.  Again I used one of their weekly sketches.  This one from November 2014.  What prompted me to go back so far on their site and use this sketch?  They have a link on their sidebar to all of their challenges.  I then copied and pasted them into a word document.  When I had a few pages full of sketches I stopped and printed them out.  They sit on my work table as a reference for those moments I don't have the brain power to think of a layout.  Here is the sketch I used. 
Again, I looked for a sketch that had a large area for the sentiments in this stamp set.  I then picked my pattern paper to go in the background.  I wanted something that had a softer shade color to use for my sentiment area.  I picked the English Garden Designer Series Paper (#138440) and Mint Macaron for my stamping area.  I chose two other colors from the DSP for the horizontal strip.  I went with Hello Honey and Whisper White, then punched the 3/4" strips with my Triple Banner Punch (#138292).  
Now I needed something to dress up the card a little.  I pulled out all the ribbons that matched the colors in the DSP.  I laid each one down on my card until I found one that I liked.  The Blushing Bride Sequin Trim (#138400) worked nicely with the Blushing Bride card base.  I put a mini glue dot on my last sequin and fold it over to the second sequin.  Doing this at both ends helps to keep it from unraveling.  I attached it to the card with several mini glues dots spaced about 1-1/2" apart.  

I picture this card with a small bouquet of flowers to celebrate the latest accomplishment in your friends life.

PRODUCTS USED:
Built for Free Using: My Stampin Blog


My Demonstrator Website

Monday, July 20, 2015

Feel Goods Stamp Set--Day 1

I spent the last two weeks doing more activities with my family.  Now I am back with another stamp set of the week.  This time I have the stamp set Feel Goods (Wood #131916, Clear #129684).  I really like the saying in this set.  There is so much meaning in them and when you give someone a card they will certainly Feel Good.

I would like to thank the lovely ladies at Pals Paper Arts for the sketch that inspired my card today.  The layout was on their website back in May.  They have a weekly sketch or color combination for inspiration.  Their team of artists show many great projects using that weeks inspiration.  This sketch caught my eye for using with the larger saying stamps in my collection and was perfect for the Feel Goods stamp set.

 The color combination is bright with Melon Mambo, Daffodil Delight, and Tempting Turquoise.  The pattern paper is from the Brights Color Collection (#138434).  I used my Project Life Corner Punch (#135346) on the 2-1/2" x 3-1/2" sentiment layer.  After stamping the sentiment in Momento Black Ink (#132708), I used my Paper-Piercing Tool and Pierce Mat around the sentiment layer.  A quick piece of 1/4" Cotton Melon Mambo Ribbon and it is done.  I encourage you to send a card to someone special.  Remind them that they are one of the best things in your life and make them Feel Good.

PRODUCTS USED:
Built for Free Using: My Stampin Blog


My Demonstrator Website

Friday, July 10, 2015

It's Blog Hop Time with the Stampin' Addicts!!

I hope everyone has been enjoying the new Stampin' Up! 2015-2016 Catalog.  The Stampin' Addicts have put together a blog hop to showcase some of the newest stamp sets available.  You may have come from Rhonda's Blog, The Stampin' Bunny, or you may have started here.  Either way don't worry, the hop will loop you back to the beginning.  Just follow the links below and you will see everyone's projects.  If you would like to see all the links or chat about the hop, you can go to the discussion thread on Stampin' Addicts HERE.  Now on to my projects.......

I am featuring the From Land to Sea stamp set on page 83 in the catalog.  I immediately fell in love with the turtle.  It reminds me of the Hawaiian Honu.  The Honu is the Hawaiian symbol for luck, endurance, and a long life.  After stamping the image in Momento Black ink, I colored mine with Mossy Meadow, Old Olive and Crumb Cake markers.  I chose the Decorative Dots embossing folder to resemble the spots on the turtles body.

Next, I have the swordfish stamp.  It just called out "I caught a fish THIS BIG!".  I can picture it mounted on a fisherman's wall.  It makes a perfect masculine image.  I layered my image several times to give it the feeling of being mounted on the wall.  He is colored with a Smokey Slate marker.  The Silver 1/8" Ribbon gives the card that little prize winning touch without taking away the masculine feel of the card.

The Boat Wheel image has always been a fun nautical image.  I love the idea of being out on the open sea steering a boat, just being calm with my thoughts.  I have had the Typeset Specialty Designer Paper in my stash for awhile now and it just called out to me for this project.  The Mini Treat Bags are so easy to make with the thinlets die.  I wrapped my bag with a piece of Very Vanilla cardstock before adding my tag.  The stamp set has a jellyfish image.  Do you see it?  I turned it over and used the tentacles to make the seaweed at the bottom of the tag and insert.

Lastly, I have the lighthouse stamp.  Lighthouses shine their beacons to help ships find their way home.  When I see one it makes me think of a loved one on the shore waiting for their sailor to come home.  I used sponges and several shades of blue and green to create the see and land.   The sky is done with Soft Sky pounced to give a cloudy look.  The sand is Hello Honey.  Of course the beacon is shining to help guide our loved ones home and the sentiment sends my feelings to the person who is far from me.  I wish this picture was hanging on my wall, so I framed out the area with the Hardwood background stamp.  I cut out the center of the frame so it sits on top of the image area.

I hope you have enjoyed my projects with the From Land to Sea stamp set.  I love to receive comments, so please leave one below.  The next stop on the hop is sure to brighten your day.  Yapha is featuring the You're Sublime stamp set.


PRODUCTS USED:
Built for Free Using: My Stampin Blog


My Demonstrator Website

Thursday, July 2, 2015

Red, White & Blue Week--Day 4

Our men and women in uniform deserve a personal thank you every day.  While signs in store windows, hanging a flag in your yard, and posts on Facebook are great, please ask yourself when you last personally thanked a man or woman in uniform.  This can be a member of our military, firefighters, first responders or police force.  Any service that someone does who puts their life on the line to help others.  

If your BBQ this weekend has a lot of left over food, I encourage you to take it to the firehouse.  While at the community festival and fireworks this weekend, shake the hand of the police officer who is there to keep things safe, so your family can have a great time.  Most importantly, next month, when we are not focused on patriotic holidays, send a thank you card to your neighbors soldier.  1% of our population serves in the military.  That means 1 or 2 kids from EACH graduating class will enter the military from EACH high school EVERY year.  These are our children, who are asked to become adults overnight.  Pray for them.  

OK, I am off my thank our service members soap box.  Here is today's project.  Again, it is not flashy or over the top, just a thank you from the heart.  The pattern paper is from the Brights Designer Series Paper Stack (#138434)  You get 4 double sided sheets for each color in the collection, 40 sheets total.  I cut a 3" square from the blue then turned it in the corner.  I used a bit that I trimmed off for the bottom corner.  The red stripe strips are 1" wide.  There is a 1/2" strip of glimmer paper over top of the right striped piece.  The star was made with the 2nd size Star Framelits (#133723) and cut from Silver Glimmer Paper (#135314).  The sentiment is stamped in Pacific Point from the One Big Meaning Stamp Set (#138788).  The entire card is layered on a mat of Real Red (4-1/8" x 5-3/8").

PRODUCTS USED:
Built for Free Using: My Stampin Blog


My Demonstrator Website

Wednesday, July 1, 2015

Red, White & Blue Week-Day 3

I made a beautiful Red, White & Blue butterfly the other day, but was not sure how I wanted to use it.  Then I got a text from a friend of mine.  Her family was driving across country from one duty station to their next and they were passing through my area.  We only got two hours to visit before they had to continue their drive, but those two hours meant a lot to me.  I sat down this morning and made this card for her.  


I have yet to figure out how to take a good photo of a white card with embossing in the background.  If you look closely, you can see the Fluttering Embossing Folder(#139304).  The butterfly was made with the Bold Butterfly Framelits (#138135) and the Butterflies Thinlets (#137360).  I cut a solid Pacific Point butterfly, then cut one Whisper White and one Real Read lacy butterfly.  I adhered the white one to the blue, then put the little red pieces in the spaces.  I used glue stick on half the blue area at a time.  If I made another one, I would attach the white one with glue stick and then put little dabs of Multipurpose Liquid Glue on the little spaces for the red bits.  By the time I got to the end of attaching the red bits the glue stick had dried and the bits kept falling off.

PRODUCTS USED:
Built for Free Using: My Stampin Blog


My Demonstrator Website

Tuesday, June 30, 2015

Red, White & Blue Week--You're Invited

It's Party Time!!  Here is an invitation for that big block party you are planning for the 4th of July.  Or the kids Captain America birthday party.  Or the retirement celebration for a dear friend.


I love the Red and Silver Glimmer Paper on this one.  I cut two 1-1/2" x 4" rectangles from each paper.  Then cut each on diagonally in half.  I covered a piece of scrap cardstock in glue stick and put the glimmer triangles on with all the points meeting in the middle of one side.  I then trimmed the extra glimmer paper off the edges.  It is put on a Whisper White piece of cardstock and onto a Pacific Point card base.  The Stitched Satin Ribbon is wonderful.  There is a texture on one side from the stitching and the other side shines with the subtle lines.  The sentiment tag was made with the Decorative Label Punch.

I am hoping my son picks Captain America for his birthday party theme this year, so I have a reason to make more of these.

PRODUCTS USED:
Built for Free Using: My Stampin Blog


My Demonstrator Website

Monday, June 29, 2015

Red, White and Blue Week

4th of July is this coming weekend, so I thought it would be a great time for a week brought to you "Courtesy of the Red, White & Blue."  I love that song.  Toby Keith rocks!   Those who follow my blog or come to my classes know my husband is a proud Army soldier.  I am a proud Army wife who does what I can to support our unit and the families.  There are lots of military spouses who do the same.  While we never do it for the recognition it is nice when the thank you's come.  Be it a verbal thank you in front of the group, a certificate for outstanding dedication or a handmade card.  I like to keep a few cards on hand to give to someone who might help at the car wash fundraiser or clean-up from the summer picnic after everyone else has gone home.


Stampin' Up! has several stamp sets that can be used to simulate stripes on a flag.  This stamp is new to the 2015-16 catalog.  It is called Brushstokes (#138952) and is actually a full size background stamp.  I used my Real Red and Pacific Point Markers to color in 7 stripes on the stamp in the 3x4" size I wanted.  I then cleaned my stamp and inked only the blue stripe area again.  I carefully laid my cardstock back on the stamp to fill in the white spaces in the blue field.  I cut the flag out with my paper snips following the curvy lines the brushstroke stamp made.  The 3 stars are punched out with the star from the Itty Bitty Accents Punch Pack (#133787).  The saying was inked with my marker and is from the One Big Meaning Stamp Set (#138788).  The background was done with the Gorgeous Grunge Stamp Set (#130517).  You can ink it with you marker a few times or use your Pacific Point ink pad.

Cards do not have to be lots of layers and use lot of accessories to make someone know you appreciate what they have done for you.  Just give them a simple card and a "Thank You" from the heart.

PRODUCTS USED:
Built for Free Using: My Stampin Blog


My Demonstrator Website

Friday, June 26, 2015

Layered Letters--Last Day

I hope you have enjoyed this week with the stamp set Layered Letters.  It truly is a wonderful alphabet set.  I have one last project to show you.  The inspiration for this came from the Baby card I showed you yesterday.  I like to keep various cards on hand for a last minute need.  Baby cards are tough though.  I never know which gender I might need, so I end up making them neutral colors.  It has also been 6 years since I was on the receiving side of the baby card.  Things have sure changed in that short time and now, gender reveal announcements are all over the place.  I live far from my family, how cool would it have been to announce the gender with a card.


The Layered Letters Stamp Set has several additional symbols.  I used the # sign the other day.  How perfect is the ? sign for this project!  I used my Stampin' Write marker to draw in the apostrophe.  Then of course we have the REVEAL!  (And so my blog reading family and friends know--I am NOT having another baby!)


How much do you love that cute print used inside the explosion box?  It is from the Go Wild Designer Series Paper Stack.  And the ribbon?  I loved the Stitched Satin Ribbon in the last catalog.  I was so glad to see them get 5 fresh colors for it this catalog.  

PRODUCTS USED:
 
Built for Free Using: My Stampin Blog

My Demonstrator Website

Thursday, June 25, 2015

Layered Letters --Day 4

The great part about alphabet stamp sets is that you can spell anything you want.  LOVE, HELLO, or THANKS are popular.  Another favorite is BABY!


I mentioned yesterday that the Layered Letters Stamp Set comes with two different shapes to layer the letters onto.  This is the circle image.  I stamped it full strength in So Saffron today.  I stamped the letters in Calypso Coral and Pear Pizzazz.  Did you check out the Weekly Deals yesterday?  I used another one today.  The Large Polka Dot Embossing Folder is on sale this week.  (hard to see in photo--it is embossed on the Whisper White background)

The "Welcome" is from a stamp in the And Many More Stamp Set.  I inked only the word I needed and stamped it on my So Saffron cardstock before punching it out with the Word Window Punch.  I advise getting any stamp set with small words in wood.  It makes it much easier to handle the words, clean them, keep them from getting lost, and stamping them straight without ink marks from rocking a block.

PRODUCTS USED:
Built for Free Using: My Stampin Blog


My Demonstrator Website

Tuesday, June 23, 2015

Layered Letters--Day 2

One of my favorite color combinations for everything is Black & White with that splash of Red.  I love how all three colors stand out to one another.  It is crisp, clean and makes me smile.  It is also timeless and never goes out of style.  So when I saw the Everyday Chic Designer Series Paper (#138445) in the new catalog I just had to have it.


Designer Series Paper from Stampin' Up! comes with 12 sheets: 2 each of 6 double sided designs.  Each sheet is 12"x 12" so there are many uses.  I cut one of the papers into a 4" wide strip.  I cut a 5-1/4" piece from the strip for my card front.  I cut my 4"x 5-1/4" piece at the 1-1/4" line and turned the bottom part over.  The letter pieces are 1-1/2" x 1" and layered on my favorite color combination.  I wrapped the Real Red Cotton Ribbon (#134563) to the back of the Basic Black strip and tied a Fork Tie Bow to attach to the front.  The Sweetheart Punch (#133786) is put on a couple dimensionals to make it pop forward.

PRODUCTS USED:
  
Built for Free Using: My Stampin Blog


My Demonstrator Website

Monday, June 22, 2015

Layered Letters Week--Day 1

I shared the Layered Letters Stamp Set with you during the sneak peek weeks.  If you missed my first post with this stamp set you can see it HERE.  I enjoyed that project so much, I thought I would share a weeks worth of projects using the stamp set.  With yesterday being Father's Day, what better way is there to start the week than with a card for DAD.


This card came together in less than 15 minutes.  It is also perfect for having a little craft time with the kids.  The # symbol on the second layer comes in the stamp set.  What a great way to make your own background.  I embossed the top layer and added a simple ribbon tie.  No bows on the DAD card.  The fun part about this card is the way it opens. 

The two panels fold open to reveal a place for your message.  The card base is only 5-1/2" x 4-1/4".  The middle layer is 8-1/2" x 3-1/2" (scored at 4-1/4").  The top layer is 8-1/2" x 2-3/4" (scored at 4-1/4").  The Whisper White insert is 3-1/4" x 2-1/2".

PRODUCTS USED:
Built for Free Using: My Stampin Blog


My Demonstrator Website