Tuesday, December 13, 2011

Exclusive Offer December 13th & 14th ONLY!


Treat yourself to an early Christmas gift.  Get over $350 worth of great Stampin' Up! Products for ONLY $125 by signing up to be a Stampin' Up! Demonstrator.  This offer is only good through demonstrators attending Leadership Conference (which I am) and only good for the next two days.
You can sign up online right now at my Demonstrator Business Website.
You can choose from the Standard Starter Kit or the My Digital Studio Starter Kit.  To sweetin' the deal SU! is also giving you the choice of a FREE pack of Designer Series Paper or Digital Download EVERY month from February thru December of 2012.  That is an approx $120 value right there.
There is nothing to loose.  Contact me today with any questions.

(Publication shown is the Demonstrator Monthly Magazine full of tips and ideas.  Demonstrators receive this publication for FREE.)

Saturday, November 19, 2011

Online Extravaganza


Stampin' Up! is kicking off the holiday season with some great savings.  The online extravaganza will begin Monday, November 21, 2011, and run through Wednesday, November 30, 2011.  Shop some great deals from the comfort of your own home.

Log in to my Online Store on Monday, November 21, to take advantage of great savings, like FREE digital downloads valued at $40 when you buy My Digital Studio Express, 60 percent off select Designer Fabrics, and 30 percent off an exclusive ribbon bundle!

In addition, there will be two items on sale for 24 hours only (November 21, 12:01 AM - 11:59 PM [MT])-so make sure you don't miss the first 24 hours of Online Extravaganza! 

SPECIAL BONUS--Anyone who places an online order thru my website during this promotion will be entered into a drawing for a gift certificate from me.  The more people that order, the higher the gift certificate will be ($10 minimum).  Additional drawing entries for every $40 in product you purchase. Drawing will be held on December 1st.

Watch for more detailed information on November 21st on My Demonstrator Website.


Friday, November 4, 2011

Digital Scrapbooking Day


Digital Scrapbooking Day is November 5th, but Stampin' Up! is celebrating all weekend long, from November 4-7.  The event will include Free Downloads, blog posts and exciting project ideas.  Go to www.MyDigitalStudio.net, complete a short survey and download your FREE digital content, then stay for all the exciting action.  You can use this digital content in My Digital Studio available from Stampin' Up! OR with any digital software program, such as Adobe Workshop.  What a great chance to try out Stampin' Up! Digital Downloads for yourself.
These Free downloads are only available for the weekend.  After the event is over the downloads will be in the online shop for their regular price.

You can purchase My Digital Studio Online at My Demonstrator Website.  There are two versions.  My Digital Studio (#118108) is the full software (comes in disk form) and 100's of Stampin' Up! exclusive artwork, papers and digital accessories to use over and over.  My Digital Studio Express (#124483) is a downloadable version with the full software, but select digital content from the original disk version.  There is also a ton of downloadable content available in the Stampin' Up! Shop with new things coming every month.

Thursday, October 27, 2011

Simple In Color Treats

Last month I had a need for some quick little thank you's.  The Top Note Die for the Big Shot is perfect when you need something fast.  

I cut the Top Note shape from a piece of each current In Color cardstock.  Then a scored a couple lines on both sides of center for my mini candy bars to fit into.  It isn't necessary to score the lines, but I am just like that.  I put a little bit of snail adhesive inside to help the candy bar from sliding out the side.  Using my Crop-A-Dile I punched a hole in the top and tied a piece of ribbon through it.  The front image is stamped with the Oval All Stamp Set and punched out with the scallop oval punch.  I used Stampin' Write Markers to color a little bit on the image.

Here is a close up of the treats.

The 2010-2012 In Colors.  Available until end of June 2012 (Front to Back)
Poppy Parade, Blushing Bride, Peach Parfait, Pear Pizzazz, Concord Crush

The 2011-2013 In Colors.  (Front to Back)
Lucky Limeade, Pool Party, Calypso Coral, Wisteria Wonder, Island Indigo

ONLY 4 MORE DAYS LEFT ---GET YOUR FREE BIG SHOT FOR BECOMING A STAMPIN' UP! DEMONSTRATOR DURING OCTOBER.  Contact me or your local demonstrator today for more details.  

Wednesday, October 26, 2011

More Halloween Ideas

I sure have some talented friends.  Here are a few more of the cards I received from swaps with my demonstrator friends.
Again all the stamp sets can be found in the 2011 Holiday Mini Catalog.


Tuesday, October 25, 2011

Halloween Ideas

One of the best things about Stampin' Up! is all the great friends you make.  I have gotten to meet many demonstrators from all over the US and Canada.  One of the enjoyable things we do throughout the year is swap cards.  These are some of the Halloween cards I have received from my great Stampin' Up! Demonstrator friends.  All of the stamp sets can be found in the Current Holiday Mini Catalog.

Contact me today to find out more about becoming a Stampin' Up! Demonstrator.  Join during October and receive a Big Shot (or choice of $100 worth of product) for FREE!


Thursday, October 20, 2011

Christmas Card Class

This Saturday is the second session of my Christmas Card Class.  Class participants will make 10 cards (5 each of 2 designs) with envelopes for $25.00.  This is one of the designs for this month.  I have a couple more spots in the class.  It is at 11:00 in my stamping room.  Please RSVP on my Class Calendar.
This card features the "Dear Santa" Stamp Set from the current Holiday Mini Catalog along with the Two Tags Die and some punch art cookies.


Products Used:
Stamps: Dear Santa (wm#123823, cm#123824)
Cardstock: Old Olive, Real Red, Confetti White, Chocolate Chip, Crumb Cake
Ink: Stampin' Write Markers (Real Red, Chocolate Chip, Old Olive
Accessories: Color Spritzer, Scallop Circle Punch, Paper Snips, Two Way Glue Pen, 1 3/4 Circle Punch, Real Red Satin Ribbon, Petals-A-Plenty Embossing Folder


Tuesday, October 18, 2011

Christmas Card without a Christmas Image

It is getting closer.  Have you been thinking about your Christmas cards for this year?  Do you have your stamp  set picked out yet?  Maybe you don't have any Traditional Christmas images or don't want to use the same one as last year.  Maybe your budget is just tight and you want a stamp set you can use all year long.
I have the answer for you.  "Delicate Doilies"  (wm#122590, cm#122592) found on page 127 of the 2011-2012 Idea Book and Catalog.  This stamp set can be used for just about any occasion.  All you need is a sentiment for whatever purpose you need a card.

All three of these cards use the Delicate Doilies Stamp Set along with the Curly Cute Stamp Set.  A simple change of the colors and presto.  The colors are all from the Bold Brights Color Collection and the buttons are all found in the Bold Bright Designer Buttons Pack.  If you don't have a lot of ink pads yet, I would suggest the Stampin' Spots.  You get an entire color collection of 1" ink pads for a fraction of the cost of a set of full size ink pads.  Later, when you find yourself using one color more often, you can purchase the full size pad.  It is a great way to start when you are not sure what colors you will use the most.
Here are some close-ups of the cards.  Each one also uses an embossing folder on the right hand side.  You could just as easily stamp this area in a tone on tone manner or even leave it blank.  As always my favorite way to step up a card is with dimensionals.  I used them under the sentiment strip.  The button is held on with a mini glue dot.


Products Used:
Stamps : Delicate Doilies (wm#122590, cm#122592), Curly Cute (wm#117014, cm#120510)
Cardstock: Bold Brights (#119706), Whisper White (#100730)
Ink: Bold Brights Classic Ink (Full size #119694, Stampin' Spots #119714)
Accessories:  Bold Bright Designer Buttons (#119747), Linen Thread (#104199), Dimensionals (#104430), Mini Glue Dots (#103683), Big Shot (#113439), Embossing Folders--Stripes (#123128), Vintage Wallpaper (#120175), Petals-a-Plenty (#116824)

Sign-up to become a Stampin' Up! Demonstrator by October 31, 2011 and get a FREE Big Shot!  Already have a Big Shot, select $100 worth of Stampin' Up! Products of your choice.  Contact me today with questions about becoming a Stampin' Up! Demonstrator or go to my Demonstrator Website to sign up today.  

Friday, October 14, 2011

Big Shot Blog Hop

For those who don't know, my husband has received orders for a new assignment.  I have spent the last few weeks getting our home ready to put up for sale.  For this reason I have not had any time to stamp.  I thank you for your patience and I hope to be back to stamping very soon.
I do have a very special treat for you today though.  My wonderful friends at Stampin' Addicts are doing a Big Shot Blog Hop.  These are some very talented ladies and I know you will find all of their projects truly inspirational.  Each person on the Hop is focusing on a different Big Shot Die, so be sure to go through the entire Hop.  You simply need to click on the icons at the end of each posting.

To get started click HERE.  It will take you to the first stop on the Stampin' Addicts Big Shot Blog Hop, where Rhonda is waiting to show you the new Embossing Frames.  If you would like to learn more about Stampin' Addicts, please go to the website www.stampinaddicts.com

FREE BIG SHOT!!  If you would like to learn how you can get your own Big Shot for FREE, please contact me or any of the fine ladies on the Hop.  We would all love to share the world of Stampin' Up! with you.


Monday, October 3, 2011

Greeting Cards Kids Spring Card

Here is another one of those simple Fun Fold Cards that adds a lot.  This was the third Fun Fold card we did at Stamp Camp Last month.  Folds flat into the envelope.  When the recipient takes it out, it Springs Up!

The stamp set is Greeting Card Kids.  You can easily make this card with any of the stamps in the set.  The entire image is colored in with Stampin' Write Markers.  The grassy area at the bottom was two step.  First, I took the flat side of my Pear Pizzaz and colored the entire area in one layer strokes.  (If you go over the area more than once, it will get a little darker)  Then I took an Old Olive Marker and drew on the little whisps of grass.

Side view below.  You can write a message on the back of the card if you like.
Don't miss out on this month's Stamp Camp--October 15th or 17th.  Go to the calendar of events on My Demonstrator Website to reserve your spot today.  


Products Used:
Stamps: Greeting Card Kids, Teeny Tiny Wishes
Colors:  Naturals White, Concord Crush, Pumpkin Pie DSP
Inks: Basic Black, Stampin' Write Markers
Accessories: Scallop Edge Punch, Word Window Punch

Saturday, October 1, 2011

Sweet Pressed Cookie Stamps


The easy-to-use cookie stamp has a solid wood handle with three interchangeable stamp images: a heart, a jack-o-lantern, and a snowflake.

Just make your favorite shortbread cookie dough (or one of the two included recipes) and stamp away! Create beautiful, hand-stamped cookies in a flash. The stamp images are completely food-safe and child-friendly.  No-Ink Required.

Contact me to order yours today or order online 24/7 at My Demonstrator Website.


Sweet Pressed Cookie Stamps--Item #125152  
Only $16.95  
Available until January 3, 2011.

FREE BIG SHOT!!!


You heard me right.  Stampin' Up! is giving a Free Big Shot to anyone who signs up to be a Demonstrator during the month of October.  That is over $440 worth of Stampin' Up! Products for only $175.  WOW!   You can choose from the Standard Starter Kit or the Digital + Starter Kit.
This is a fabulous promotion.  Already have a Big Shot?  No Problem.  You can substitute $100 worth of product instead.  As always you can supplement anything in the Starter Kit for products of similar nature and value.  Sign up now and you will be ready for the Holidays and Sale-A Bration at the first of the year.  Sign up now and you can be a demonstrator for 6 months with no obligations.  Your first quota will not be due until the END of March.  What do you have to loose?
There is no obligation to hold workshops or classes.  You can be whatever type of demonstrator you wish to be.  If you simply want to purchase products for your own use, that is fine also.  Stampin' Up! doesn't mind.  Of course, you can always grow your own business and Stampin' Up! is here to help you.
Stampin' Up! is a fabulous family and values it's demonstrators.  They have all sorts of things to help you be the kind of demonstrator you want to be.  They have been in business for over 20 years, are completely debt free, and maintains the highest standards of business practices and products.
If you have any questions about being a demonstrator, please contact me.  I am more than happy to share the Stampin' Up! Opportunity with you.
Ready to sign up?  Go to My Demonstrator Website today and sign-up online.  You will receive your confirmation email within an hour, so you can order your Big Shot (or $100 worth of product of your choice) today.

Wednesday, September 28, 2011

Free Standing Pop-up Card

I love this fancy fold.  Makes for a fun card to give and the receiver can display their card easily.  For those who have never made a Free Standing Pop-up Card it folds up to fit in a standard size envelope.  This card was part of a Fun/Fancy Fold theme for my September Stamp Camp held a couple weeks ago.
The main image area was done with a masking technique.  You stamp the image you would like upfront first (the cloud).  Then you cover it up with the same image cut from a piece of scrap.  When you stamp the second image (the moon) it won't stamp lines through the first image.  I them masked off the cloud, the moon and the pumpkins before sponging all over the entire area.  The masks were them removed and the pumpkins and moon colored in with marker.

Don't miss out on the October Stamp Camp next month.  Check out my events calendar on My Demonstrator Website.

Products Used:
Stamps: Out on a Limb (wm#123822, cm# 123824), Teeny Tiny Wishes (wm#115370) 
Cardstock: Basic Grey (#121004), Basic Black (#121045), Whisper White (#100730)
Ink:  Basic Black (101179), Chocolate Chip (#100908), Marina Mist (#119668), Night of Navy (102977), Stampin' Write markers
Accessories: Sticky Strip (#104294), 1" Circle Punch (119868), Daffodil Delight Satin Ribbon, Pumpkin Pie Grosgrain, Early Espresso Bakers Twine (#123124), Bold Bright Buttons (#119747), Neutrals Brads (#119736), Stampin' Sponges (#101610)

Thursday, September 22, 2011

Christmas Card Class this Saturday

"Joy to the World", it is time for Christmas Card Classes.  "The Sounding Joy" is a new stamp set by Stampin' Up! in the 2011 Holiday Mini Catalog.  This set has so many possibilities.  It is perfect for those elegantly embossed Christmas cards like this one.  This will be one of the two cards we are doing at this month's Christmas Card Class on Saturday.
Only need a few cards this year?  No problem.  Need 30 cards this year?  No problem.  Come one month, two months or all three.  Each month we will be making 10 cards (5 each of 2 designs).  30 cards in all (5 each of 6 designs).  This is the first month, so you have not missed anything.  Each month is $25.00 and includes all 10 cards and envelopes.  Future class dates are October 22nd and November 19th.  Classes start at 11:00 in my home.  Call me with any questions or to register today.
Registration for this month's class closes at 6:00pm TODAY. (Sept. 22nd)


Order Stampin' Up! products online 24/7 by clicking on "Shop Now" in the upper right hand corner of My Demonstrator Website.

Products Used:
Stamps:  The Sounding Joy (wm #121967, cm #121979)
Colors:  Cherry Cobbler, Whisper White, Brushed Silver (#100712)
Accessories: Cherry Cobbler Embossing Powder (#122949), Silver EP (#109131), Dimensionals (#104430), VersaMark ink pad (#102283) , Heat Tool (#100005), Ticket Corner Punch (#119867), Cherry Cobbler Dotted Scallop Ribbon (#124138)

Monday, September 19, 2011

Birthday Boy

I have been busy the last week with workshops, classes and life in general.  I will post a few of the workshop cards in a few days.  For now I have a quick post of a Birthday Card I made for a special little 5 year old's party the other day.  I don't have any truck or dinosaur stamps, so I had to come up with something a little more general.  This card was quick, simple and can be done in any color combination to suit the receiver.
The little boy is into Transformers, so I tried to go with a bold color scheme to mimic the bold colored robots.  So you have your Optimus Prime (Real Red and Pacific Point) colored cupcake with your Bumblebee (Daffodil Delight) card base and a little Old Olive accent for good measure.  The cupcake panel and sentiment circle are put up on dimensionals (my must have product).

You can order Stampin' Up! products online 24/7 by clicking "shop now" in the upper corner of My Demonstrator Website.  Don't forget to "Follow Me on Facebook" and have all the blog updates sent directly to your News Feed.


Products Used:
Stamps:  Word Play (wm #120308, cm #120651), (Crazy for Cupcakes (wm #111618)
Colors: (cardstock and markers to color) Daffodil Delight, Old Olive, Pacific Point, Real Red, Whisper White, Chocolate Chip, Basic Black Classic Ink Pad
Accessories:  Fire Rhinestone Square Brads (#109112), Real Red Satin Ribbon (#117286), Scallop Circle Punch (#119854), 1-3/4" Circle Punch (#119850), Houndstooth Embossing Folder (#123134), Big Shot (#113439), Dimensionals (#104430)

Wednesday, September 14, 2011

Simply Stunning Doily

I really enjoy when a card is quick, easy and full of WOW!  I participated in a swap with my fellow Stampin' Addict Demonstrators a couple weeks back.  Normally in swaps I have a tendency to use lots of things like embossing folders or extra embellishments.  This time we were given strict guidelines to the number of things we could use.
We were only allowed to use one color family.....I chose Bold Brights.
We were only allowed to use one embellishment.....I chose Real Red Satin Ribbon.
We were only allowed to use one stamp set (and sentiment if none in stamp set chosen)......I chose Hello, Doily.
The idea was to keep it simple and not use a lot of different products.  I stamped the image in versamark and covered it with various colors from my Stampin' Pastels using a cotton ball.  This technique called Poppin' Pastels is one of my favorite.  It always brings out the colors in a bold way.  I started in the center with some Daffodil Delight.  Next I added some Tangerine Tango and Old Olive.  Lastly I put on some Pacific Point.  I then lightly rubbed the Pacific Point cotton ball over the outer area of the Whisper White cardstock.  As you are adding each color, blend it into the one before.  At the end I gently brushed my Pacific Point cotton ball over the entire area to clean up any dust left behind.  It also gave that little bit of shade to really pull the colors forward.
The sentiment is from my go to sentiment set, Sincere Salutations.  It is stamped in Basic Black Classic Ink.  You can easily make this card in any color scheme to match the occasion.  The ribbon is two pieces.  The first is long and adheres to the back.  The second is short and ties to the first piece.

You can order Stampin' Up! Products 24/7 by clicking on "Shop Now" in the upper right corner of My Demonstrator Website.

Products Used:
Stamps: Hello, Doily (wm #122845), Sincere Salutations (#115068)
Cardstock: Daffodil Delight, Tangerine Tango, Whisper White
Ink: Versamark (#102283), Basic Black (#101179)
Accessories: Real Red Satin Ribbon (#117291), Stampin' Pastels (#120962)

Stampin' Pastels (#120962)
Versamark (#102283)


Thursday, September 8, 2011

Embossing Folders--Not just for backgrounds

Anyone who has stamped with me knows I have a love affair with the embossing folders.  They are a quick and easy way to add that extra something to your cards.  I tend to use them for backgrounds when they feel plain.  But they can just as easily be the focal point too.
We made this card at the August Stamp Camp.  The Flower Garden Embossing Folder was designed to be part of the "Beyond the Garden" Product Suite on pages 106-107 of the 2011-2012 Idea Book & Catalog.  I think it goes equally well with the Paisley Petals Designer Series Paper on page 184.

And what do you think of that ribbon?  The New Artichoke Denim Jean Ribbon on page 194.  It is fabulous and also comes in Blue Jean.  I pulled out one of my stand by stamp sets "Oval All" and matching Scallop Oval Punch.  A few dimensionals and we are done.  Quick, easy and a great way to use those little pieces of DSP you have left over from cutting the sheet for other projects.

Order Stampin' Up! Products online 24/7 at My Demonstrator Website.  Have all of my blog posts sent to your Facebook News Feeds by liking my Demonstrator Facebook Page.

Products Used:
Stamps: Oval All (#)
Ink:  Bravo Burgundy (#105214)
Cardstock:  Marina Mist (#119668), Paisley Petals DSP (#122367)
Accessories:  Flower Garden Embossing Folder (#), Artichoke Denim Ribbon (#125054), Scallop Oval Punch (#119856), Big Shot (#113439), Scallop Trim Border Punch (#118402), Dimensionals (#104430)

Tuesday, September 6, 2011

Make your own chipboard with the Big Shot


For the last few months I have changed my monthly class format from a club to a stamp camp format.  This has allowed people to come as they are able and work more within their budget.  Each month we still do a variety of projects.  In August we did a series of projects using the Big Shot.  I showed you the "Beautiful Wings" card last week.  This week I wanted to show you another great use for your Big Shot.  Making your own chipboard.

The Big Shot is capable of cutting through many types of material from cardstock to fabric, chipboard and even thin metals.  Stampin' Up! sells sheets of chipboard that are easily cut with the Big Shot metal edge dies.  Not everyone has chipboard lying around though.  It is easy to make your own.  Simply cut multiples of the same shape from any of our cardstock colors.  You can also cut other materials around your house, like the boxes that most food comes packaged in.

For this example I cut 5 of each number out of Crumb Cake Cardstock.  The layers can be help together with a little bit of two way glue pen.  I chose Crumb Cake for the base of my homemade chipboard as most chipboard looks like a tan style cardboard.  You can then stamp on the cardstock, color it with inks or markers, or cut an additional layer from designer series paper or another cardstock color.  I left this one plain to match the embossed strip at the bottom of the page.  To make the strip at the bottom, I put the center of the strip in the Stripes Embossing Folder and ran it thru the Big Shot.  Then I moved the folder over so the last stripe lined up with the folder.  I then ran in thru the Big Shot just to the end of the embossing folder.  I did the same thing on the other side.  Now the stripes go all the way across.

The flowers on the left side are made with the Blossom Bouquet Triple Layer Punch.  There are so many ways you can use the pieces.  You can put the layers on straight or twist them up.  You can decorate them with brads, buttons or other small accents.  I attached the flowers to the page with snail if it was completely off the photo mat.  Any flowers that went over the photo were attached with a dimensional.  This way the photo could be added later.

The next Stamp Camp will be on Saturday, September 17th @ 11:00 am.  For more information or to register, check out My Demonstrator Website Calendar of Events.  Can't make it on Saturday, there is also a Monday option.

Order Stampin' Up! Products online 24/7 at My Demonstrator Website.  

Products Used:
Colors: Melon Mambo, Concord Crush, Bashful Blue, Pear Pizzazz, Whisper White, Pretty in Pink, Crumb Cake
Accessories:  Alphabet Simple Numbers (#115968), Timeless Type Alphabet (#115951), Blossom Bouquet Triple Layer Punch (#122464), In Color Glimmer Brads (#121005), Pearl Accents (#119247), Brights Designer Buttons (#119747), Tasteful Trim Die (#120893), Big Shot (#113439), Dimensionals (#104430), Lace Ribbon Punch (#122362), Stripes Embossing Folder (#123128)
Lace Ribbon Border Punch #122362
Brights Designer Buttons #119747
Blossom Bouquet Triple Layer Punch #122464

Saturday, September 3, 2011

Operation Lean On Me

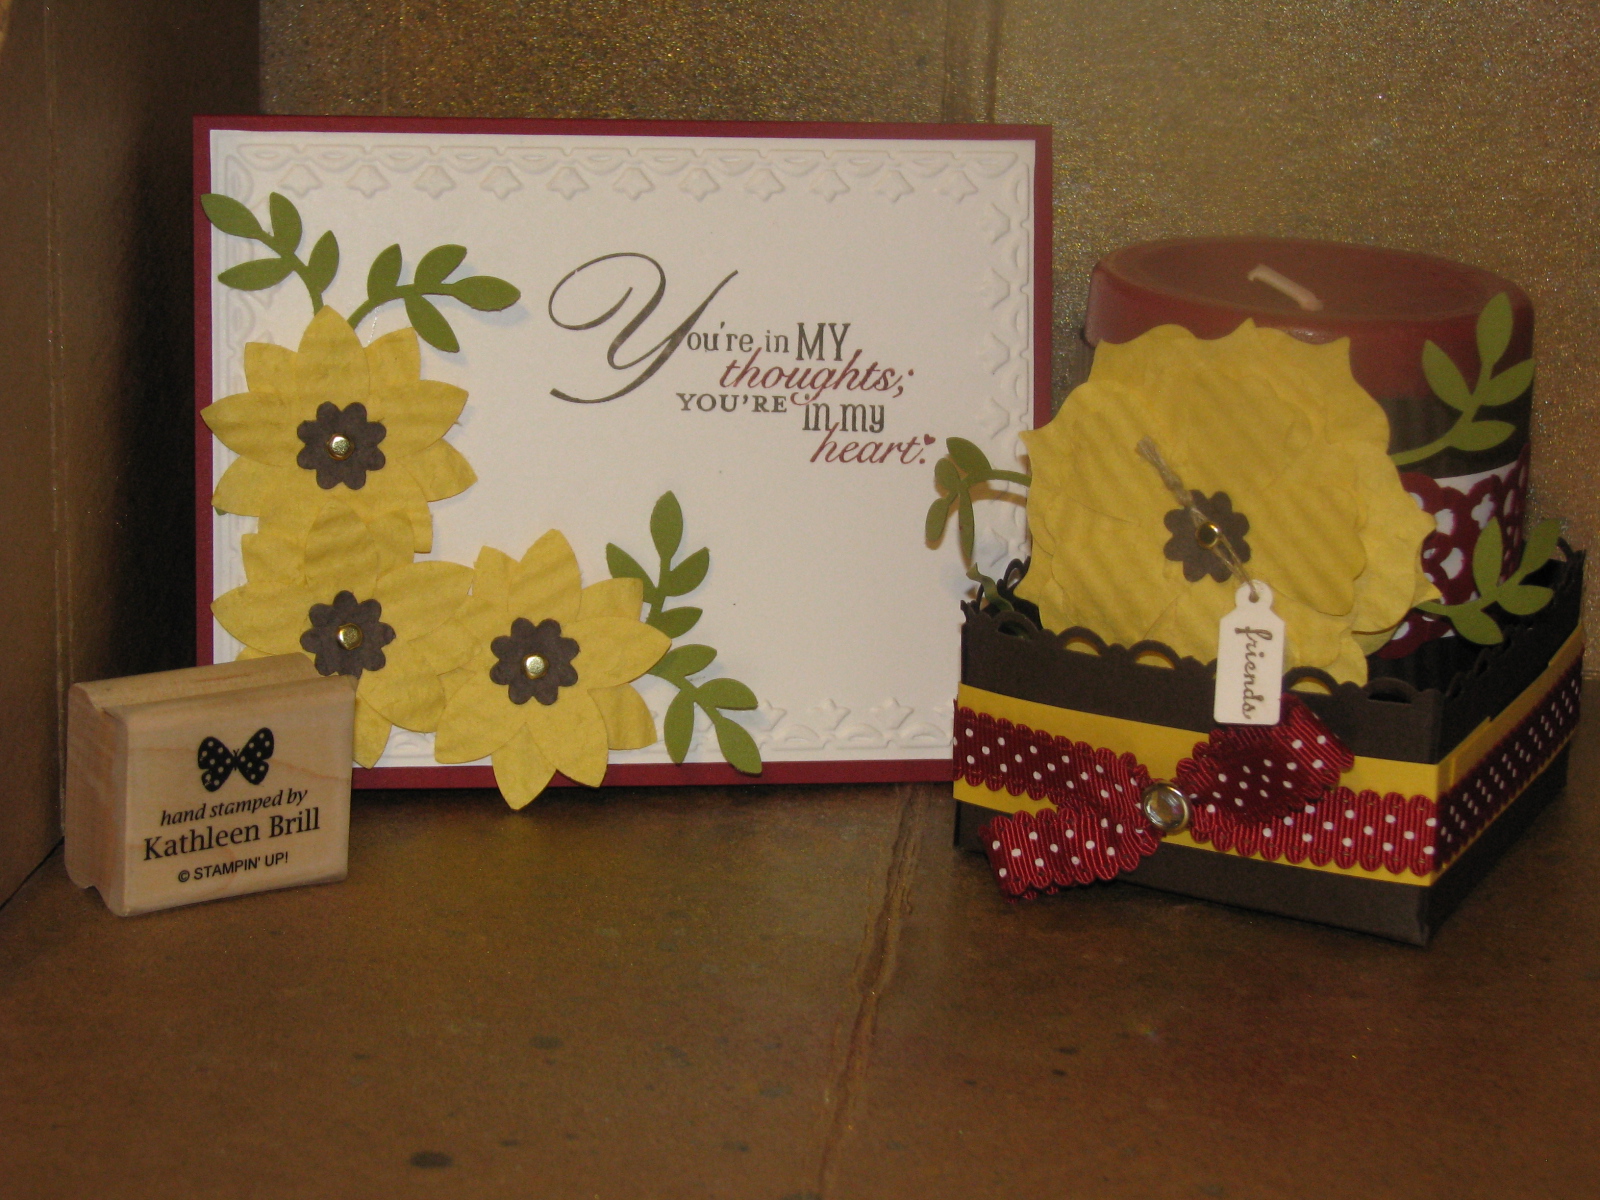
I had the opportunity to meet an amazing group of ladies a couple weeks ago.  They are a group of Army Wives in a small unit with a lot of heart.  They have several "sister" units stationed around the globe that are going through deployments and general rough times.  These ladies wanted to reach out and brighten the days of some of their sister wives.  They chose to first support a unit from Fort Polk, LA that has unfortunately lost several soldiers during their latest deployment. They asked me to help them make some very special projects to remind the unit that they are not alone in their fight.  We made all of the wives a card and decorated candle.

Both projects use a technique I enjoy.  To make the flowers look softer in nature, you break up the fibers inside and then peel them apart into two pieces.  You can break the fibers in the cardstock by crumpling or running it through a crimper several times.  We used the crimper as it leaves a wavy style design to the cardstock when finished.  The candle box is made from a 6.5" square that was scored like a tic-tac-toe board at 1-3/4" on each side.  The sides were then punched with the scallop trim edge punch before folding into the box bottom.
I had such a fun time helping these woman support their "sister" unit and look forward to more projects with them in the future.

Products Used:
Stamp Sets: Word Play (mw #120308, cm #120651), Tiny Tags (wm #118091)
Ink: Stampin' Write Markers--Cherry Cobbler (#119681), Early Espresso (#119680)
Cardstock:  Early Espresso, Daffodil Delight, Old Olive, Whisper White, Cherry Cobbler
Accessories: 5 Petal Flower Punch (#119880), Scallop Trim Border Punch (#118402), Fun Flowers Bigz L Die (#121812), Big Shot (#113439), Crimper (#), Framed Tulip Embossing Folder (#121809), Jewlery Tag Punch (#117190), Two Step Bird Punch (#117191), Cherry Cobbler Scallop Dots Ribbon (#124138), Lace Ribbon Border Punch (#122362), Boho Blossom Punch (#119858), Clear Rhinestone Brads (#113144), Gold Brads (#104337), Dimensionals (#104430), Sticky Strip (#104294), Linen Thread (#104199)

Thursday, September 1, 2011

It's Time for the Holiday Mini Catalog!

The Holiday Mini Catalog starts today.  I am so excited for this mini to start.  It is FULL of great stamp sets, coordinating punches, new accessories and fabulous ideas.  You can view the catalog online here.

There are so many great things I don't even know where to start.  How about with Halloween?
 
The "Out On A Limb" Stamp Set is fun and has a lot of coordinating stamps to make a fun flying card or a spooky night scene.  This card, with it's fancy fold, will be one of the projects at my September Stamp Camp on Saturday, September 17th at 11:00.  You can register for the class on My Demonstrator Website Calendar of Events.    Can't come on Saturday?  There is a Monday night option also.

Products Used:
Stamps: Out on a Limb (wm #123822, cm #123824)
Ink: Stazon Black (#101406), Early Espresso (#119670), White Craft Ink (#101731), Stampin' Write Markers (Coloring Images)
Cardstock: Night of Navy, Daffodil Delight, Cherry Cobbler, Whisper White
Accessories: Simply Scored (#122334), Paper Snips (#103579), Word Window Punch (#122161), 2-1/2" Circle Punch (#120906), Dimensionals (#104430)

Wednesday, August 31, 2011

"Sunny Fun" from the Summer Mini

Today is the last day to order from the Summer Mini Catalog. Don't miss out on these great stamp sets. To make sure you get the items you want before they are gone, order online at My Demonstrator Website. The new Holiday Mini Catalog starts tomorrow. My regular customers should have received theirs in the mail already. If you still need one, please let me know.
Todays card features the "Sunny Fun " Stamp Set from the Summer Mini Catalog.
I used the flip flop image. The stamp set also has a row of kids in innertubes and a row of ice cream cones. The sentiment shown on the card is also part of this stamp set. The card itself is 3 x 6. This is a great size for getting the most out of a 12x12 piece of cardstock. Each piece will make 4 cards. Mine is Daffodil Delight. The Tangerine Tango piece was embossed with the Big Shot and the NEW Houndstooth Embossing Folder. The image has been colored in with Stampin' Pastels and a Blender Pen.

PRODUCTS USED:
Stamps: Sunny Fun (wm#123040 , cm#123042)
Ink: Stazon Black (#101406)
Cardstock: Daffodil Delight, Tangerine Tango, Concord Crush, Whisper White
Accessories: Daffodil Delight Taffeta Ribbon (#119254), Houndstooth Embossing Folder (#123134), Stampin' Pastels (#120962), Blender Pen (#102845), Big Shot (#113439), Dimensionals (#104430)


Monday, August 29, 2011

Big Shot Butterlies

The Big Shot makes paper crafting so easy. One of my favorite Embosslits for the Big Shot is the Beautiful Wings (#118138). An embosslit both embosses (makes areas raised) and cuts the images out at the same time. The Beautfiul Wings Embosslit makes 5 different butterflies at the same time.
For this card I used the embosslit with 4 different colors of cardstock; Whisteria Wonder, Pumpkin Pie, Pretty in Pink, and Melon Mambo. Since the embosslit is so small (2-1/4" x 2-1/2"), it is a great way to use up small scraps.

You can stack the butterflies to give them a little more dimension. I used the largest butterfly for the center focal point and stacked two together for the bottom row. They are held together with a dab of 2 way glue pen. The rhinstone accent is the smallest in the package. There is one of the largest ones in the corner of the large butterfly. All the butterflies are then attached to the card using dimensionals. I cut smaller pieces off the dimensional sheet for the small butterflies. I still had a number of the butterflies left over, so I attached sever of the smallest ones to the inside of the card with some 2 way glue pen.


The little tag was made with the Tiny Tags Stamp Set and the Jewlery Tag Punch. The Tiny Tags Stamp Set does come in both wood mount and clear mount. The pieces are rather small, so I do suggest getting them in a wood mount. They are much easier to clean and stamp with this way, and much harder to loose accidentaly. The piece of Designer Paper at the bottom is from the Flirtacious Specialty DSP and ran through the crimper for some added dimension.

Place your order 24/7 online at My Demonstrator Website. Simply click "shop now" in the upper right corner.

PRODUCTS USED:
Stamps: Tiny Tags (wm #118091 , cm#118592)
Ink: Basic Black (#101179)
Cardstock: Naturals White, Melon Mambo, Pumpkin Pie, Whisper Whiseria, Pretty in Pink, Flirtacious Specialty Designer Series Paper (#122360)
Accessories: Beautiful Wings Embosslit (#118138), Big Shot (#113439), Dimensionals (#104430), 2 Way Glue Pen (#100425), Basic Rhinestone Jewel Accents (#119246), Crimper (#101618), Jewlery Tag Punch (#117190), Linen Thread (#104199)