Thursday, September 30, 2010

October Bonus Card Kit

Featured Set: “Welcome Christmas” and Featured Accessory: Rhinestone Jewels
Featured Stamp Set for the YEAR: Teeny Tiny Wishes

October Bonus: There are two card kits to select from this month. To view the other one click HERE.

Why Card Kits?

Card Kits are the Stamping Classes that come right to your door! You’ll receive the supplies to create SIX of EACH design shown here – that means all of the consumable supplies that you need to create 12 cards total. You will also receive 2 additional full color photographs of “alternative” cards that you can make with the combined contents of the kit! In addition, you’ll receive detailed, step-by-step instructions on how to complete each of the 4 designs. This month’s card kit items are listed below, and the price of the Card Kit is just $20 – that’s less than $1.70 per card!!

Card Kit Order Deadline is by October 10th. You will receive your kits at the end of the month.
Special Offer for October! Purchase the Card Kit and receive “Welcome Christmas” and the Featured Accessory, “Rhinestone Jewels” at 20% off!

The Card Kit ($20) Includes:
Cut Cardstock Pieces
Cut Ribbon Pieces
12 –Very Vanilla Envelopes
Step by Step Instructions to complete 4 different card designs using the kit pieces

Add-on Products:
Early Espresso Classic Ink ($5.95)
Old Olive Classic Ink ($5.95)
Boho Blossoms Punch ($16.95)
2 ½” Circle Punch ($16.95)
Teeny Tiny Wishes Stamp Set ($36.95 – discount given on first card kit purchase of the year only – discounted price $29.56)
Welcome Christmas Stamp Set: Wood - ($27.95) $22.36 Clear - ($19.95) $15.96 with the purchase of the Card Kit.
Basic Rhinestone Jewels ($4.95) $3.96 with the purchase of the Card Kit

Other Optional Purchases:
Stampin’ Dimensionals ($3.95)
Mat Pack ($9.95)
Paper Piercer ($3.95)
SNAIL Adhesive ($6.95)
Bone Folder ($6.95)
Paper Snips ($9.95)

Please Note: I am glad to ship kits directly to you! There is a $3.50 shipping charge.

Contact me today to order your Card Kit Today!
Kathleen Brill-Myrice
Fa_stamper@sbcglobal.net

October Card Kit

Featured Set: “A Cute Little Christmas” and Featured Accessory: Candy Cane Buttons
Featured Stamp Set for the YEAR: Teeny Tiny Wishes

OCTOBER BONUS KIT--There are two kits to select from this month. Click HERE to view the other one.

Why Card Kits?

Card Kits are the Stamping Classes that come right to your door! You’ll receive the supplies to create SIX of EACH design shown here – that means all of the consumable supplies that you need to create 12 cards total. You will also receive 2 additional full color photographs of “alternative” cards that you can make with the combined contents of the kit! In addition, you’ll receive detailed, step-by-step instructions on how to complete each of the 4 designs. This month’s card kit items are listed below, and the price of the Card Kit is just $20 – that’s less than $1.70 per card!!

Card Kit Order Deadline is by October 10th. You will receive your kits at the end of the month.
Special Offer for October! Purchase the Card Kit and receive “A Cute Christmas” and the Featured Accessory, “Candy Cane Buttons” at 20% off!

The Card Kit ($20) Includes:
Cut Cardstock Pieces
Cut Designer Paper Pieces (Note: Prints will vary from kit to kit within the “Candy Cane Christmas” Pack)
Cut Ribbon Pieces
12 – Whisper White Envelopes
Step by Step Instructions to complete 4 different card designs using the kit pieces

Add-on Products:
Basic Black Classic Ink ($5.95)
Garden Green Stampin’ Write Marker ($3.50)
Real Red Stampin’ Write Marker ($3.50)
Baja Breeze Stampin’ Write Marker ($3.50)
In Color Stampin’ Write Markers ($14.95)
Teeny Tiny Wishes Stamp Set ($36.95 – discount given on first card kit purchase of the year only – discounted price $29.56)
A Cute Christmas Stamp Set: Wood - ($25.95) $20.76 Clear - ($18.95) $15.16 with the purchase of the Card Kit.
Candy Cane Designer Buttons ($8.95) $7.16 with the purchase of the Card Kit

Other Optional Purchases:
Stampin’ Dimensionals ($3.95)
SNAIL Adhesive ($6.95)
Mini Glue Dots ($4.95)
Bone Folder ($6.95)
Paper Snips ($9.95)

Please Note: I am glad to ship kits directly to you! There is a $3.50 shipping charge.

Contact me today to order your Card Kit Today!
Kathleen Brill-Myrice
Fa_stamper@sbcglobal.net

Saturday, September 25, 2010

Blog Candy Winner!

Thanks to everyone who entered to win my blog candy.
And the WINNER is..............

PaperFairyFris--Please contact me by 9:15 am on Sunday or a new winner will be drawn.
You can email me at fa_stamper@sbcglobal.net

Friday, September 24, 2010

Demonstrator Opportunity-Craft Tote Promotion

If you have even briefly thought about becoming a Stampin' Up! Demonstrator, now is the time to join.
The Greenhouse Gala Craft Tote Tote-ally ROCKS! It is large and will fit all the products you get with the starter kit. The stamps, the cardstock, the ink pads, and all the accessories. If you select the add-on kit it will also hold the 12x12 paper and when the time comes a paper cutter.

It is a $39.95 value and you get one for FREE by signing up to be a Stampin' Up! Demonstrator between now and October 18th.
The starter kit is only $175 and you get everything you need to start a thriving business or just gather supplies for a new hobby. There is no obligation to keep the items in the starter kit after you purchase it. However, there are plenty of incentives to continue with a wonderful company.
For all the details about being a Stampin' Up! Demonstrator contact me today. I will be happy to get you started with the Stampin' Up! Opportunity.

Halloween Projects

LAST DAY TO ENTER BLOG CANDY. I will have my darling daughter pull the winner after school today.
Yesterday I showed you the scrapbook page we did at stamp club this month. Today I have the card and one of the 3-D items we made.

The card is a combination of two great cards from Lynn Pratt. Again, I wanted to show a cute way to use the owl punch. I used the main part of the owl body, then added wings. The wings is the bitty bat punch cut in half. The little bats are the bitty bat punch themselves. The eyes on the little bats are the smallest circles from the owl punch. I then used a Stampin' Write Marker to dot the center of the eye. The tombstones are done with the NEW Decorative Label Punch in the Winter Mini Catalog. I spounged the edges and drew on sone cracks with a Stampin' Write Marker. It is hard to see in the photo. The grass was torn and then cut to give it a more realistic look. The tree branch was hand cut. I stamped the woodgrain background onto it in a darker shade and then edged the branch with a Stampin' Write Marker.
TIP: I inked up the woodgrain stamp. Layed the stamp on my desk (stamp side up), put the cardstock onto the stamp and pressed down with my fingers. This helped to ensure I got the swirl part of the image where I wanted it.
The 3-D item shown is one of two we made that day. We also made the Web Luminary from the Blog Hop a few weeks back. Click here to see the luminary. The NEW Candy Wrapper Die from the Winter Mini catalog is so easy to use. Simply cut with the Big Shot, fold, fill with candy and tie shut. You only need a small piece of sticky strip to hold the candy wrapper shut. I also put a small piece of sticky strip on the back of the tag to hold it where I wanted it to be.
Products Used:
STAMPS: Woodgrain Background (#117100), Got Treats? (W-#119114, C-#120627)
CARDSTOCK: Pumpkin Pie, Not Quite Navy, Whisper White, Chocolate Chip, Basic Black, Basic Gray, Old Olive, Rich Razzleberry, Wicked Fun Specialty DSP (#117400)
INK: Stampin' Write Markers (Basic Black, Early Espresso, Old Olive, Pumpkin Pie, Rich Razzleberry), Classic Ink (Basic Black, Early Espresso)
PUNCHES: Two step owl (#118274), Bitty Bat (#119279), 1-3/8" Circle, Decorative Label, 2-3/8" Scallop Circle (#118874), 1-3/4" Circle
OTHER: Big Shot, Candy Wrapper Die (#120890), Raven Lace Trim (#120988), Paper Snips, Sticky Strip

Thursday, September 23, 2010

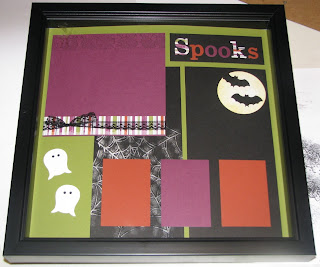
Spooks-Scrapbook Page

Before we get started with todays project, don't forget to enter my BLOG CANDY. The winner will be drawn on Friday night.
This is the scrapbook page we made at stamping club last weekend. I placed it in a shadowbox frame I got at the local craft store. Below you will find a couple tips for the techniques on this page.
The scrapbook page is 12x12. I wanted to incorporate a few things I have learned recently. I have had a lot of fun working with the Web Embossing Folder. I was having some problems figuring out how to use it on a scrapbook page. My problem is that it is only the size of a card front. I didn't want to have a web that led to nowhere. To solve the probem, I cut the black cardstock into two pieces. The original design was going to follow a somewhat progressive page layout, so the black piece was 8-1/2 x 11. I decided it would be better as a more square shape. Instead of going with an 8-1/2 by 8-1/2, I compensated for the extra gap between the two halves and cut it 9 x 8-1/2. Then cut in half at 4-1/4". This way I could emboss one portion of the area with the embossing folder and feel like the web didn't stop abruptly. To make the web stand out a little more, and have a shimmer to it I coated it with some shimmer paint.
TIP #1: To coat the web with shimmer paint, I used a spounge dauber. I first dabbed the paint onto my scrap paper then onto my web area. Don't dab too hard or you will get circle marks from the dauber. You could try a spounge, but I felt like it covered to much area for me and I didn't have enough control. By dabbing it on the scrap paper first it help to tone down the paint. It is always easy to add more, but once it is there you are stuck with it. I did want more in the center of the web.
To make the moon is simple. I punched out a 2-1/2" Circle with the new punch in the Winter Mini Catalog. Then using a stampin' spounge I added some Daffodil Delight Classic Ink to the edges. The bats were punched with the bat punch. In retrospect they should be on dimensionals.
The ghosts are one of my favorite things that creative demos have come up with. It is actually the owl punch upside down and his feet cut off. I punched a couple of eye holes with my crop-a-dile and then put a scrap of black behind his head to show through the eyes. I also love to use my wheels when I get a chance, so there is a strip of the Web Stampin' Around Wheel at the top of the 6x6 area.
TIP #2: This has to do with the title letters. I made them with my Big Shot and Timeless Type Junior Alphabet. Whichever print you want to show on our page, needs to face the die when you cut the letters out. Personally, I cut with my die facing up. It makes it easier to place my scraps of cardstock on the area I want to cut. So the design I want to show on my projects, must go down on my die.

Products Used:
Stamps: Web Stampin' Around Wheel (#115666)
Ink: Daffodil Delight (#119667), Black Stampin' Around Cartridge (#104581), Platinum Shimmer Paint (#116807)
Cardstock: 12x12 Old Olive (#119934), Basic Black (#121045), Rich Razzleberry (#115316), Cajun Craze (#119684), Whisper White (#100730), Wicked Fun Specialty Designer Series Paper (#117400)
Accessories: Timeless Type Junior Alphabet (#115951), Raven Lace Trim (#120988), Bitty Bat Punch (#119279), Two Step Owl Punch (#118074), Web Embossing Folder (#120889), Spounge Daubers (#102892), Stampin' Spounges (#101610)

Wednesday, September 22, 2010

74cent- Just a Note

I need to pass a quick note to my son's teacher the other week. Of course it would have been too simple to just scribble it on a piece of paper and put in his backback. So I ran to my craft room, grabbed some Stampin' Write Markers, a couple pieces of cardstock and my "Hello Again" Stamp Set.

Cards do not have to cost tons of money or have lots of bling to be perfect. This is a simple matted card. No fancy layers, no punches, no cutting.....just ink, stamp and send. I colored directly on the stamp with the In Color Stampin' Write Markers. I then "huffed" hot air onto the stamp and stamped onto the Confetti White Cardstock. This is fast and simple to do. It is also a great way to use different colors on one stamp image.

You can always purchase each individual Stampin' Up! Color in Ink, Cardstock, Markers and re-inkers. You can also purchase then in Color Collections. Both Pear Pizzazz and Blushing Bride are in the 2010-2012 In Color Collection. You can purchase the variety pack of cardstock (#119797, $6.95), containing 4 sheets of each of the 5 In Colors for 2010-2012. Then mix and match the cardstock to create over 26 cards in this design. If you use the Confetti White cardstock as your base color you can make over 60 cards with $44.35 in product. That is only 74cents per card.
Order products online 24/7/365 at My Stampin' Up! Website. Or contact me today to schedule your own workshop so all of your friends can learn how to make cards for under $1.00 each.

PRODUCTS USED:
Stamps: Hello Again (Pictured Here)(#113780, $12.95)

Cardstock: Pear Pizzazz(#119795, $6.95), Blushing Bride(#119796, $6.95), Confetti White (#102028, $9.50)
Ink: 2010-2012 In Color Stampin' Write Markers (#119801, $14.95)

Tuesday, September 21, 2010

Club Card--Hello Baby

It is always a good idea to have a baby card in your file, just in case. This is the card we made at stamp club last month for that very reason. Members could choose between making a boy or girl card. For more information on stamp club contact me.
Since Stampin' Up! only offers most ribbon in 13 of the 45 colors, we learned how to die the white taffetta ribbon to match any color in the SU! spectrum. We also learned how to color with the Watercolor Pencils. To give the card a simple twist, we made it into an easel card. This is simple to do and requires only an extra piece of cardstock for the front and something on the inside to help it stand up.


Don't miss out on a chance for the blog candy I have this week. Check out yesterdays post for more details.

Monday, September 20, 2010

BLOG CANDY

I wanted to take a moment to thank all of my wonderful followers. Thanks to you and the Stampin' Addicts Winter Mini Blog Hop I have surpassed a milestone....... 10,000 hits (and climbing). To show my appreciation to all of you I am offering this BLOG CANDY.
Winning is simple.....leave me message. Tell me what you have enjoyed or even what you would like to see more of. Just type something. On Friday, Sept. 24th, I will put all of the comments into a hat a have my darling daughter pull one out. The winner will be announced on Saturday and receive everything shown in the photo. There are two retired hostess stamp sets (Punches Three & Patterned Pines), 3-1/2 yards of Wild Wassabi Stripped Ribbon and a new package of Real Red Bead Duos.

Be sure to check back as the winner only has 24 hours to contact me, then a new name will be drawn.

Don't miss out on future posts.....subscribe to my blog today.

Sunday, September 19, 2010

Back to School

Each month I have a wonderful group of ladies that gathers for my stamp club. We make a variety of projects each month. Generally we make a card, a scrapbook page and a 3-D item of some sort. With school is in full swing everywhere I thought it would be a nice focus for our scrapbook page last month.
I LOVE the new Owl Punch. He is fun to dress up and soooo easy to use. The Designer Series Paper on his chest is from the Gala Greenhouse collection. It is also used on the strip across the bottom portion. I used it as my inspiration for my color scheme. (Pumpkin Pie, Daffodil Delight, Baja Breeze, Chocolate Chip, Pear Pizzazz, and Real Red) Some of the colors only got little hints in the embelishments I made with the "Beary Bright" Build-A-Bear Sizzlits Die. The journaling block in the lower right corner was first punched with the Spiral Border Punch. I then tour a little off the top and bottom before crumpling it to give it that used notebook paper look.
The simple title was done with the "Rough Type" alphabet from the summer mini catalog. The new clear stamp option made this easy to do. Simply place all the letters on one clear block and then stamp at the same time. Worried that the letters will not line up correctly? Do as I did and stamp them crooked on purpose.

Do you live in the SW Oklahoma area? Are you interested in gathering with friends for a few hours of stamping fun once a month? Contact me to join stamp club. We are always ready to welcome new members. There is no supply fee and you will get a chance at earning the hostess benifits. Contact me for more details. fa_stamper@sbcglobal.net
BLOG CANDY COMING SOON!

Products Used:
Stamps: Rough Type Alphabet
Colors: Pumpkin Pie, Baja Breeze, Pear Pizzazz, Chocolate Chip, Daffodil Delight, Whisper White, Real Red
Accessories: Gala Greenhouse DSP, 2-step Owl Punch, 2-step Bird Punch, Large scallop circle, top note big shot die, spiral punch, Mini Library Clips, Beary Bright Sizzlit, Chocolate Chip Stampin' Write Marker