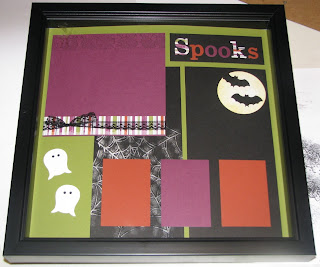
This is the scrapbook page we made at stamping club last weekend. I placed it in a shadowbox frame I got at the local craft store. Below you will find a couple tips for the techniques on this page.
 The scrapbook page is 12x12. I wanted to incorporate a few things I have learned recently. I have had a lot of fun working with the Web Embossing Folder. I was having some problems figuring out how to use it on a scrapbook page. My problem is that it is only the size of a card front. I didn't want to have a web that led to nowhere. To solve the probem, I cut the black cardstock into two pieces. The original design was going to follow a somewhat progressive page layout, so the black piece was 8-1/2 x 11. I decided it would be better as a more square shape. Instead of going with an 8-1/2 by 8-1/2, I compensated for the extra gap between the two halves and cut it 9 x 8-1/2. Then cut in half at 4-1/4". This way I could emboss one portion of the area with the embossing folder and feel like the web didn't stop abruptly. To make the web stand out a little more, and have a shimmer to it I coated it with some shimmer paint.
TIP #1: To coat the web with shimmer paint, I used a spounge dauber. I first dabbed the paint onto my scrap paper then onto my web area. Don't dab too hard or you will get circle marks from the dauber. You could try a spounge, but I felt like it covered to much area for me and I didn't have enough control. By dabbing it on the scrap paper first it help to tone down the paint. It is always easy to add more, but once it is there you are stuck with it. I did want more in the center of the web.
To make the moon is simple. I punched out a 2-1/2" Circle with the new punch in the Winter Mini Catalog. Then using a stampin' spounge I added some Daffodil Delight Classic Ink to the edges. The bats were punched with the bat punch. In retrospect they should be on dimensionals.
The ghosts are one of my favorite things that creative demos have come up with. It is actually the owl punch upside down and his feet cut off. I punched a couple of eye holes with my crop-a-dile and then put a scrap of black behind his head to show through the eyes. I also love to use my wheels when I get a chance, so there is a strip of the Web Stampin' Around Wheel at the top of the 6x6 area.
TIP #2: This has to do with the title letters. I made them with my Big Shot and Timeless Type Junior Alphabet. Whichever print you want to show on our page, needs to face the die when you cut the letters out. Personally, I cut with my die facing up. It makes it easier to place my scraps of cardstock on the area I want to cut. So the design I want to show on my projects, must go down on my die.
Products Used:
Stamps: Web Stampin' Around Wheel (#115666)
Ink: Daffodil Delight (#119667), Black Stampin' Around Cartridge (#104581), Platinum Shimmer Paint (#116807)
Cardstock: 12x12 Old Olive (#119934), Basic Black (#121045), Rich Razzleberry (#115316), Cajun Craze (#119684), Whisper White (#100730), Wicked Fun Specialty Designer Series Paper (#117400)
Accessories: Timeless Type Junior Alphabet (#115951), Raven Lace Trim (#120988), Bitty Bat Punch (#119279), Two Step Owl Punch (#118074), Web Embossing Folder (#120889), Spounge Daubers (#102892), Stampin' Spounges (#101610)

6 comments :
Beautiful page, wonderful fall colors
This is my first visit to your blog and I am really enjoying all of your great ideas. This scrapbook page is fantastic...love all of the details and tips on adding the shimmer to the web. Have a great day! :)
Great page! I like that you framed it too. I'm thinking it would make a grandparent gift!
Fun page! Thanks for the tips with the shimmer spider web!
What a great page for Halloween! Love the colors and thanks so much for all the tips.
Fabulous lay out!
Post a Comment