I am starting a new club year with the new catalog. The great part about Flex Club is you decide your benefit level. Our first gathering is this Wednesday, June 12th at 10:00. For more details about Flex Club click on the "Flex Club" tab at the top of this page.
This month we will be doing a Father's Day card and using several new items from the NEW Catalog. Come check out the new Big Shot magnetic platform, In Colors and stamps.

Sunday, June 9, 2013
Wednesday, May 22, 2013
Spring Cleaning Time
Long Time....No Blog. We all go through those times where life throws us a curve ball. Then there are the times when you need to focus on something else for awhile. The last few months I have had a combination of them both. February 1st I started homeschooling my middle child. It took us both some time to get into a groove that didn't wear us out by afternoon. Summer is upon us and we are still schooling, but we have found a groove that will allow for a little more me time (aka. Stamp Time)! I am gearing up for new classes. clubs and lots of great surprises!!
The new catalog is just around the corner. Stampin' Up! is currently in retirement sale time. For the most recent update of retiring items go directly to MY STORE. Click on "Shop Now" and then "retiring products".
.JPG) To prepare for the new catalog I am doing some major Spring Cleaning. I have been a demonstrator for over 7 years now and collected a lot of swaps in my time. What is a swap? From time to time demonstrators exchange card ideas. I send copies of one card to someone, who then sends me back an assortment of cards from other people. At Stampin' Up! events the most fun thing can be swapping cards with other demonstrators in person. Many of us will use these cards for inspiration for our classes or show our customers what other ideas are out there for a stamp set. Over time the stamp sets retire and the colors may change. Ribbon or designer paper is no longer available. BUT I STILL LOVE MY SWAPS!! I have used many over and over. I might like the layout or it gives me a technique idea. Something catches my eye each time I look through them. After 7 years I have A LOT. I just don't have room for them all and it is time they helped to inspire someone else.
To prepare for the new catalog I am doing some major Spring Cleaning. I have been a demonstrator for over 7 years now and collected a lot of swaps in my time. What is a swap? From time to time demonstrators exchange card ideas. I send copies of one card to someone, who then sends me back an assortment of cards from other people. At Stampin' Up! events the most fun thing can be swapping cards with other demonstrators in person. Many of us will use these cards for inspiration for our classes or show our customers what other ideas are out there for a stamp set. Over time the stamp sets retire and the colors may change. Ribbon or designer paper is no longer available. BUT I STILL LOVE MY SWAPS!! I have used many over and over. I might like the layout or it gives me a technique idea. Something catches my eye each time I look through them. After 7 years I have A LOT. I just don't have room for them all and it is time they helped to inspire someone else.
HOW CAN YOU GET MY INSPIRATIONAL SWAPS? Easy, place an order of any kind between now and June 30th and I will send you a ziplock bag of swaps and maybe (wink) another small gift from my retired spring cleaning stash.
What good are the swaps to you? Use them for your own inspiration. Copy the layout for your next project. Make it into a full card. (Many swaps are just the front of the card--ass a half sheet of cardstock and viola--ready to go card.) Some of the swaps may come ready to send---feel free to give it away. The only thing I ask it that you DO NOT SELL THE CARDS. Some wonderful demonstrator took the time to make these to trade with other demonstrators over the years. These are a treasure that I have valued over the years. It is just time for me to "pay it forward" so please give the designers the same respect that I have.
DOUBLE YOUR PLEASURE!! Want two sets of inspirational swaps? Place an order before May 29th and use the code "RQXAHHYV" at check out. I will send you two packs of swaps and an extra gift from my retired stash.

Need a little inspiration each month? Check out Paper Pumpkin! It is a new kit that comes to you in the mail each month directly from Stampin' Up! For only $19.95 a month you receive exclusive stamps and all the supplies you need to create a fun and step by step project. You can skip a month at any time or just keep enjoying those special red boxed surprises in your mailbox for months to come. Join Paper Pumpkin! and select me as your demonstrator before June 30th and I will send you another set of inspirational swaps!
The new catalog is just around the corner. Stampin' Up! is currently in retirement sale time. For the most recent update of retiring items go directly to MY STORE. Click on "Shop Now" and then "retiring products".
.JPG)
HOW CAN YOU GET MY INSPIRATIONAL SWAPS? Easy, place an order of any kind between now and June 30th and I will send you a ziplock bag of swaps and maybe (wink) another small gift from my retired spring cleaning stash.
What good are the swaps to you? Use them for your own inspiration. Copy the layout for your next project. Make it into a full card. (Many swaps are just the front of the card--ass a half sheet of cardstock and viola--ready to go card.) Some of the swaps may come ready to send---feel free to give it away. The only thing I ask it that you DO NOT SELL THE CARDS. Some wonderful demonstrator took the time to make these to trade with other demonstrators over the years. These are a treasure that I have valued over the years. It is just time for me to "pay it forward" so please give the designers the same respect that I have.
DOUBLE YOUR PLEASURE!! Want two sets of inspirational swaps? Place an order before May 29th and use the code "RQXAHHYV" at check out. I will send you two packs of swaps and an extra gift from my retired stash.
Need a little inspiration each month? Check out Paper Pumpkin! It is a new kit that comes to you in the mail each month directly from Stampin' Up! For only $19.95 a month you receive exclusive stamps and all the supplies you need to create a fun and step by step project. You can skip a month at any time or just keep enjoying those special red boxed surprises in your mailbox for months to come. Join Paper Pumpkin! and select me as your demonstrator before June 30th and I will send you another set of inspirational swaps!
Tuesday, January 22, 2013
SALE-A-BRATION HAS BEGUN!!
It's the most.... wonderful time...of the year. Yes, I am singing, but I am not talking about Christmas. It is time for the biggest promotion of the Stampin' Up! year. Sale-A-Bration!!

THE BASICS
For those new to SAB, it is simple. For every $50 in SU! Product (before tax and shipping) you order, you can select a FREE item from the Sale-A-Bration catalog. Want two items, order $100 and so forth. There are 12 SAB exclusive items, 6 main catalog items, and one new item (which will carry into the catalog) to choose from. With 19 choices, there is something for everyone. To place your order, contact me or order online at My Demonstrator Website.
HOST
Gather some orders from your friends and earn even more. Place a single order (or collection of orders from friends) for at least $150 and receive a pack of Silver Glimmer Paper for free, in addition to $25 hostess dollars to spend on anything in the catalog. Order $400 and receive Silver Glimmer Paper, $65 hostess dollars, 50% off any one full-prices item, and a Free Product Bundle.
BECOME A DEMONSTRATOR
Signing up with Stampin' Up! is even more wonderful during Sale-A-Bration. To help Stampin' Up! celebrate their 25th Anniversary, from now until March 22nd, new demonstrators can select 25% more product for their Starter Kit. New demonstrators get $156.50 worth of products for only $99 during SAB. You choose the items for your starter kit. Kits also come with all the catalogs and other business supplies to get you started right away. For more information on becoming a demonstrator contact me or go to My Demonstrator Website and sign up today.
NEW Paper Pumpkin Monthly Kit
Sweep away the mundane-your creativity carriage awaits!
I'm Paper Pumpkin . . .
I come to your door each month (a fully decked-out creativity carriage). I'll help you to escape your life with some paper fun.
I come in a sweet box, but you'll really love what you find on the inside:
All the stamps, ink, paper, and accessories to create pinable projects. Create stuff like cards, journals, décor, and more!
Paper Pumpkin by Stampin' Up! is a new monthly kit program that anyone (even you) can enjoy!
Get Started
It's so easy to get started. Simply sign up for the program by visiting www.mypaperpumpkin.com and click Get it. Every month a new, surprise project kit arrives at your doorstep. Just think of the anticipation of creating a fun project to pin, showoff, and share with your friends and family-every month!
Of course, you'll want to know more. So here's the nitty gritty:
- Each month we send you a unique, surprise kit with a project-cards, journals, décor, and more! (We've even color-coordinated, measured, and cut everything for you!)
- Each kit includes stamps, ink, paper, and accessories-everything but adhesive.
- Each kit gives you a 30-minute creativity escape.
- Stampin' Up! will ship your Paper Pumpkin on or around the 15th of the month.
- You need to sign up for a kit by the 10th of the month to get that month's kit. If you sign up on the 11th of the month, your first kit will come the next month. (Let's say you sign up on May 10th, we'll send your kit around May 15th. If you sign up on May 11th, we'll send your first kit around June 15th.)
- A Paper Pumpkin membership is $19.95 per month (and shipping is included!)
- There's no commitment, you can cancel your monthly Paper Pumpkin at anytime. You can also skip a month if you want.
- Starting in early March, we'll offer a Try-It kit if you'd like to try Paper Pumpkin for one month.

Here's How You Order
Sign up for your monthly Paper Pumpkin by visiting www.mypaperpumpkin.com and click Get it.
Starting in early March, you can try Paper Pumpkin for one month by visiting my online store.
A Free Gift in Your Very First Kit
The Welcome Kit is the very first Paper Pumpkin you will receive in your first month of membership. The Welcome Kit includes a free gift-a clear acrylic block!
Tuesday, January 8, 2013
Twisted Card Photo Tutorial
Here is more information on the Twisted card from last weeks Blog Hop. Today, I have photos of the steps to making the card base and an easy way to cut the pieces for the embellishments. I am working on a video tutorial, but my home is rarely quiet enough to do so.
.JPG)
TWISTED CARD BASE DIRECTIONS:
Materials: 4-1/4" x 11" piece of cardstock.
Step 1: Score the cardstock in half diagonally from corner to corner. I place each corner in the groove of my paper trimmer. Be sure to use the light colored scoring blade.


Step 2: Fold the cardstock on the scored line.

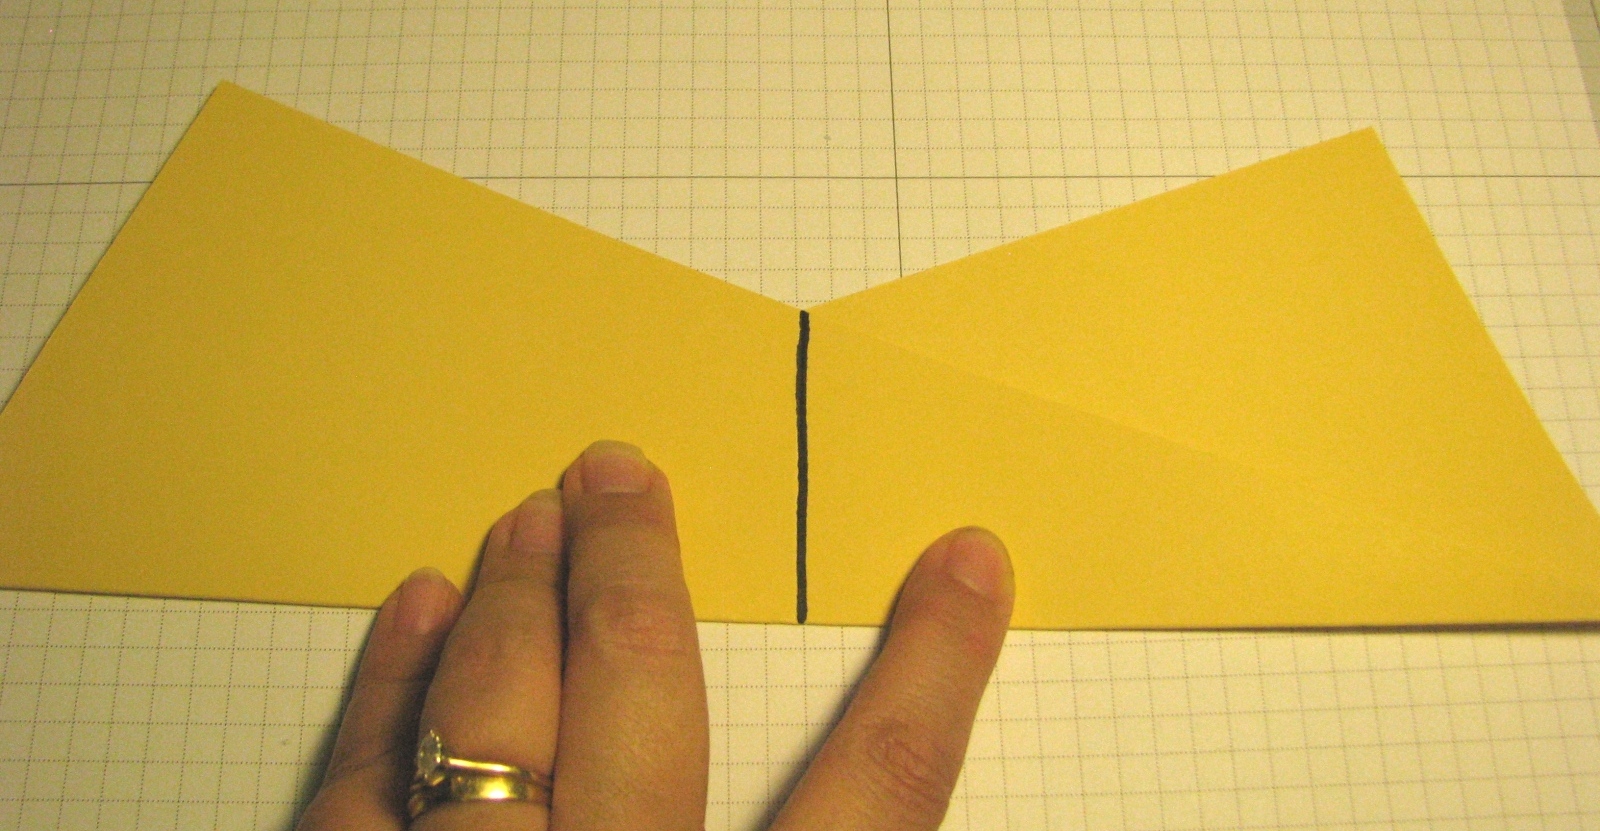
Step 3: Turn the cardstock 90* in the paper trimmer and score symetrically down the middle. You will need to make this mark heavier as there are two layers of cardstock to go through.


Step 4: Fold the card in half and press everything with a bone folder.
Step 5: Decorate card as you wish. If you want to close the front pocket, put adhesive where the red marks are, then fold the card as above. You can put similar adhesive to close the inside pocket if you wish. In my original card I closed only the front pocket.

MAKING PIECES FOR THE FRONT AND INSIDE. If you do this with two pieces of Designer Series Paper, you can mix and match the pieces for the inside and the outside.
Step 1: Start with a 5-1/4" x 4" piece of cardstock or Designer Series Paper.

Step 2: Measure up from the lower left corner 2-1/8". Make a small pencil mark or crease in the cardstock. Measure over from the upper right corner 4-1/2" Make another small pencil mark or crease in the paper. I drew lines to show where you will cut.

Step 3: Cut from the 2-1/8" mark to the lower right corner. Then cut from the 4-1/2" mark to the corner where the 2-1/8" mark was. You will discard the corner with the slash marks.

.JPG)
TWISTED CARD BASE DIRECTIONS:
Materials: 4-1/4" x 11" piece of cardstock.
Step 1: Score the cardstock in half diagonally from corner to corner. I place each corner in the groove of my paper trimmer. Be sure to use the light colored scoring blade.


Step 2: Fold the cardstock on the scored line.

Step 3: Turn the cardstock 90* in the paper trimmer and score symetrically down the middle. You will need to make this mark heavier as there are two layers of cardstock to go through.

Step 4: Fold the card in half and press everything with a bone folder.
Step 5: Decorate card as you wish. If you want to close the front pocket, put adhesive where the red marks are, then fold the card as above. You can put similar adhesive to close the inside pocket if you wish. In my original card I closed only the front pocket.

MAKING PIECES FOR THE FRONT AND INSIDE. If you do this with two pieces of Designer Series Paper, you can mix and match the pieces for the inside and the outside.
Step 1: Start with a 5-1/4" x 4" piece of cardstock or Designer Series Paper.

Step 2: Measure up from the lower left corner 2-1/8". Make a small pencil mark or crease in the cardstock. Measure over from the upper right corner 4-1/2" Make another small pencil mark or crease in the paper. I drew lines to show where you will cut.

Step 3: Cut from the 2-1/8" mark to the lower right corner. Then cut from the 4-1/2" mark to the corner where the 2-1/8" mark was. You will discard the corner with the slash marks.

If you have any questions, please post in the comment section. I will do my best to answer them.
Monday, December 31, 2012
Clear Case Scrapbook
Thank you to everyone who visited my blog for the Stampin' Addicts Blog Hop this last weekend. If you missed it, you can check it out HERE>. There were some fantastic projects from my Stampin' Addicts friends. You should also check out the Stampin' Addicts website. We are a FREE website for those "Positively Creative! Positively Stampin' Up!"


Here are some more details on the Clear Case Scrapbook I showed on the hop. The outside insert for the case is 7" x 10.5" and scored at 5" and 5-1/2". When designing your outside cover insert, it is best to keep things flat and not use a lot of layers. Bulky objects and layers will put stress on the case plastic and can tear over time. When you are done creating the cover, open the case and slide the insert between the plastic case and the thin plastic cover.

For the inside there are two main pieces each measuring 7" x 5". I adhered them to the left and right side of the inner case with snail adhesive. If you put a lot of things inside your case, you may want to consider using sticky strip for a stronger bond. There is nothing along the spine area of the case. I used the same Daffodil Delight color for the inside as I did for the outside. I kept my inside very simple this time, but you can easily add embellishments to the inside of the case. BEWARE--When the case closes anything that spans the two pages will shift. The strip of Designer Series Paper I have at the bottom is only adhered on the right side or the case. The left side is tucked under the photo so the paper will slide in and out as the case is opened and closed. If you need more space for photos you can put some on the back area of the case or even create a folded page inside to open and expand for more space.
OTHER USES:
These cases are great for little keepsakes. They come in a set of 4. Since they don't have any inserts for DVDs they are ready to use. They are easy to mail without the photos risking being bent. Perfect for grandma, traveling parents, or friends you are far apart from. They are also great for your desk at work. You can fit a lot of photos in one small area and keep it in your desk drawer easily for the time you need a quick smile on a rough day. Since the cases fit on any media rack, you can make individual ones for a series of events. No need to move around pages in a scrapbook and you can easily put in 3-D items like a first tooth or bracelet from the hospital.
Enjoy creating your own Clear Case Scrapbook.
Products Used
Stamps: Feel Goods (wm# 129681, cm#129684)
Colors: Daffodil Delight, Cherry Cobbler, Parker's Patterns DSP (#131021)
Accessories: Clear-Mount Stamp Case (#119105), Oval Framelits (#129381), Scallop Edge Border Punch (#119882)
Items from the 2013 Spring Catalog are available from Jan. 3-May 31, 2013.
BLOG CANDY WINNER
Congratulations Rhonda G. You are the winner of the "Bootiful Occasions" Stamp Set. Please email me your address and will send your stamp set to you. Thank you to everyone who commented on my Blog Hop Projects and Liked my Facebook Page.
Friday, December 28, 2012
Stampin' Addicts Blog Hop for 2013 SU! Spring Catalog

ON WITH THE SHOW--I am featuring the "Feels Good" Stamp Set found on page 21 of the Spring Catalog. There are 5 stamps in this set and I have 3 projects to show you today. The catalog was previously known as the Occasions Mini Catalog and this stamp set is perfect for those non-holiday OCCASIONS that fill our lives.
.JPG)
.JPG) My first project is a Twisted Card for a CONGRATULATIONS OCCASION. It was originally created by a member of my extended SU! family, Kelly Gettelfinger. I have several friends who train to run in marathons. A couple of them have completed their first half-marathon (13.1 miles). On the inside pocket I put a 13.1 sticker for them to proudly display on their car window.
My first project is a Twisted Card for a CONGRATULATIONS OCCASION. It was originally created by a member of my extended SU! family, Kelly Gettelfinger. I have several friends who train to run in marathons. A couple of them have completed their first half-marathon (13.1 miles). On the inside pocket I put a 13.1 sticker for them to proudly display on their car window. 
My second project is a Treat Bag made from one sheet of 12"x12" cardstock and perfect for a THANK YOU OCCASION. It features the Window Frame Framelits that will carry over into the Spring Catalog. Any of the stamps in this set would work wonderfully on this bag. The bag can also be easily made to form a 6"wide x 2"deep x 5"high gift box.

 My last project is a Clear Case Photo Box for the OCCASION WHEN YOU NEED A SMILE. These are the same clear cases that Stampin' Up! uses for their wonderful stamp sets. You can purchase them separately from your demonstrator in a pack of 4. It is best to keep the front flat and put any 3-dimensional embellishments inside. I made this box for the OCCASIONS when my soldier husband is away from home and misses our kids. They are also great for grandma or long distance friends.
For more details on any of these projects, check back this coming week. I will have measurements, tips and more photos. The next stop on the blog hop will take you to Sara's for "A Little Bit of Spring".


BLOG CANDY--No blog hop would be complete without a little bit of Blog Candy. I recently Celebrated two OCCASIONS. First I passed my 7 year anniversary as a demonstrator in November and then I passed my $50K in career sales milestone this month. I am giving away the "Bootiful Occasions" stamp set from page 50 of the SU! Annual Catalog to a random winner. You can enter once by leaving a comment here on this blog post. You can get a second entry by following me on my Facebook Page. I will draw a random winner on Monday.
Subscribe to:
Posts
(
Atom
)