Showing posts with label Tutorials. Show all posts

Tuesday, January 8, 2013

Twisted Card Photo Tutorial

Here is more information on the Twisted card from last weeks Blog Hop.  Today, I have photos of the steps to making the card base and an easy way to cut the pieces for the embellishments.  I am working on a video tutorial, but my home is rarely quiet enough to do so.

TWISTED CARD BASE DIRECTIONS: 
Materials:  4-1/4" x 11" piece of cardstock.

Step 1:  Score the cardstock in half diagonally from corner to corner.  I place each corner in the groove of my paper trimmer.  Be sure to use the light colored scoring blade.

Step 2:  Fold the cardstock on the scored line.

Step 3:  Turn the cardstock 90* in the paper trimmer and score symetrically down the middle.  You will need to make this mark heavier as there are two layers of cardstock to go through.
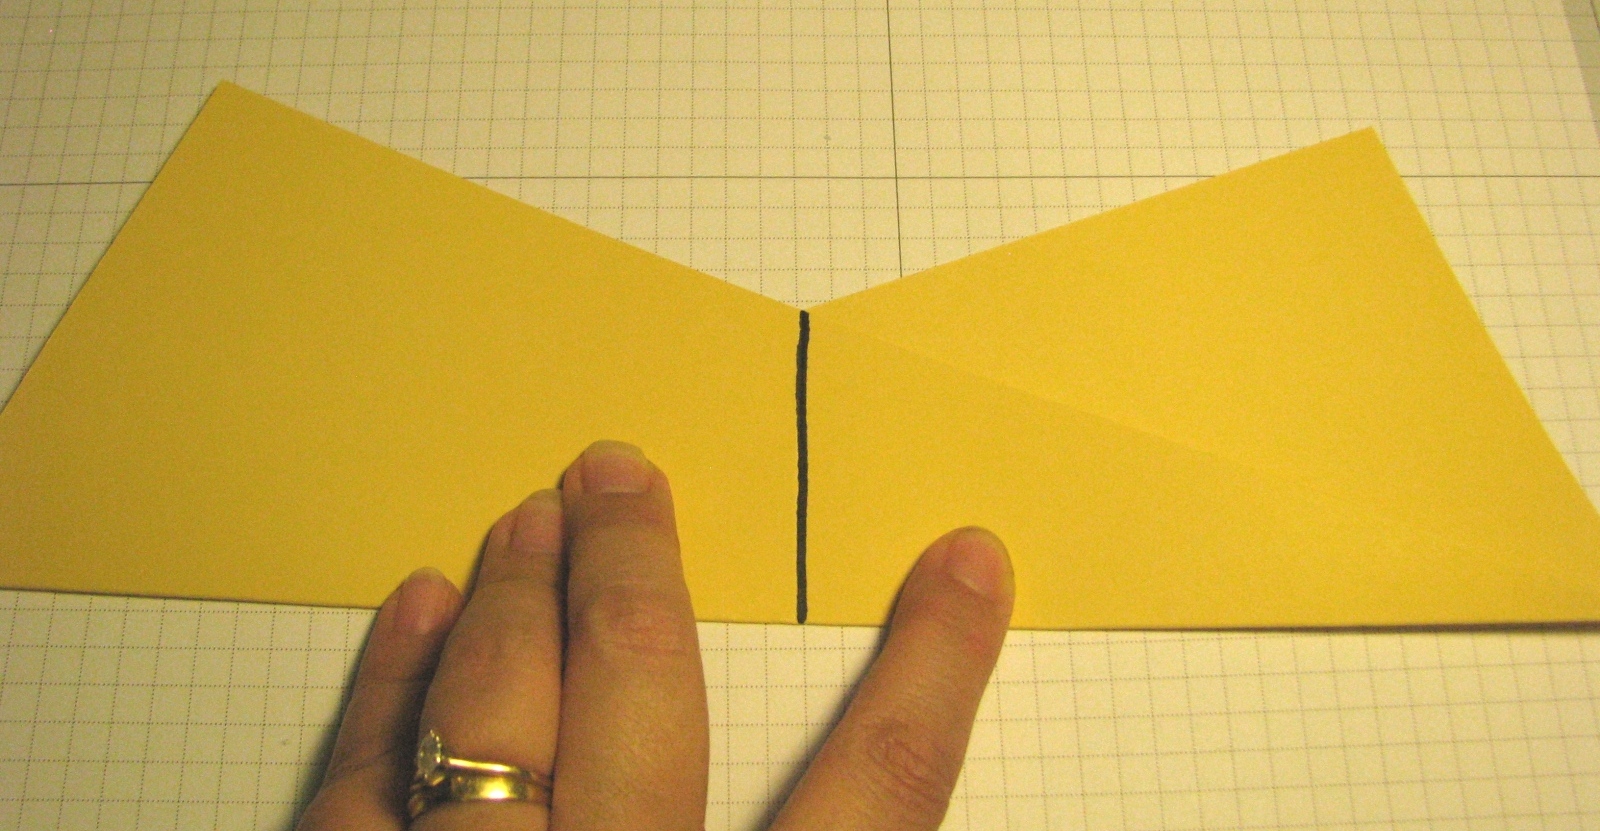
Step 4:  Fold the card in half and press everything with a bone folder.

Step 5:  Decorate card as you wish.  If you want to close the front pocket, put adhesive where the red marks are, then fold the card as above.  You can put similar adhesive to close the inside pocket if you wish.  In my original card I closed only the front pocket.

MAKING PIECES FOR THE FRONT AND INSIDE.  If you do this with two pieces of Designer Series Paper, you can mix and match the pieces for the inside and the outside.

Step 1:  Start with a 5-1/4" x 4" piece of cardstock or Designer Series Paper.

Step 2:  Measure up from the lower left corner 2-1/8".  Make a small pencil mark or crease in the cardstock.  Measure over from the upper right corner 4-1/2"  Make another small pencil mark or crease in the paper.  I drew lines to show where you will cut.

Step 3:  Cut from the 2-1/8" mark to the lower right corner.  Then cut from the 4-1/2" mark to the corner where the 2-1/8" mark was.  You will discard the corner with the slash marks.

If you have any questions, please post in the comment section.  I will do my best to answer them.


Tuesday, October 30, 2012

Baby Wipe Leaves

Here is the final project we made at this month's stamp club.  We used a variety of techniques for the leaves.


  • The Tangerine Tango leaf was run through the big shot with the Perfect Polka Dots Embossing Folder.  
  • The Early Espresso Leaf was made with the new Core'dinations Cardstock in the Holiday Mini Catalog.  You emboss the cardstock and then use the sanding block to rub away the raised area exposing the inner core.  Unlike the rest of Stampin' Up! cardstock the core is not the same color as the outer layer.
  • The little leaf was made using the baby wipe technique.  See Tutorial Below.

The window was first made using the Labels Collection Framelit and then run through the Fancy Fan Embossing Folder.  There is a piece of Very Vanilla cardstock behind the window.  The sentiment is stamped in Early Espresso Ink.  The Naturals Designer Buttons new to the Annual Catalog on page 176.  It is held on by a dimensional.  The entire front mat is put on the Crumb Cake card base with dimensionals.  Instead of stamping the envelope, we embossed it with the woodgrain folder available in the Holiday Mini on page 33.

PRODUCTS USED:
Stamps:  Wonderfall (wm#128084, cm#128087), Curly Cute (wm#117014, cm#120510)
Colors: Crumb Cake, Very Vanilla, Early Espresso, Core'dinations Cardstock Early Espresso (#127848), Tangerine Tango, Cajun Craze, More Mustard
Accessories:  Big Shot (#113439), Naturals Designer Buttons (#127554), Dimensionals (#104430), Autumn Accents Die (#127812), Woodgrain Embossing Folder (#127821), Fancy Fan Embossing Folder (#127751), Perfect Polka Dots Embossing Folder (#117335), Labels Collection Framelits (#125598), Linen Thread (#104199)

BABY WIPE TECHNIQUE:  Make your own custom multi-color ink pad.

1.)  Gather your materials.  You will need a disposable plate to protect your work area.  I used paper, plastic works nicely too.  Do NOT use your good dishes.  1-2 baby wipes.  You will also need 2-3 reinker colors.  If the stamp is large you might be able to use more than 3 colors, but it starts to look muddy.  I used Cajun Craze, Tangerine Tango and More Mustard here.
2.)  Fold the baby wipe so it is about 4 layers thick.  Put it on the plate.

3.)  From a height of about 1 inch, put 1 drop of your darkest reinker onto your baby wipe in 2-3 places.  The reinker will spread out some on the baby wipe.  
4.)  Do the same with the second color.

5.)  Fill in any blank areas with your lightest reinker color.  You want the colored area to be as big as the stamp you plan to use.

6.)  Stamp as you normally would.  CLEAN OFF YOUR STAMP BETWEEN EACH USE.  The colors will become muddy if you don't clean your stamp off. 

Saturday, October 27, 2012

Triple Time Stamping--Gently Falling

Triple Time Stamping has been a new technique craze.  It made the perfect technique for our stamp club card this month.


The technique is fairly easy to do.  You start with three layers of neutral cardstock.  I used Very Vanilla for mine.  The size of my layers can be found below.  Hold each layer in place with a little bit of TEMPORARY adhesive.  This way the layers do not slide around as you stamp.  
Stamp all over the area as you wish.  Don't forget to stamp the envelope or inside of the card.  You can leave a space for the sentiment or add that as an additional layer later.  Do not be concerned that there are gaps in the design where each new layer starts.  These will be covered up my the mats you add next.


Once you are done stamping, put each layer onto a mat.  Adhere the layers to your project lining up the design as best as possible.  You may have to fuss with them a little this way or that to get them to line up, but I promise they do.  

Mat Layers-  Card Base 8-1/2 x 5-1/2 folded in half, 4-1/2 x 3-1/4, 3-1/2 x 2-1/4
Stamping Layers--4 x 5-1/4, 3 x 4-1/4, 2 x 3-1/4
*TIP* All layers are 1" smaller than the next layer or the same cardstock.  Mats are 1/4" larger than the stamped layer.

I also made one with crooked layers.  Simply put your layers in the design you wish to have before stamping.

PRODUCTS USED:
Stamps: Gently Falling (wm#123802, cm#123804), Day of Gratitude (wm#120835, cm#121148)
Colors: Very Vanilla, Early Espresso, Cajun Craze, More Mustard, Bravo Burgundy
Accessories: Early Espresso 1/8" Taffeta Ribbon (#119959)


Friday, October 26, 2012

Custom Sized Treat Sleeve

Have you checked out the Diagonal Score Plate for the Simply Scored Tool?  It gives the Simply Scored Tool even more possibilities.  At my monthly stamp club a couple weeks back, we made custom sized treat sleeves for a pack of flower seeds.


These little pouches are approximately 6" tall and 4" wide.  They are made with a simple 6x6 square of Designer Series Paper.  We used Comfort Cafe for our projects.  The steps are simple enough to follow.

Step 1:  Score the 6x6 piece of DSP diagonally on all four sides at 2-3/4".  I used a white piece with dark lines for the photo.  

Step 2:  Cut off the little triangles on each side.  Put small bits of adhesive where the red markings are.  We used snail adhesive for our project.  If you plan to put a bulkier item in your sleeve, you may wish to use sticky strip.

Here are a few of the other projects made by the group.  All but the Chocolate Chip sleeve came from Comfort Cafe DSP.  The small tag was made with the Perfectly Preserved Stamp Set and Coordinating Framelits.  

PRODUCTS USED:
Stamps: Perfectly Preserved (wm#126690, cm#126692)
Colors: Comfort Cafe DSP (#126898), Midnight Muse, Cajun Craze, Summer Starfruit, Whisper White, Soft Suede, Basic Black Ink
Accessories: Simply Scored Tool (#122334), Diagonal Score Plate (#125586), Cannery Set Framelits (#127822), Big Shot (#113439), Crumb Cake Seam Binding (#122332), Linen Thread (#104199)


Thursday, March 4, 2010

Mounting Stamps

I have been asked a few times recently to help mount stamps. Here is the process I use to mount my stamps.

The stamps come with 3 parts. The rubber, the stickers and the wood blocks.
The rubber on all current Stampin' Up! stamps come die cut. You simply punch them out of the rubber sheet. I start by arranging them on the wood blocks to be sure they all fit. Sometimes there are similar size blocks and stamps. By arranging them onto the wood first, you can be sure they will all fit before taking the protective backing off.
Then I attach all the stickers. Be sure the stickers go in the direction that the image fits best.Next I hold the block in my left hand (image side up) and the rubber in my right hand (image side up). Turn the rubber so it is a mirror image of the sticker. Sometimes you have to rotate the rubber so it mirrors the sticker image.Next I turn the block over (keeping the top the top and the bottom the bottom--I twist so the sides are now opposite) and place the rubber on the block.
When you are all done, there is a sticker label to put on the side of the clam shell box. I put mine on the left end so they stack neatly on my shelf. Some people put the label sticker on the spine so they can stand them up like books. It depends on your storage space.
OOPS! What do I do if I put my stamp on the wrong way? Do not panic. You can place the stamp in your microwave for 5-10 seconds to loosen the glue. Do this one at a time. Heat the stamp, peal and restick the rubber. This gives you the best chance of the glue sticking. If the glue becomes worn and won't restick you can use a little bit of Crystal Effects (found in the accessory section of the catalog) to glue the rubber back to the block.